
30 Jaw-Dropping Honey Oak Kitchen Cabinet Makeover Ideas You Need to See in 2026
That moment when you pin another gorgeous honey oak kitchen, but a voice in your head whispers, “Could I really pull this off?” If you’ve been stuck admiring from afar, wondering how to make this classic wood feel fresh and modern for 2026, you’re in the right place. We’ve done the deep dive for you, filtering through countless designs to find what truly works. In this guide, we’re sharing 30 distinct, editor-approved ways to style honey oak cabinets. And stay until the end — we break down the most common mistakes that can ruin these looks. 📌 Save this to Pinterest for later — you’ll want to revisit these ideas.
1. Honey Oak Cabinets with Black Granite and a Grey Island Bar
What makes this kitchen feel so balanced is the savvy color-blocking. The warm honey oak provides a traditional, inviting base, but the decision to use black granite countertops is key. It adds a strong, modern line that grounds the entire space and keeps the wood from feeling overwhelming. Introducing a cool-toned light grey on the island is a designer-level move; it speaks to contemporary trends and breaks up the wood, preventing a “sea of oak” effect. This is a perfect triangle of color — warm, dark, and cool — that creates visual interest without feeling chaotic.

⭐ The One Thing
Getting this exact look is a mid-range investment, but it’s built to last. Here’s a general breakdown:
- Main Furniture (Cabinets & Island): $7,000 – $15,000
- Countertops (Black Granite): $4,000 – $8,000
- Textiles (Bar Stools): $400 – $1,000
- Decor/Accessories (Backsplash Tile): $1,000 – $2,500
- Paint (for island): $100 – $300
- TOTAL: $12,500 – $26,800
- Budget alternative: Use a high-quality black laminate countertop and paint your existing island. Cost: $3,000 – $7,000.
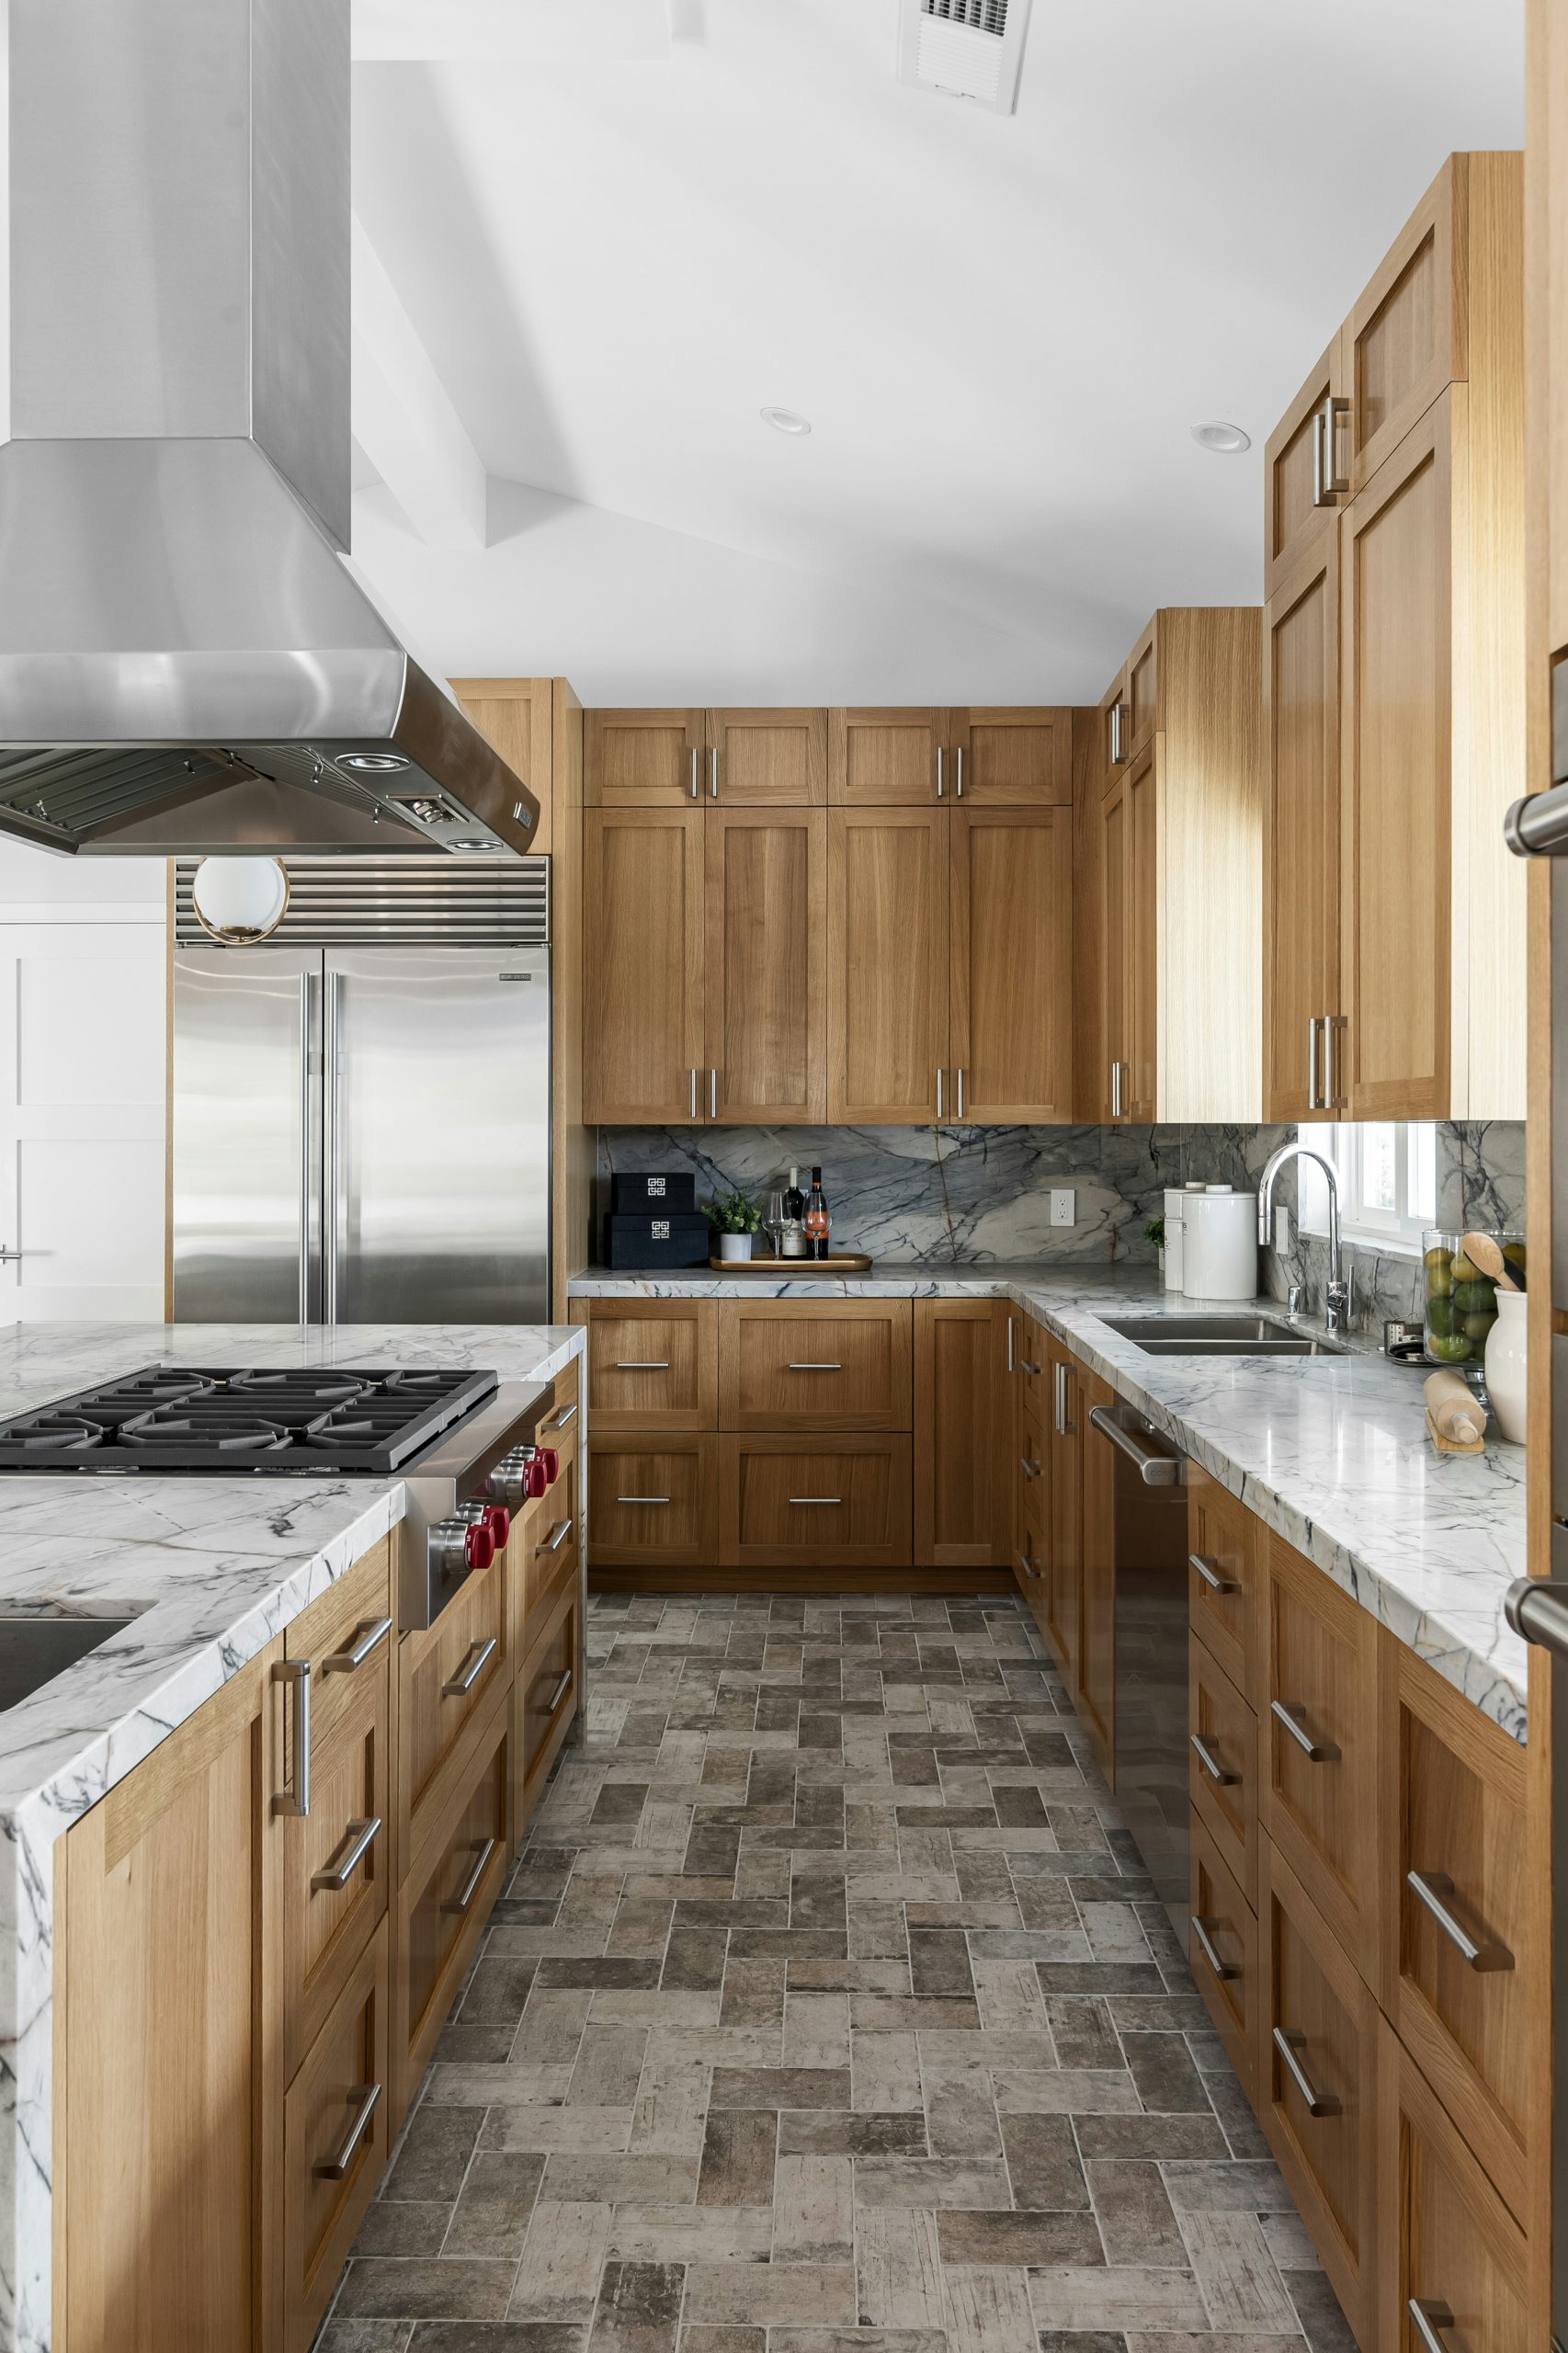
2. Modern Honey Oak with Marble and Herringbone Floors
The formula here is all about balancing pattern and simplicity. Think of it as 50% clean lines + 30% bold pattern + 20% luxe material. The honey oak cabinets are flat-panel, which offers a simple, unadorned surface. This visual quietness is the perfect counterpart to the energetic herringbone floor tiles. The remaining 20% is the white marble, which elevates the entire look from just “wood and tile” to something sophisticated. You could swap the herringbone for another bold pattern, like a geometric cement tile, and the formula would still hold perfectly.
💰 Budget Breakdown
When you have a floor with this much personality, the grout color makes all the difference. For a high-contrast, graphic look that highlights the herringbone pattern itself, choose a grout that is significantly lighter or darker than the tiles. If you want a more subtle, textural effect where the pattern blends together, select a grout color that closely matches the main color of the tile. In this case, a medium grey grout was used to create a gentle definition without overwhelming the space. Test your grout choice on a few spare tiles before committing to the whole floor!
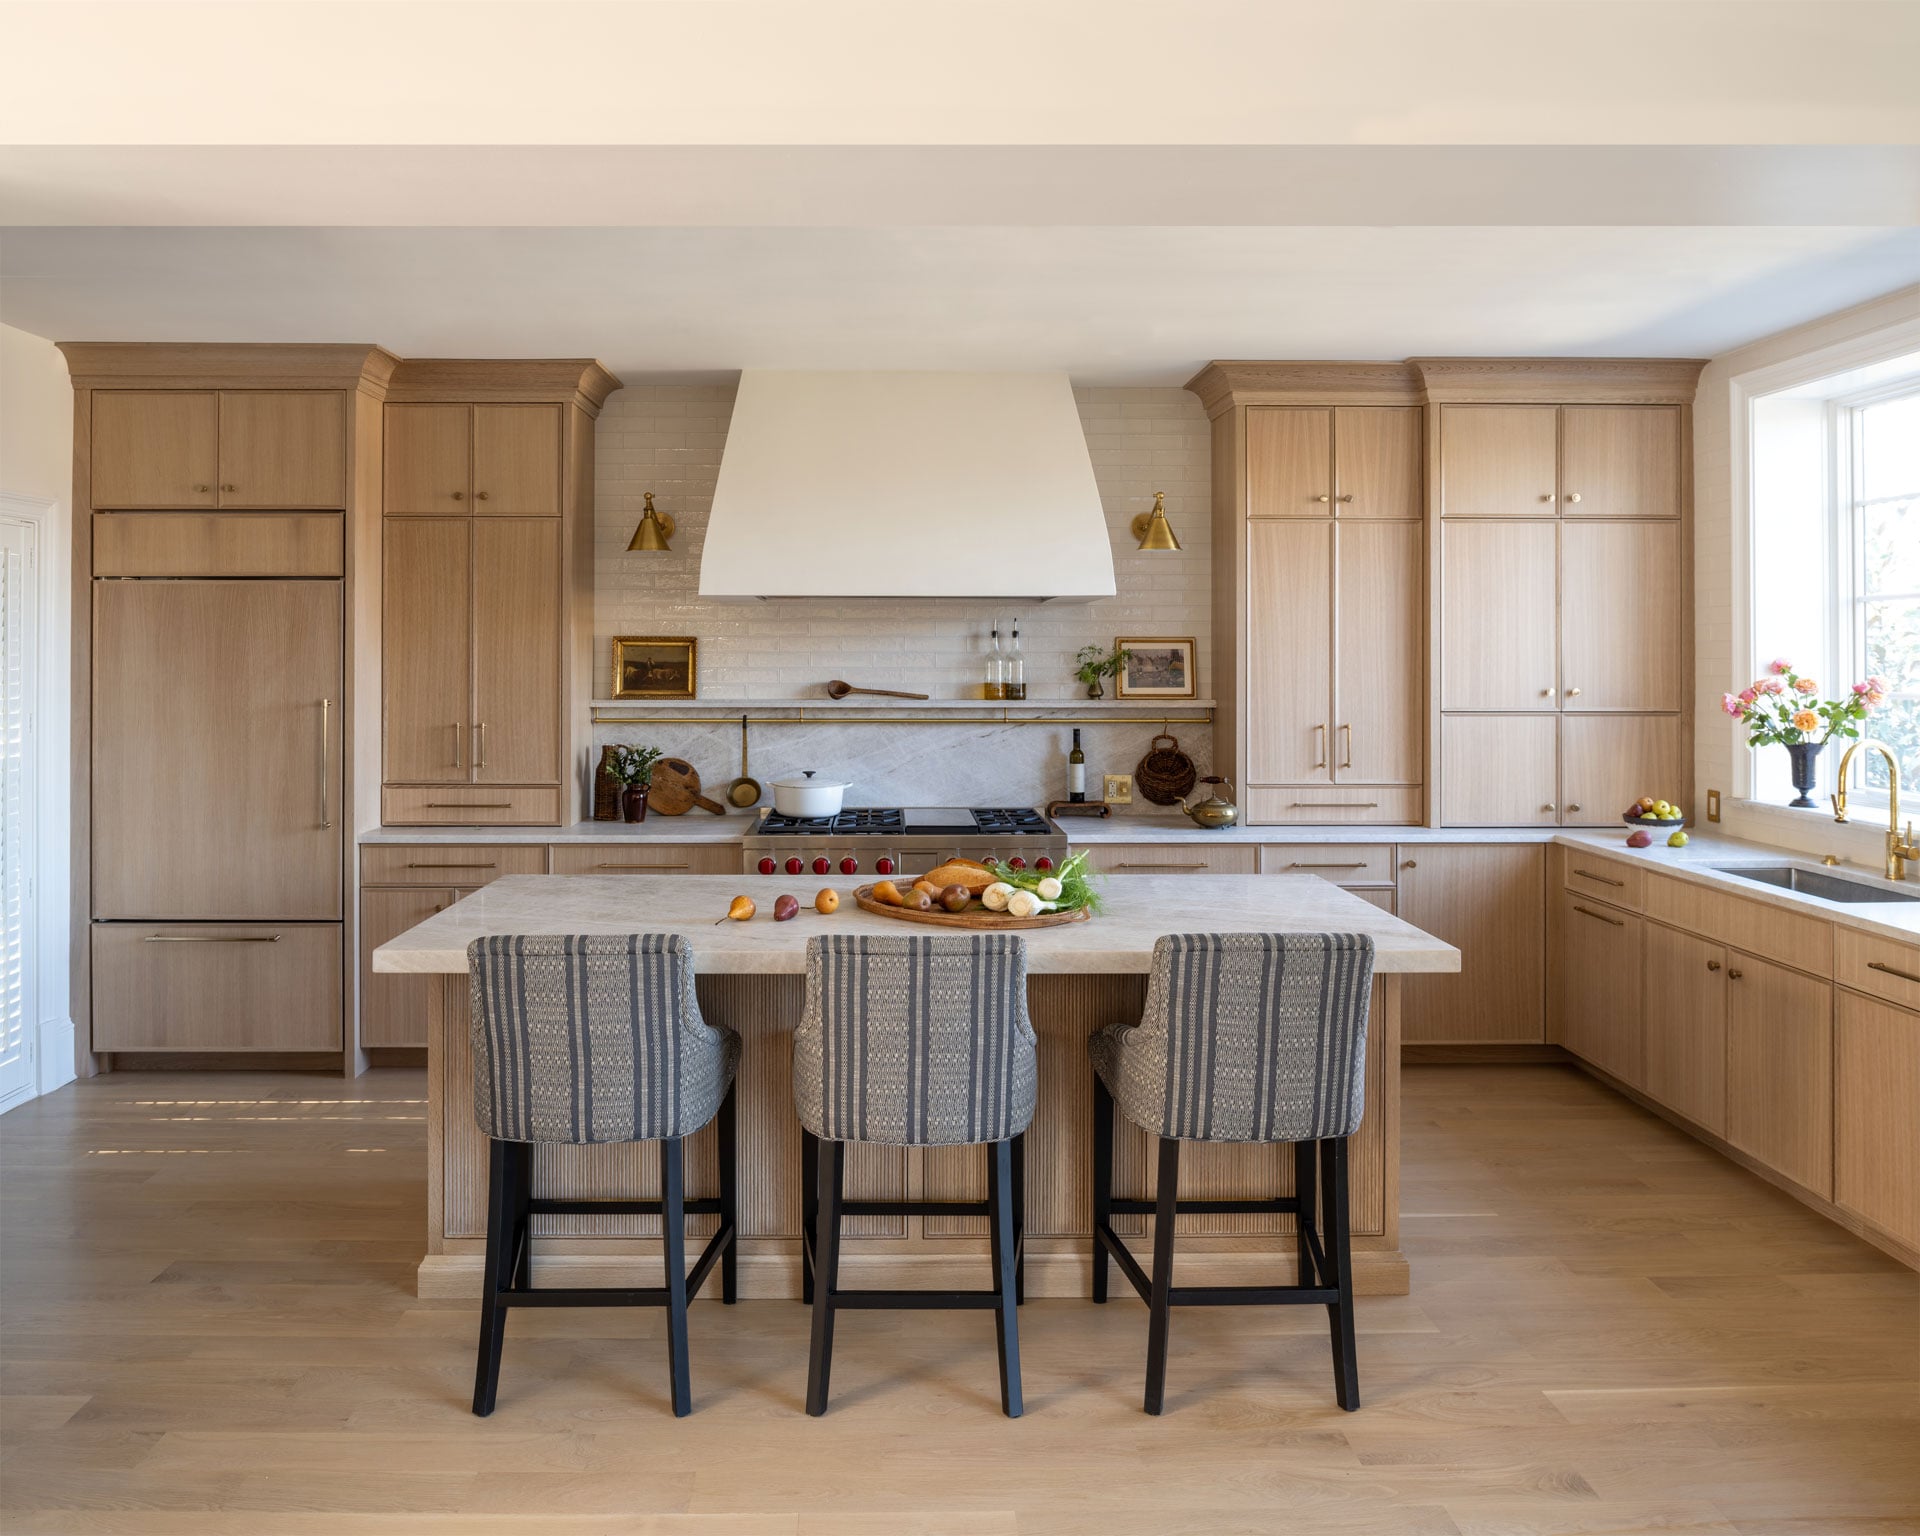
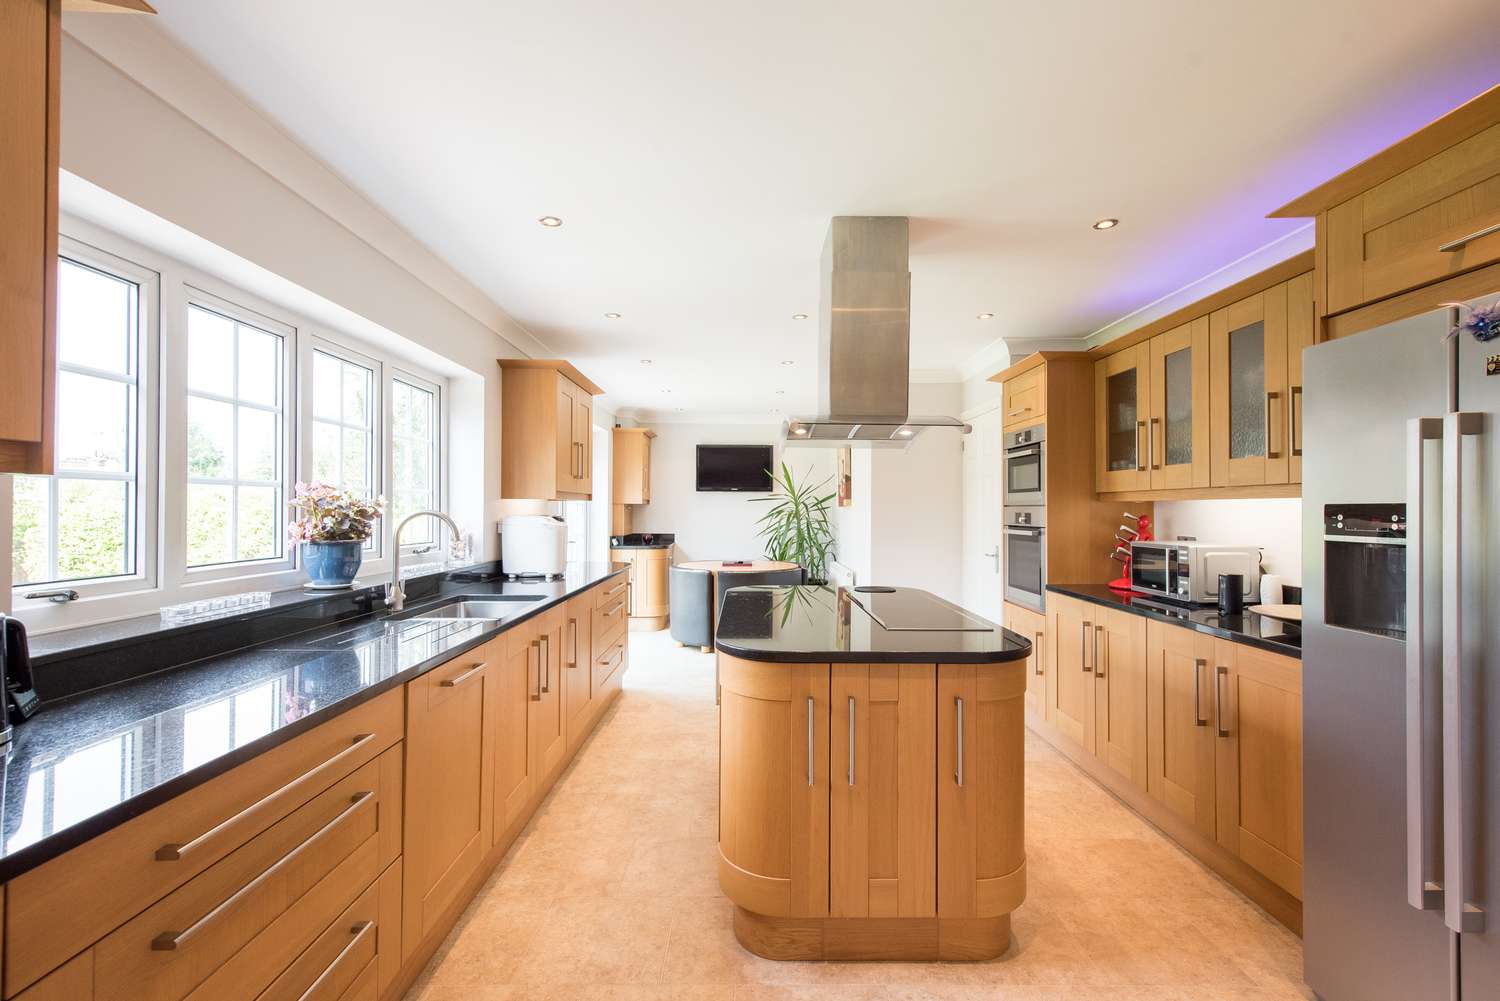
3. Light Natural Wood with an Integrated, Fluted Island
The fluted wood base on the kitchen island is, without a doubt, the element that makes this kitchen sing. Take it away, and you have a lovely, but standard, modern wood kitchen. With it, you have texture, rhythm, and a major design statement. Fluting adds a layer of refinement and detail that feels custom and high-end. It catches the light beautifully and turns a simple block-like island into a piece of functional sculpture. It’s the perfect way to add character while maintaining a clean, minimalist palette. Notice how it’s the only highly textured element, which gives it even more power.
✅ Before You Start
A kitchen this seamless and beautiful requires a specific care routine. Light natural wood, especially near sinks and stoves, is susceptible to water spots and grease stains. Use cutting boards religiously and wipe up spills immediately. For the fluted island, dusting is key; a soft-bristled brush or the brush attachment on your vacuum is your best friend for getting into those grooves. Integrated appliances offer a sleek look, but be prepared for more frequent wipe-downs of the cabinet fronts, as they’ll be handled constantly. Think of it as the trade-off for a perfectly cohesive aesthetic.
4. Traditional Oak Cabinets with a Geometric Backsplash
Let’s have some real talk about patterned backsplashes. While they can add a ton of personality, a highly specific or trendy pattern can be the first thing to date your kitchen. Before you commit to a bold geometric tile like this, be absolutely certain you love it for the long haul. Tiling is a semi-permanent choice that is more difficult and costly to change than paint or hardware. If you’re unsure, consider a peel-and-stick tile version to test drive the look for a few months. It might save you from a costly design regret down the line.
🔧 How-To Brief
This design works because it follows the principle of scale. The kitchen is quite large, with long runs of cabinetry. This generous space can handle the visual energy of a busy backsplash without feeling cramped or chaotic. The tile pattern is medium-scale, which complements the size of the cabinet doors. Furthermore, the colors within the tile—beiges and browns—are pulled directly from the honey oak wood tone, creating a harmonious, monochromatic look. It’s a lot of pattern, but it’s a cohesive pattern. For a simpler approach, see the subway tile in Idea #8.
5. Honey Oak with Dark Counters and a Chevron Floor
A bold, high-contrast floor pattern like this chevron design needs room to breathe. This look is most successful in a medium to large kitchen, ideally 150 square feet or more. In a smaller space, the sharp zig-zag lines can feel jarring and actually make the room appear more cramped and busy. This is especially true in a galley kitchen. For this idea to work its magic, you need enough visual distance to appreciate the pattern. If your kitchen is on the smaller side, consider using the pattern in a less dominant way, like a floor runner or a backsplash.
💡 Designer Tip
You don’t need to install pricey tile to make a statement with your floor. The chevron pattern can be achieved for a fraction of the cost with high-quality luxury vinyl plank (LVP) flooring, which often comes in realistic wood or stone looks. For a super budget-friendly option, consider paint and a stencil. You can paint your existing tile or vinyl floor with a durable floor paint and then use a chevron stencil to create the pattern. It’s a weekend project that can completely transform the space for under $200.
6. Honey Oak with Red Valances Over the Sink
In this warm, traditional kitchen, the bold red window valances are unequivocally The One Thing. Everything else—the honey oak cabinets, the light countertops, the wood flooring—is classic and neutral. It’s a lovely but safe foundation. The valances are what give the room its personality and memorable character. They inject a dose of unexpected, vibrant color and a touch of formality with their tassels and tailored shape. Removing them would make the kitchen feel pleasant, but forgettable. They’re a lesson in how a single, confident accessory can define a space.
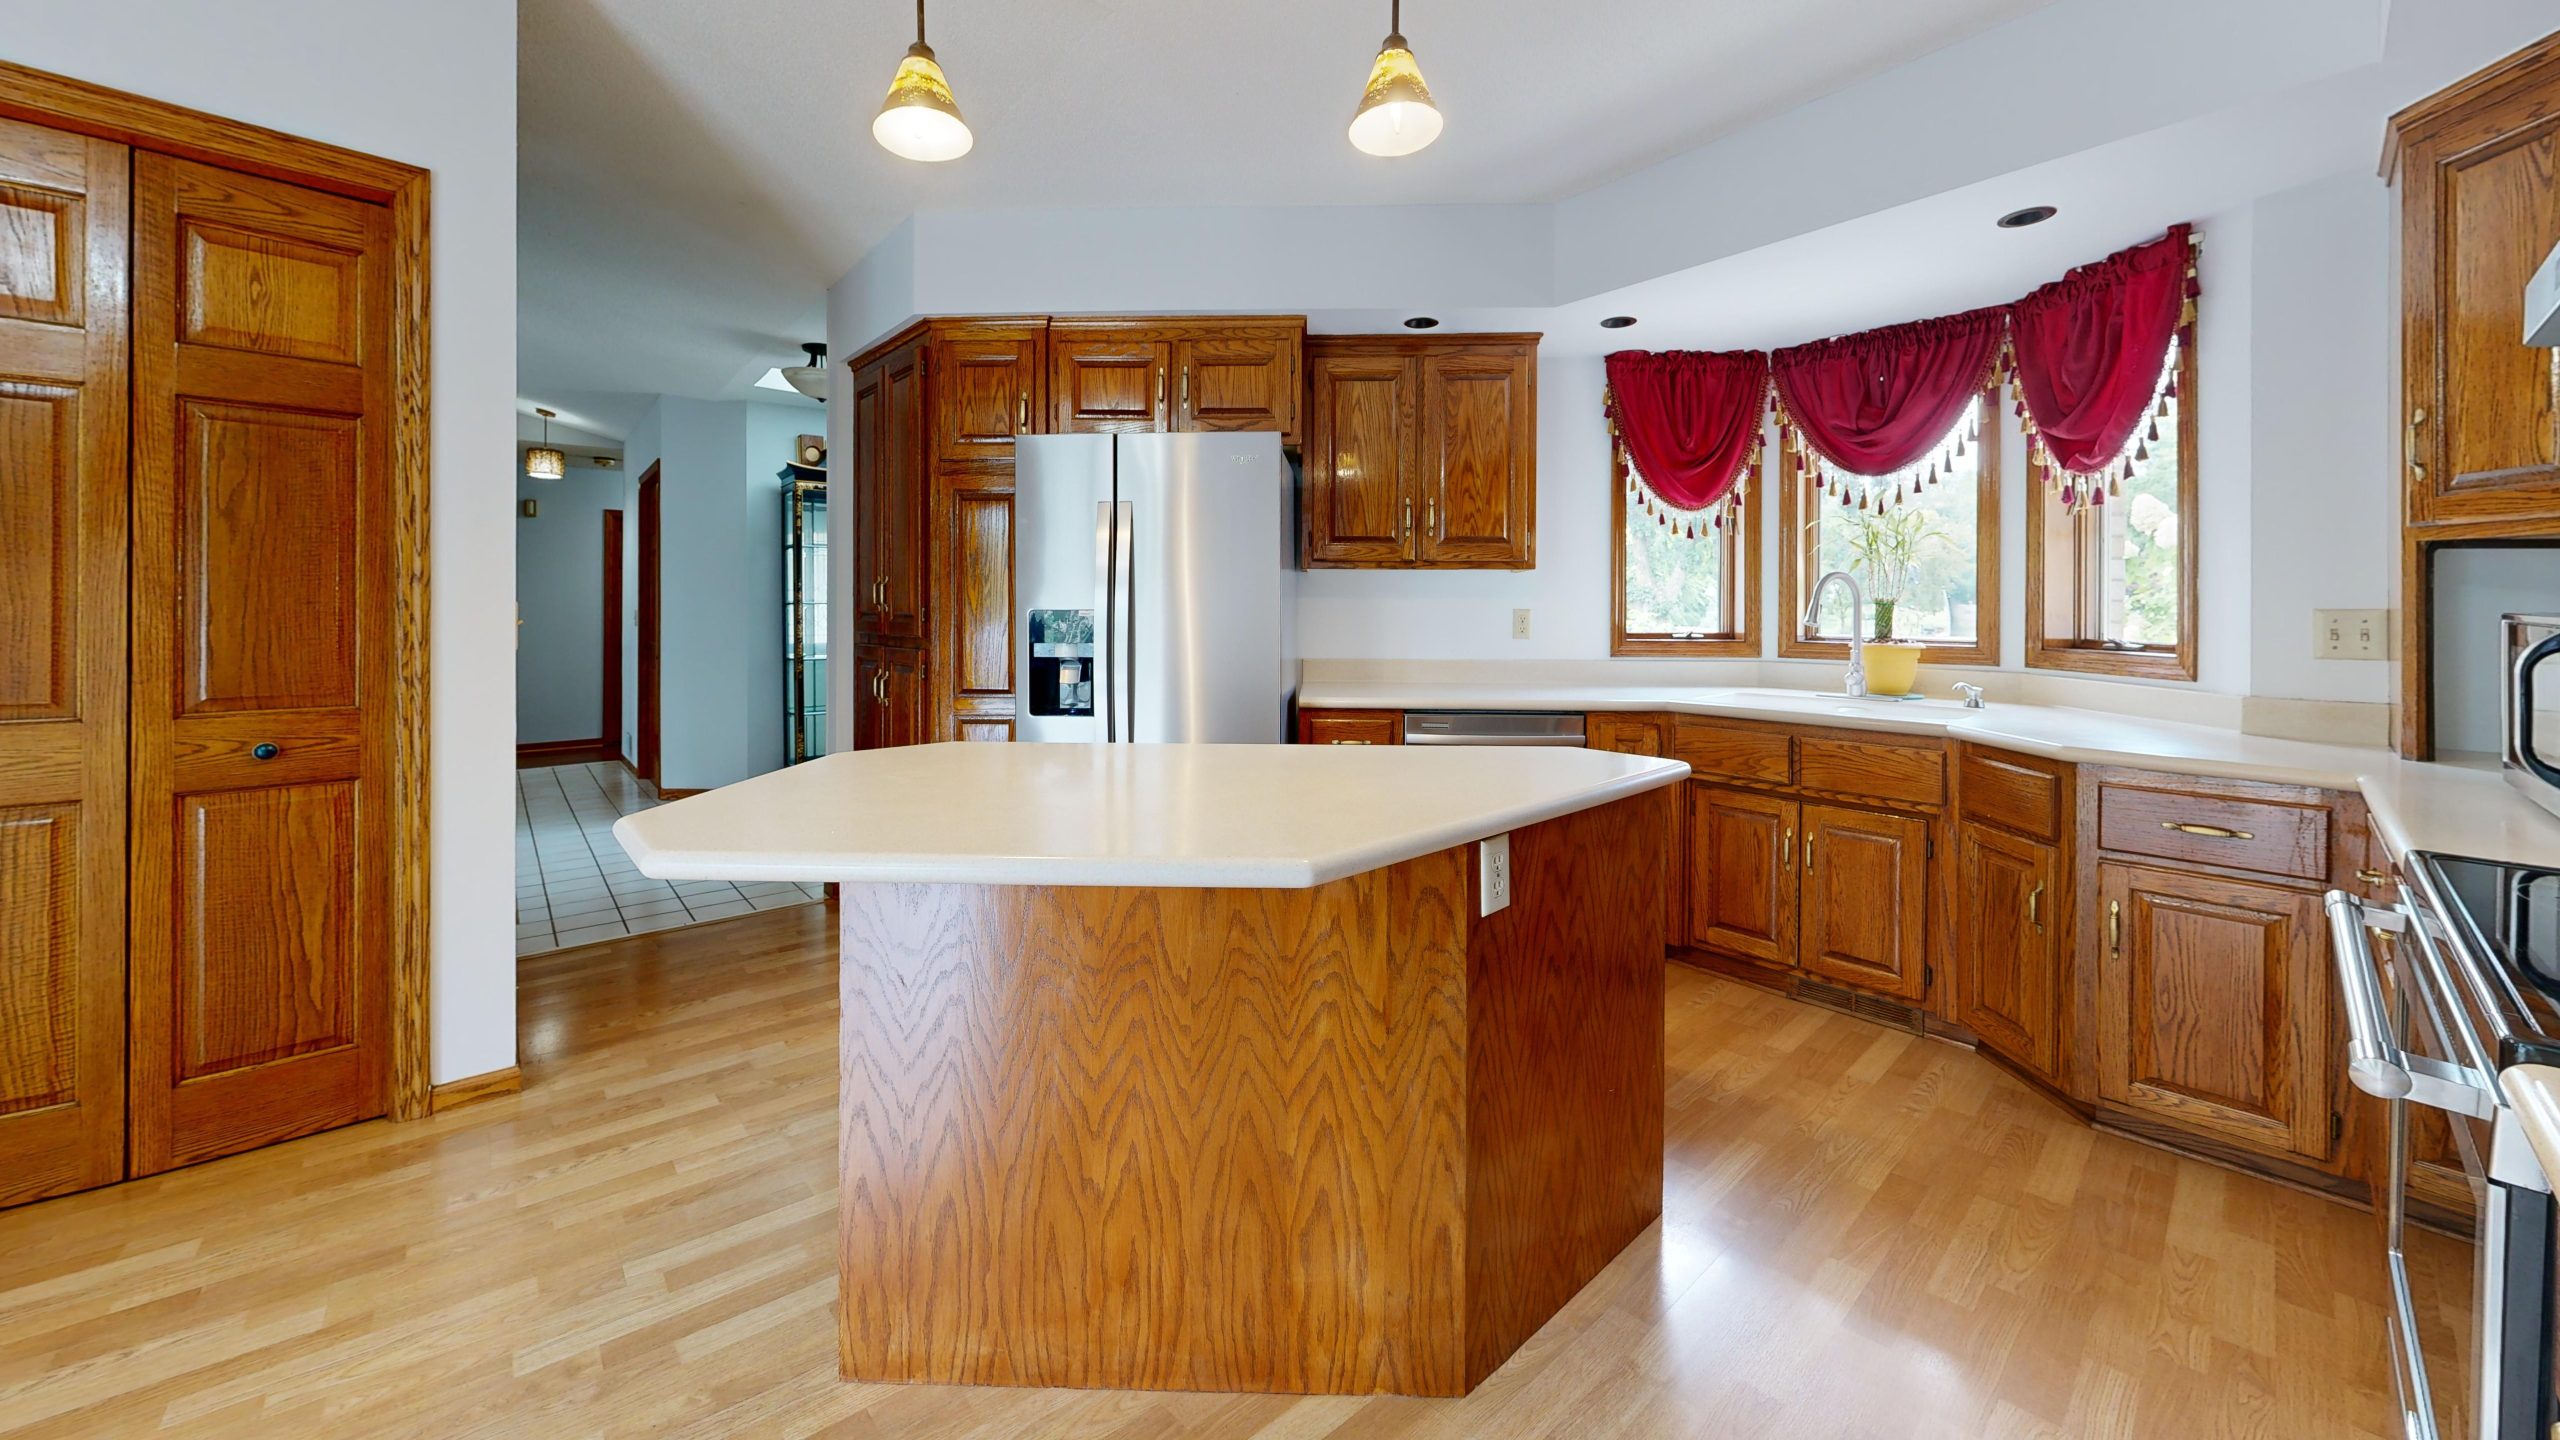
🧹 Maintenance Reality
When placing fabric window treatments in a kitchen, function must come before form. Position valances or curtains at least 24 inches away from any open flame, like a gas cooktop. For windows directly behind a sink, where splashing is inevitable, choose a high-performance, moisture-resistant fabric (like one rated for outdoor use) to prevent mildew. Also, consider how you’ll clean them. Treatments that can be easily unclipped and thrown in the wash are a much more practical choice for a working kitchen than “dry clean only” options that will inevitably absorb cooking odors and grease over time.
7. Light Oak Shaker Cabinets with a Diagonal Tile Backsplash
The success of this design lies in its understanding of balance. The Shaker-style cabinets are defined by their clean, simple lines—a hallmark of timeless design. This provides a calm, structured backdrop. Setting the square backsplash tiles on a diagonal (a harlequin pattern) introduces a dynamic energy that prevents the space from feeling too plain or utilitarian. The subtle accent tiles add just enough detail without becoming overwhelming. It’s a classic pairing: simple, straight-lined cabinetry that allows a more decorative element, like the tile, to shine without competing.

🔥 Trending Context
Adding a few decorative accent tiles is a fantastic way to customize a basic backsplash. Here’s a quick guide to do it yourself:
- Plan Placement: Lay out your tiles on the counter to decide on your pattern before mixing any adhesive. Use painter’s tape on the wall to mark where your accent tiles will go.
- Set the Field Tiles: Install the main (field) tiles as usual, leaving empty spots for your accents.
- Apply Adhesive: Apply a small amount of tile adhesive to the back of an accent tile (a technique called “back buttering”).
- Place and Press: Gently press the accent tile into its designated spot, making sure it’s level with the surrounding tiles.
- Grout Everything: Once all tiles are set and the adhesive is dry (usually 24 hours), grout the entire backsplash at once for a uniform finish.
8. Honey-Toned Cabinets Paired with a Cool Green Subway Tile
The magic here is a classic color theory formula: 70% warm tones + 30% cool tones. The honey oak cabinets and speckled granite countertops provide a dominant, warm, and inviting base. This makes up the majority of the visual real estate. The cool green subway tile is then introduced as a strong secondary element. Because green sits opposite red/orange on the color wheel, it creates a pleasing, complementary contrast. The green actively balances the warmth of the wood, making the cabinets look richer and the whole space feel more dynamic and intentional.
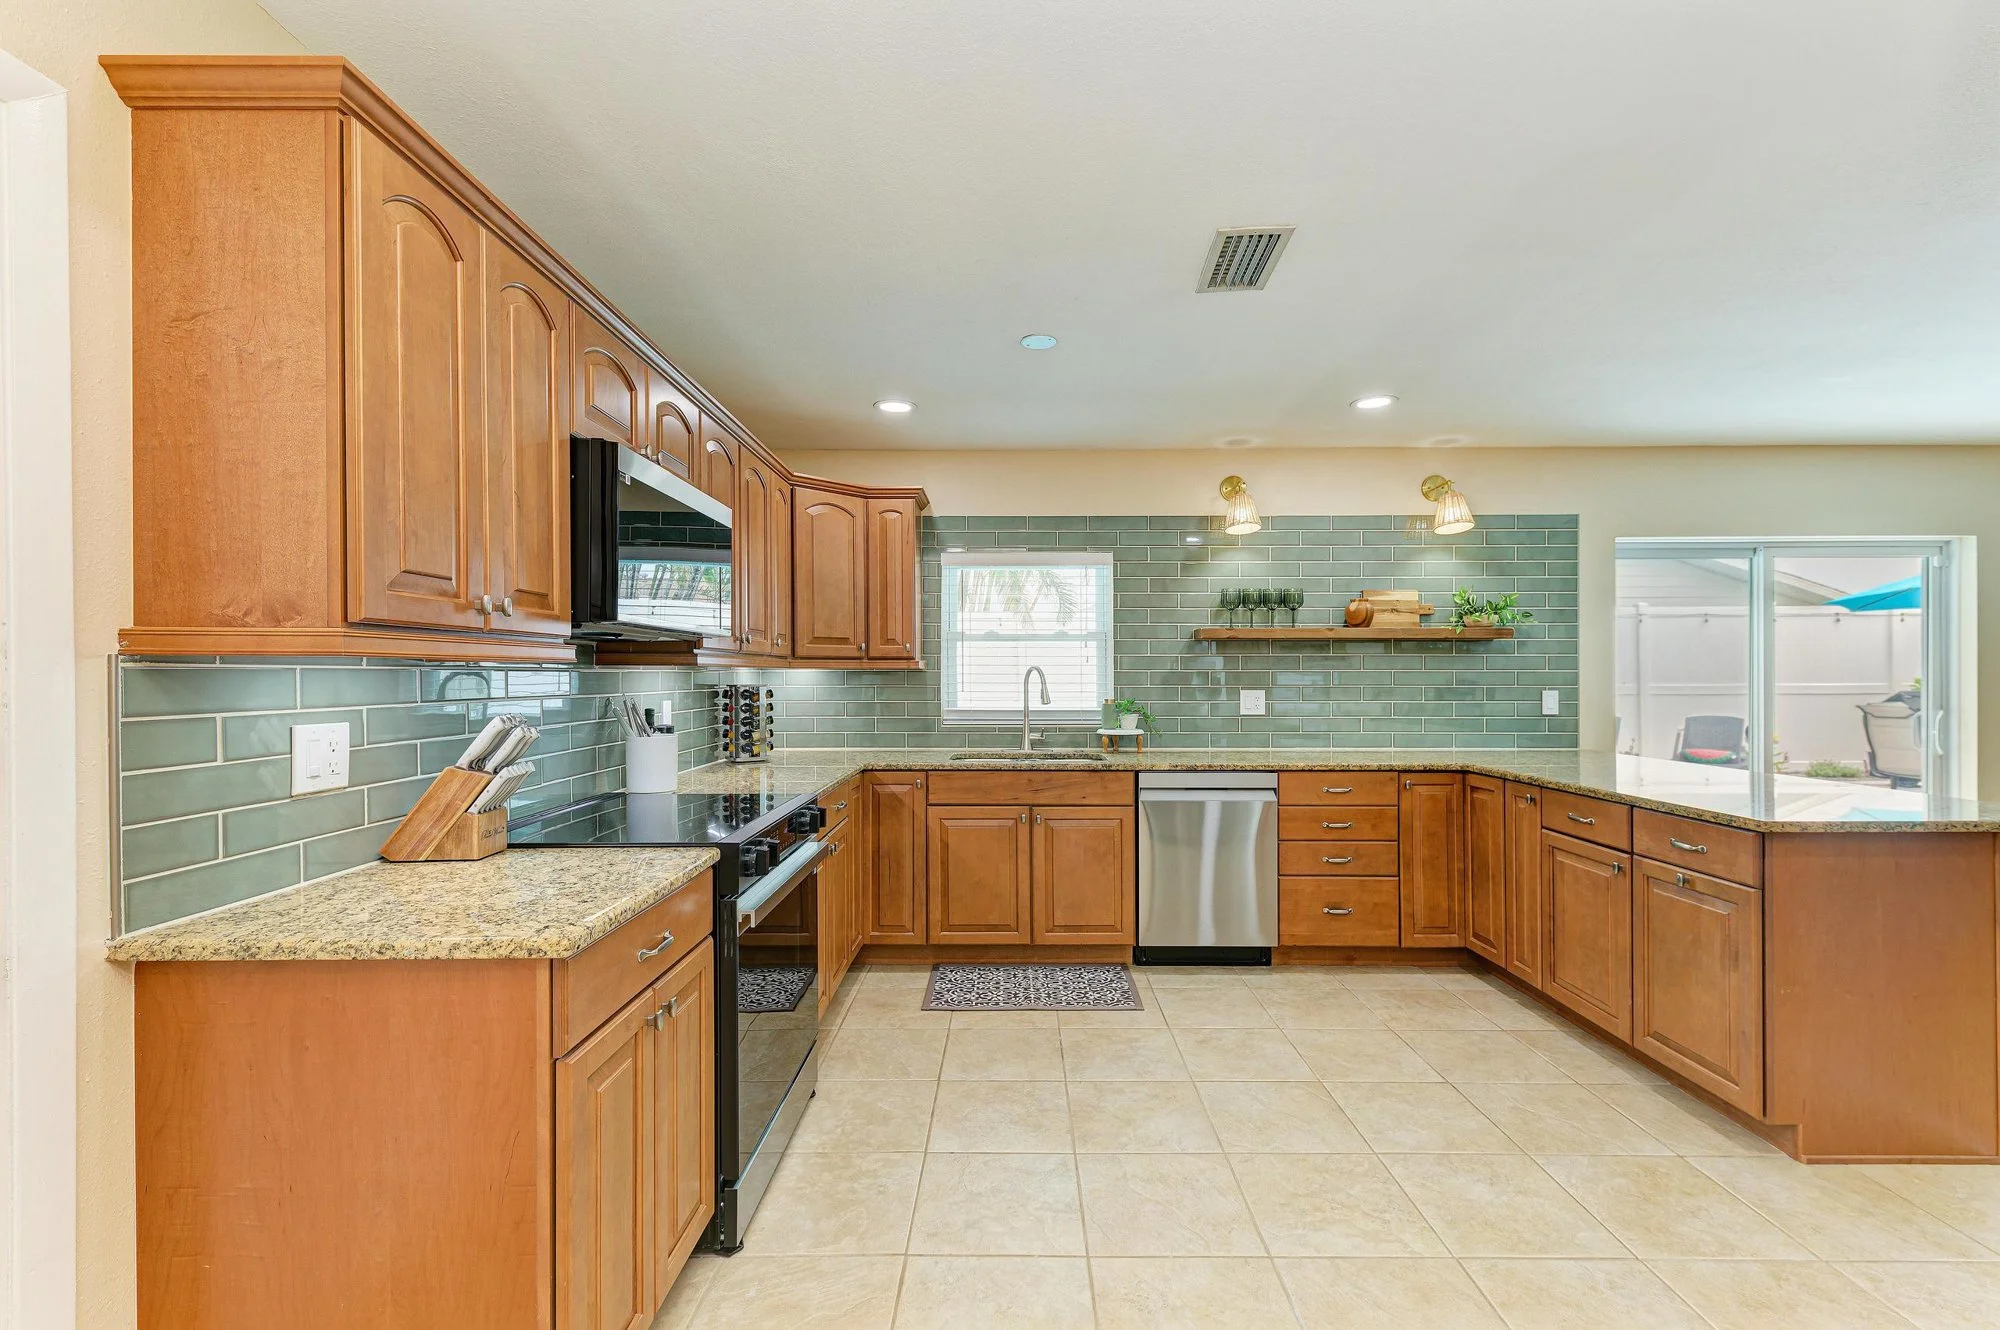
📐 Style Math
Green is having a major moment in kitchen design, and for good reason. After years of all-white and gray-on-gray kitchens, homeowners are craving color that feels both calming and connected to nature. Sage, olive, and eucalyptus greens, like the one seen here, act as a “new neutral.” They provide a beautiful splash of color but are muted enough to have real staying power. Unlike a more aggressive color, this shade of green is unlikely to feel dated in a few years, making it a smart choice for a semi-permanent feature like a backsplash.
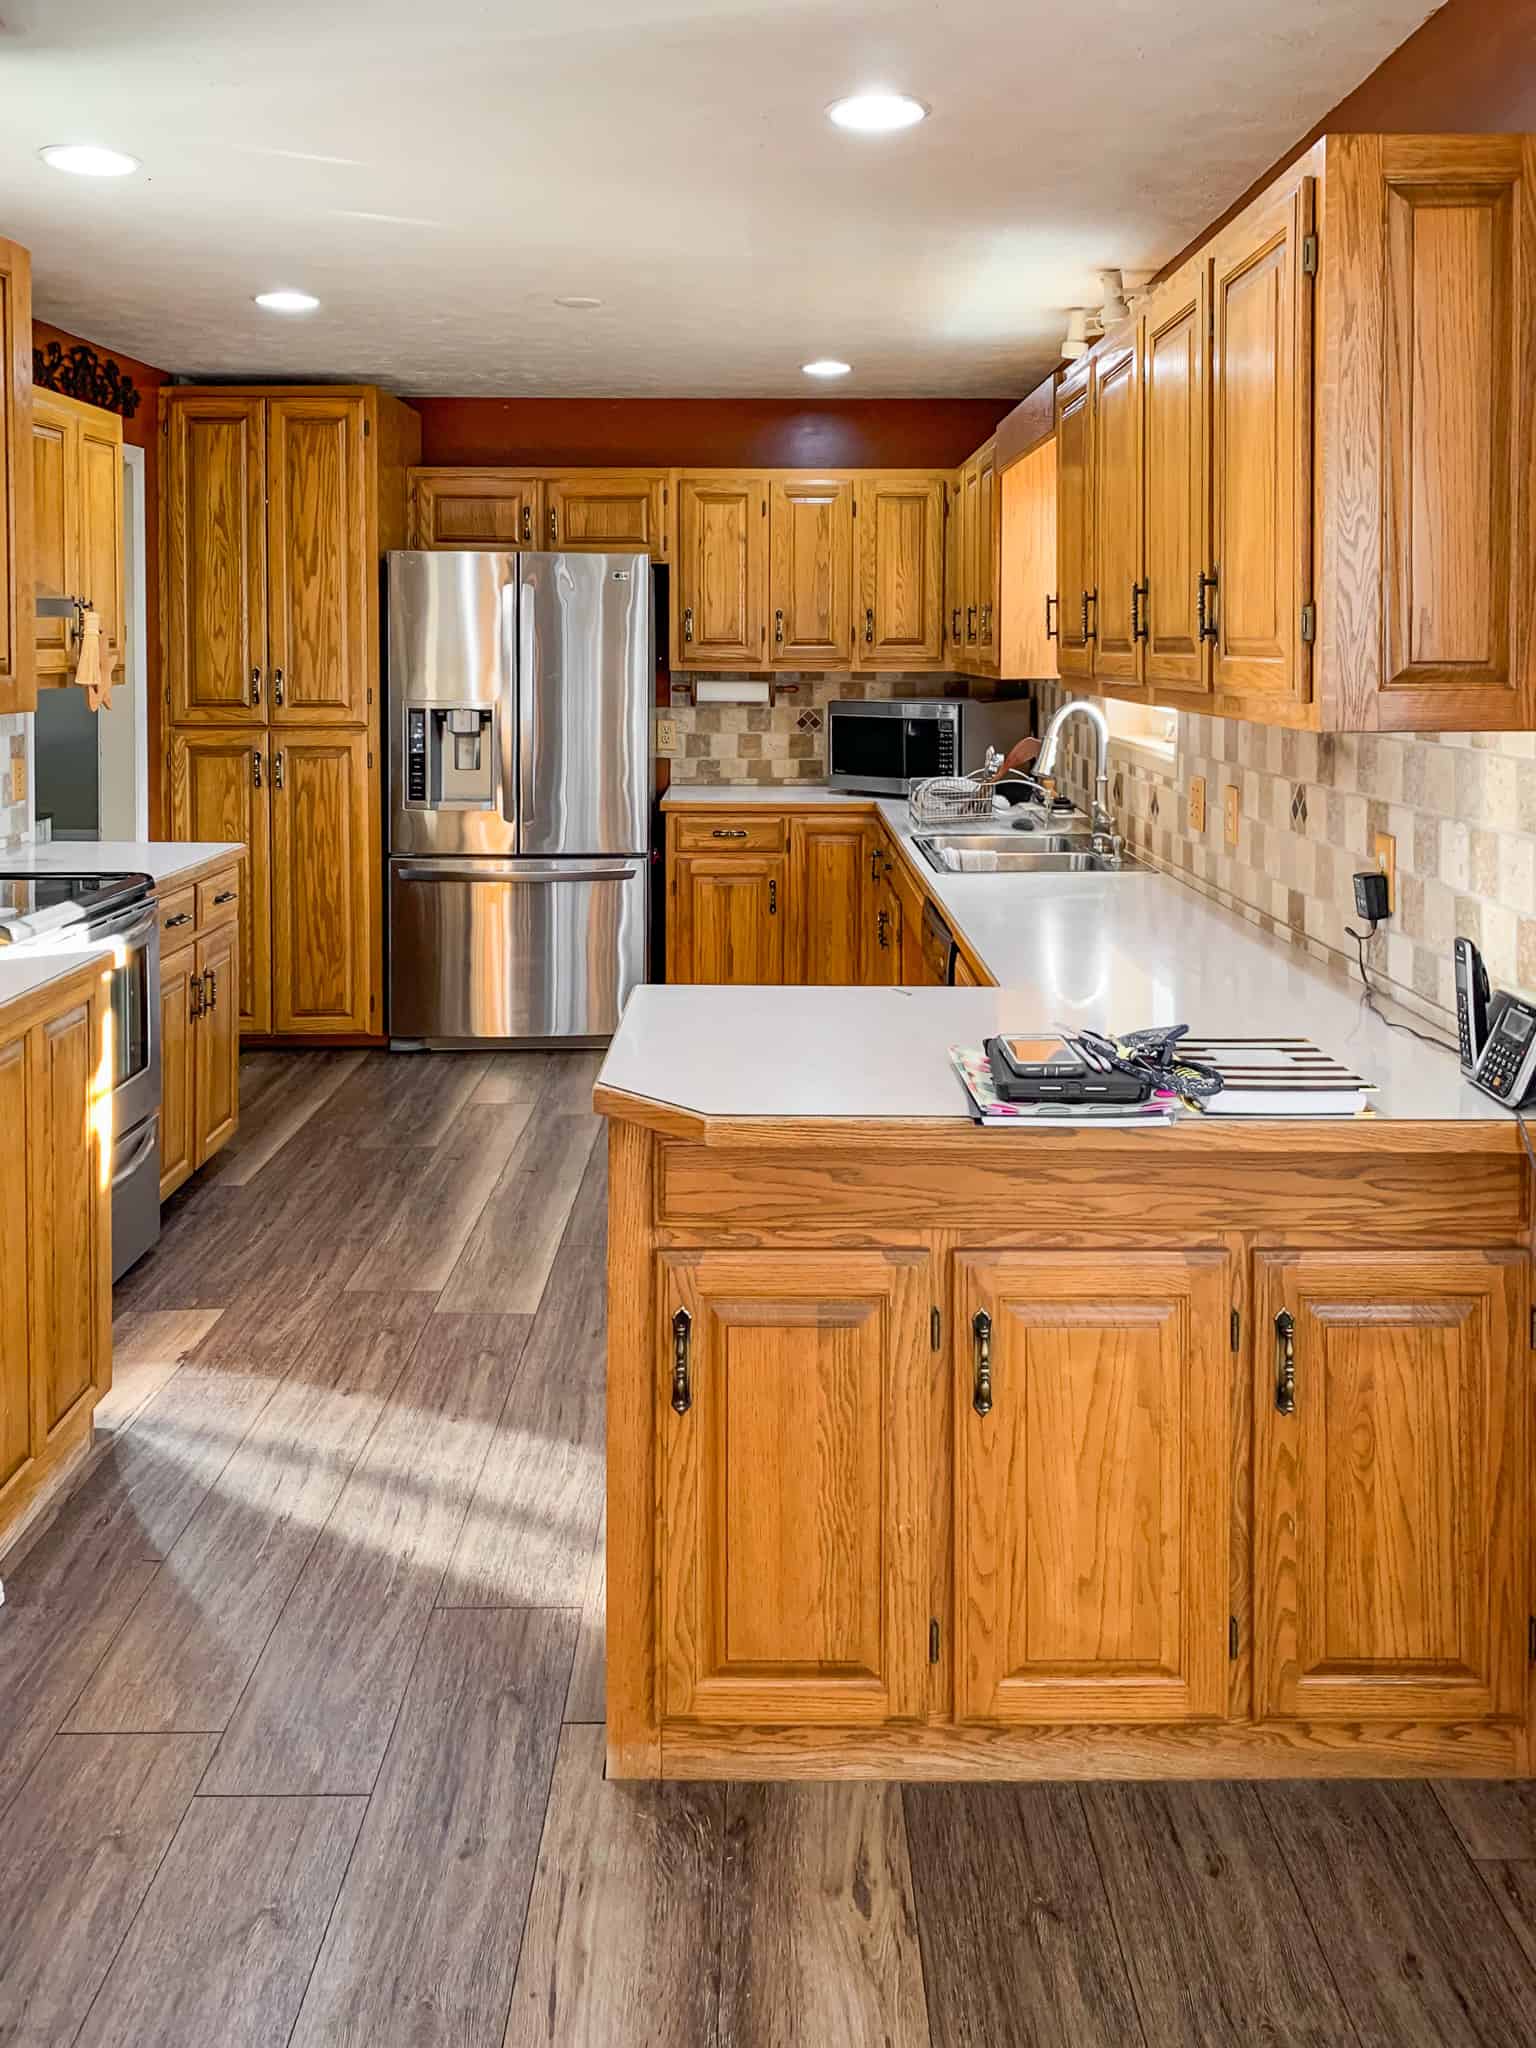
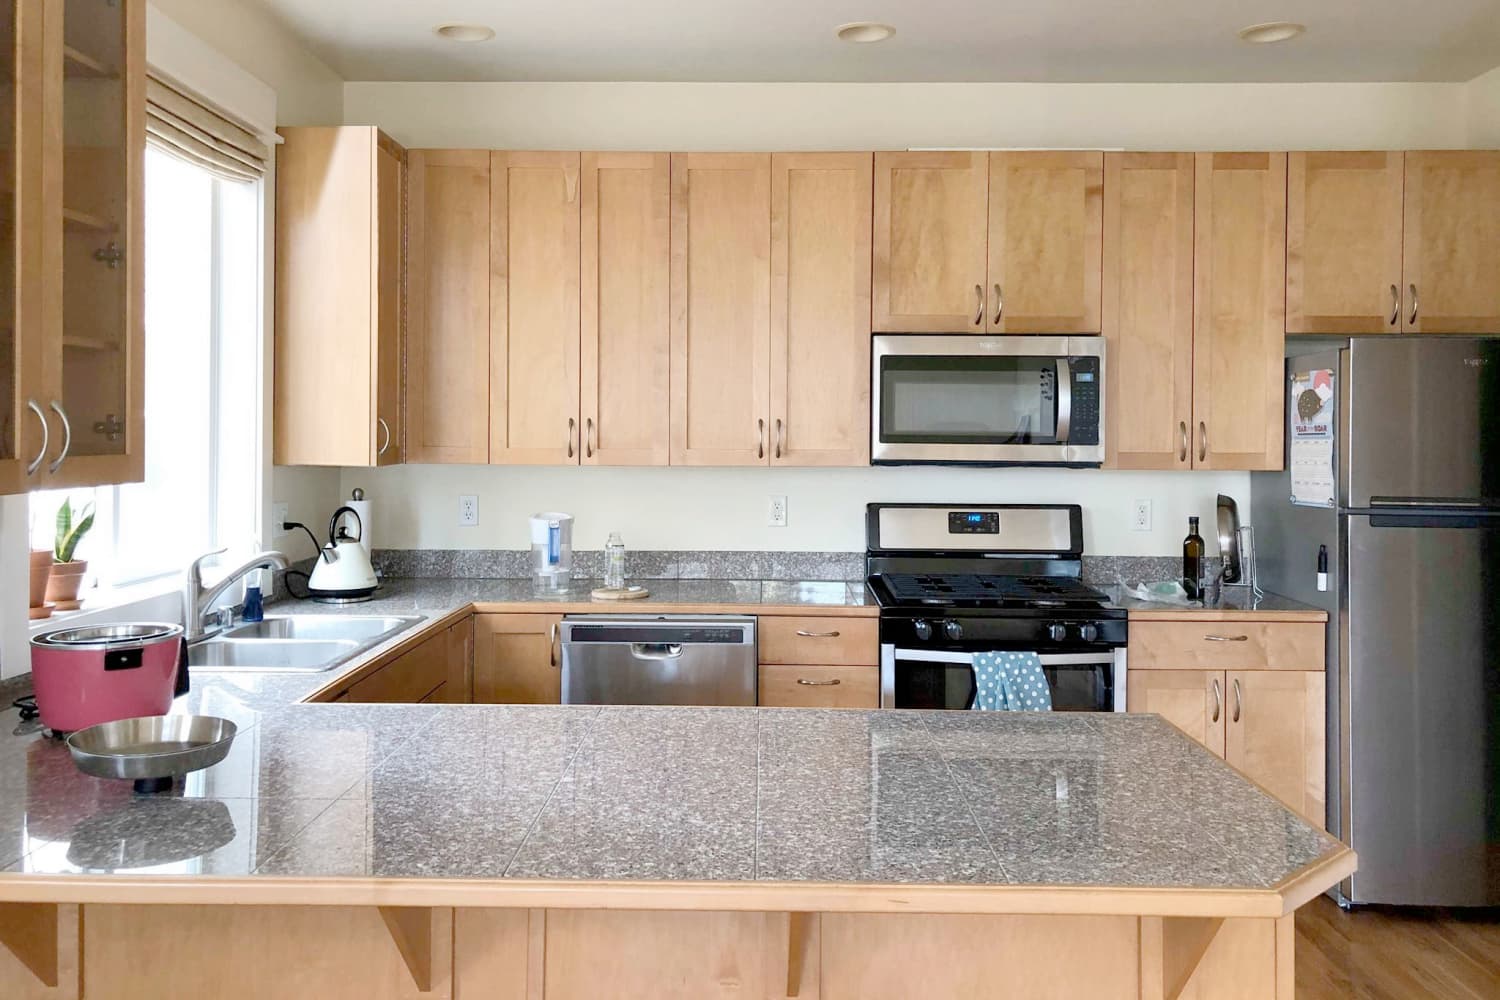
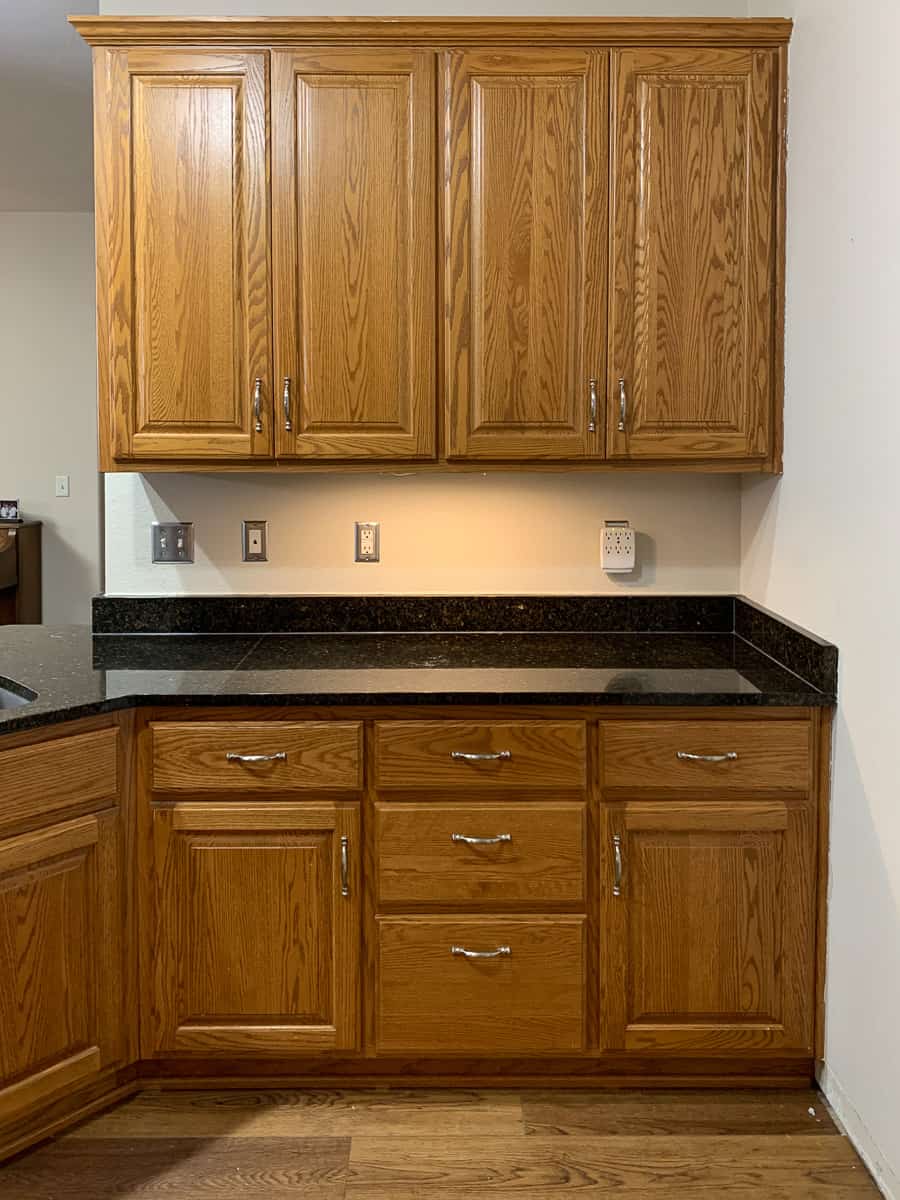
9. U-Shaped Honey Oak Kitchen with Black Countertops
A U-shaped layout is a workhorse, offering extensive counter space and storage in one continuous design. This configuration is ideal for kitchens that are at least 10 feet wide. This width allows for the standard 2-foot depth of cabinets on each side, plus a comfortable 6-foot clearance in the middle for multiple people to work without bumping into each other. If your space is narrower, a U-shape can feel very cramped. In that case, you might be better served by a galley kitchen or an L-shaped layout with an island, like the one seen in Idea #7, to keep the center of the room open.
🎯 What Makes It Work
The biggest challenge in almost every U-shaped kitchen? The two inside corners. These deep, awkward spaces often become “black holes” where small appliances and Tupperware go to be forgotten. If you’re designing from scratch, do not skimp on corner cabinet solutions. Invest in a high-quality Lazy Susan, a set of articulating pull-out shelves (sometimes called “magic corners”), or drawers specifically designed for corners. While these add to the budget, the increase in usable, accessible storage is a massive quality-of-life improvement you will appreciate every single day.
10. Classic Wood Cabinets with Speckled Granite and Beige Tile
If you have this classic 2000s kitchen and aren’t ready for a full-scale remodel, the fastest, most impactful update is changing the hardware. This kitchen has simple, matching wood knobs. Swapping them for a more contemporary option in a matte black or brushed nickel finish would instantly modernize the space. A 3- to 5-inch pull handle will feel much more current than a small knob. Expect to spend $5-$15 per handle. For about $300 and a Saturday afternoon, you can give your entire kitchen a facelift without touching a single cabinet or countertop. It’s the best bang for your buck.
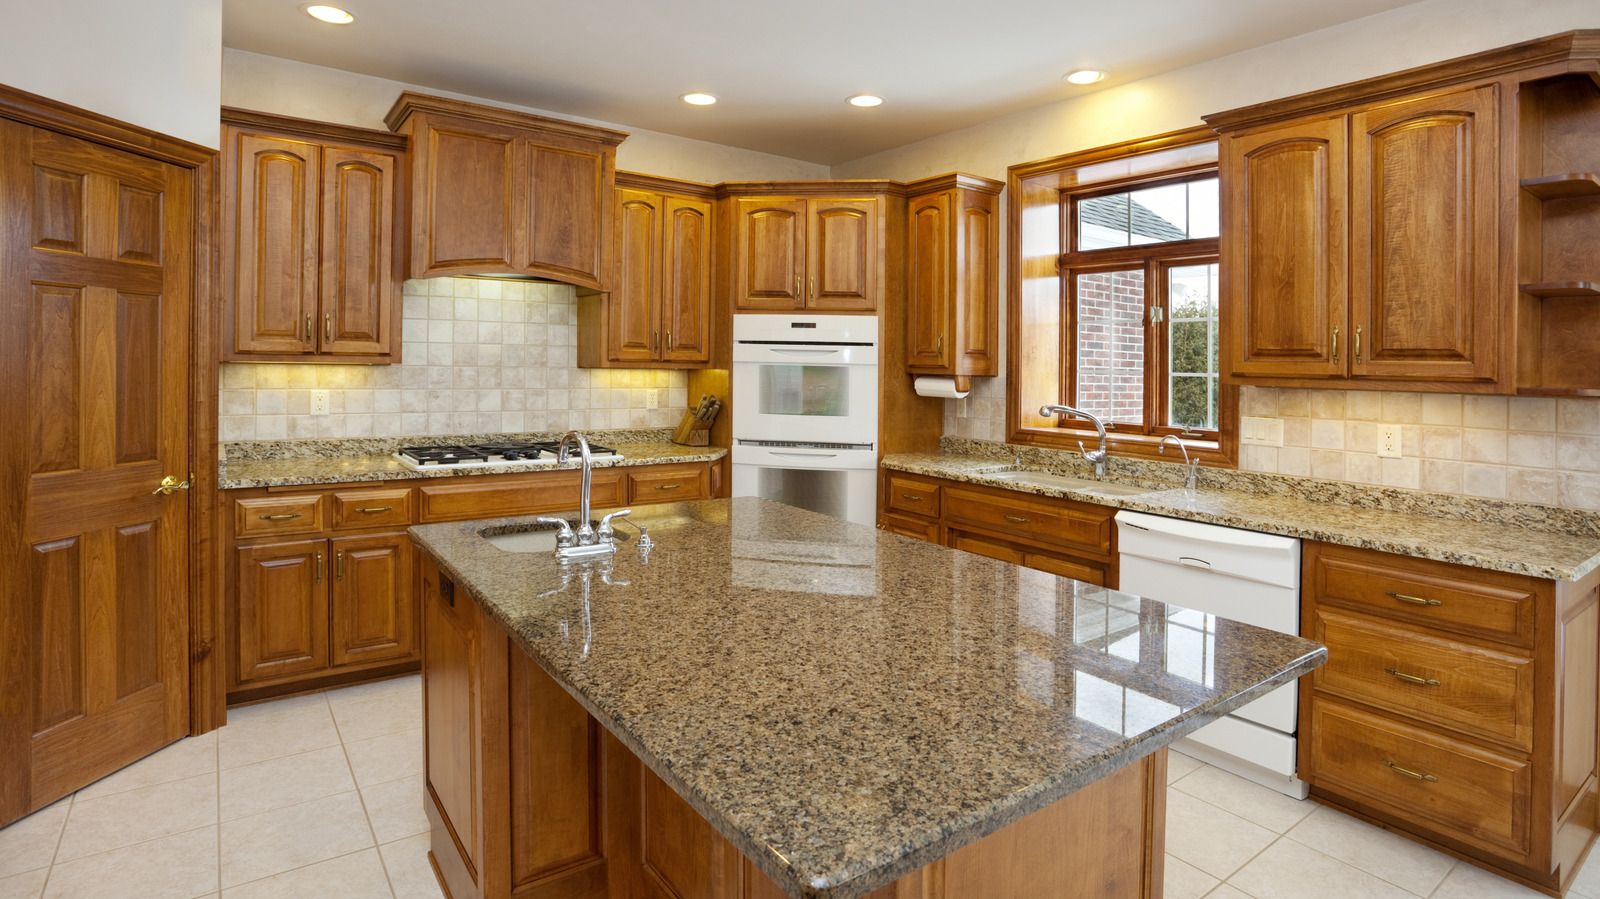
📏 Scale Guide
This look, with its speckled granite and beige tile, is very common. The good news is that you can get a dramatically refreshed version on a tight budget. Start by painting the walls a crisp, modern off-white to neutralize the beige tones. Next, use a specialized countertop paint kit (around $200 from a hardware store) to transform the dated granite into a solid white or black finish. Finally, replace all the cabinet hardware with sleek, modern pulls. These three changes can be done for under $500 and will make the kitchen feel ten years younger.
11. Honey Oak with Intricate Carved Crown Molding
In this kitchen, the single element that defines its character is the ornately carved crown molding and trim. While the cabinets and countertops are standard traditional fare, the detailed woodwork at the top elevates the room, giving it a custom, furniture-like quality. It’s a declaration of a formal, established style. Removing this trim would fundamentally change the kitchen’s identity, making it feel less grand and much more like a standard-issue builder-grade space. This proves that architectural details, even just at the ceiling line, can have an outsized impact on the overall impression of a room.
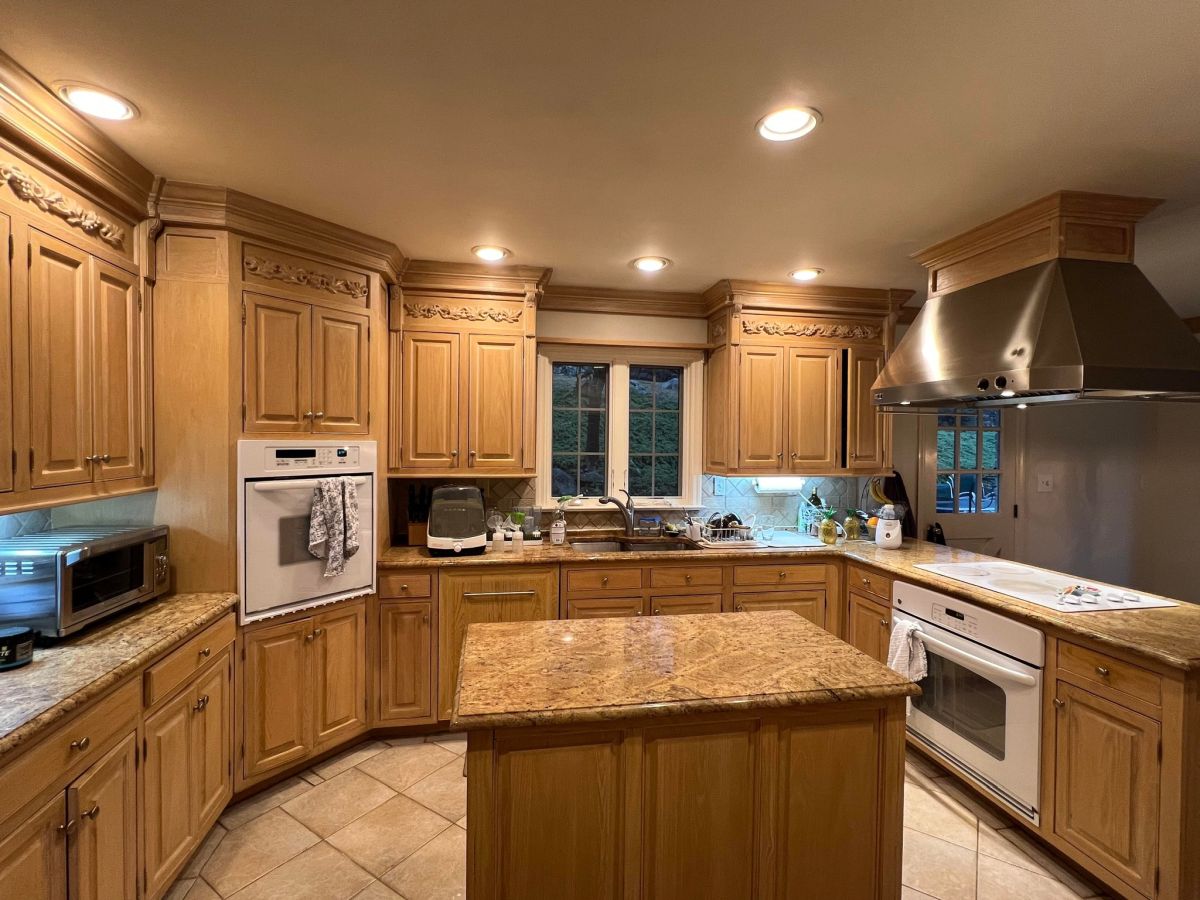
⚠️ Real Talk
That beautiful, detailed molding is a magnet for grease and dust. In a kitchen, airborne cooking grease can create a sticky film on high surfaces, and every one of those carved crevices is a place for it to collect. To keep it looking pristine, you’ll need to clean it more often than you think. A monthly wipe-down with a soft cloth and a gentle degreasing soap (like a bit of dish soap in warm water) is a must. For weekly dusting, a microfiber duster with a long handle or a vacuum brush attachment will be essential to reach the highest points and get into all the nooks and crannies.
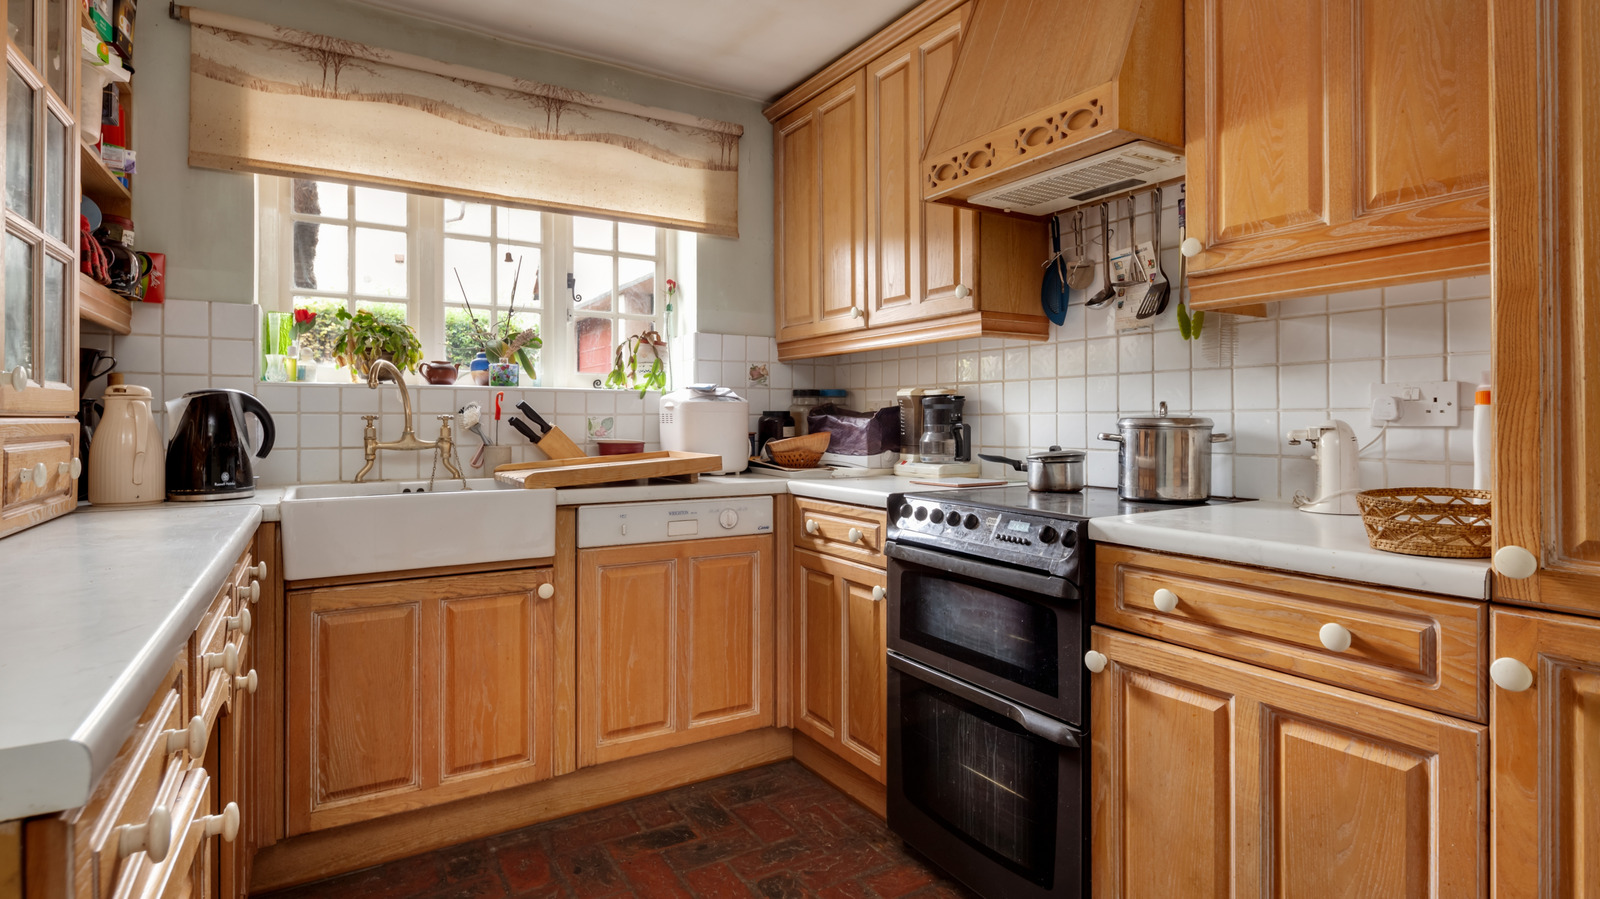
12. Cozy Oak Kitchen with a Pink Square Tile Backsplash
This combination is unexpectedly charming, and it works because it leans into a warm, retro aesthetic. The light pink of the tile has warm undertones that harmonize with the yellow-orange tones of the honey oak, so they don’t clash. The simple, square shape of the tile feels unpretentious and nostalgic, which matches the lived-in, cozy vibe of the kitchen. Finally, the choice of simple, round gold knobs is the perfect finishing touch, tying the warm tones together. It’s a cohesive look that doesn’t take itself too seriously—and that’s why it’s successful.
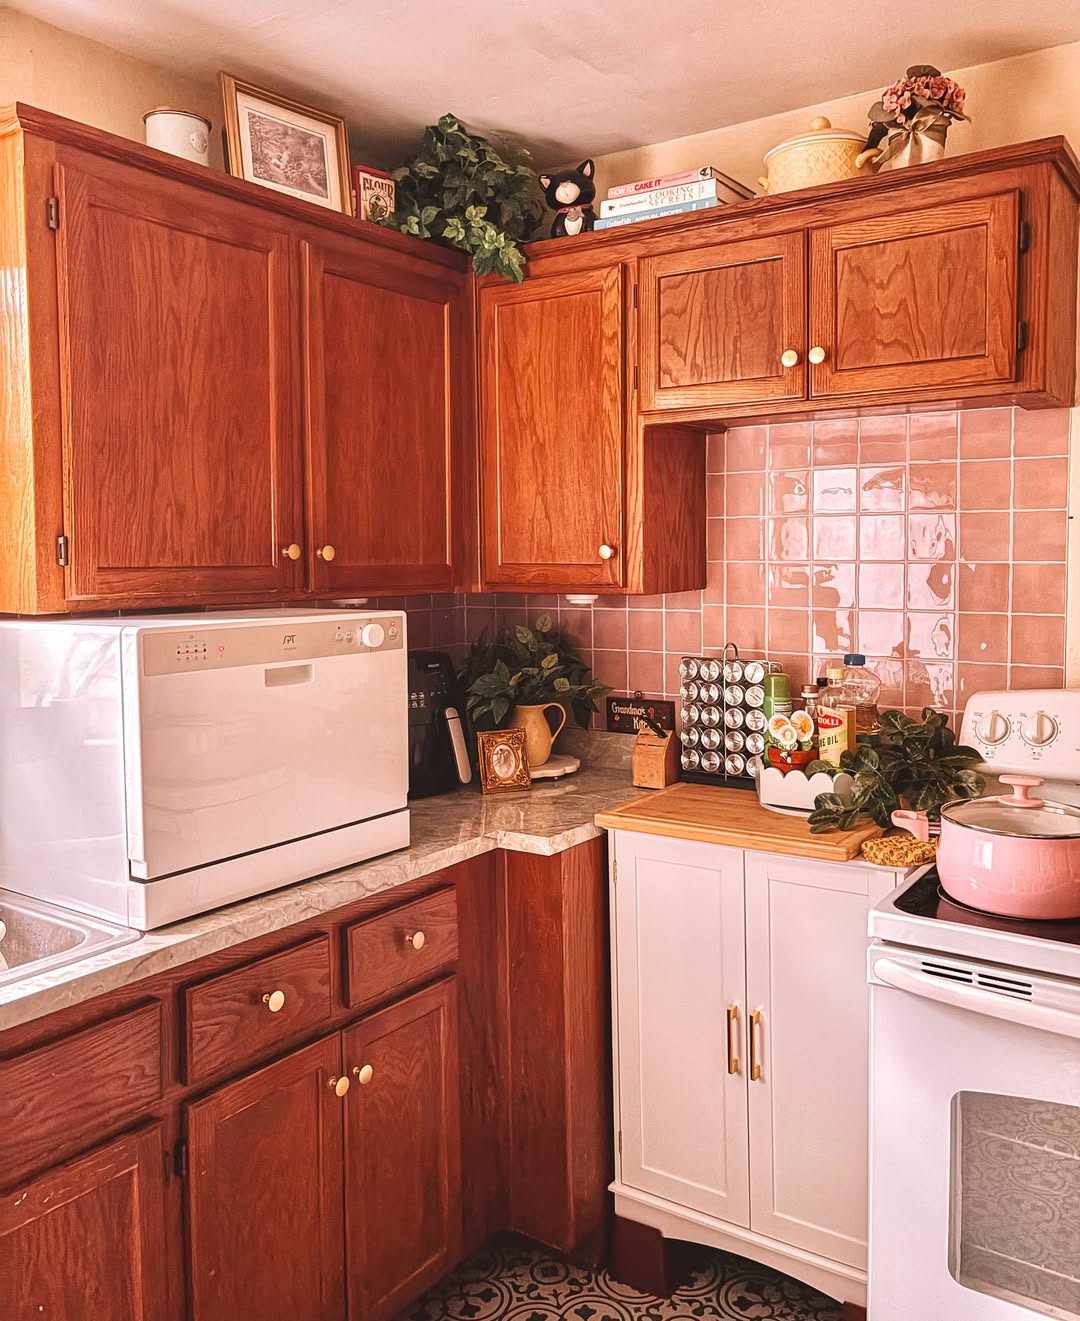
💸 Get This Look For Less
A pink backsplash is a bold and very specific design choice. Before you fall in love with this idea, ask yourself: will I still love this in five years? Or is this a fleeting trend I’m enjoying right now? A backsplash is a semi-permanent installation. If you’re a person who loves to change up your decor frequently, you might be better off painting the wall behind the counter pink and sealing it with a clear, scrubbable topcoat. This gives you the color you crave with a much easier exit strategy when you’re ready for a new look.
13. Warm Wood Cabinets and a Patterned Backsplash Medallion
When installing a backsplash medallion or focal point, precise centering is everything. Don’t just center it on the wall; center it on the appliance below it. Your range or cooktop is the visual anchor of that wall. Measure the exact width of your range and mark its center point. Then, measure the width of your medallion and mark its center. Align these two marks perfectly. Even if it means the medallion is slightly off-center on the overall wall, aligning it with the major appliance it sits above will create a much more pleasing and professional-looking composition. The human eye will notice the relationship between the stove and the tile more.
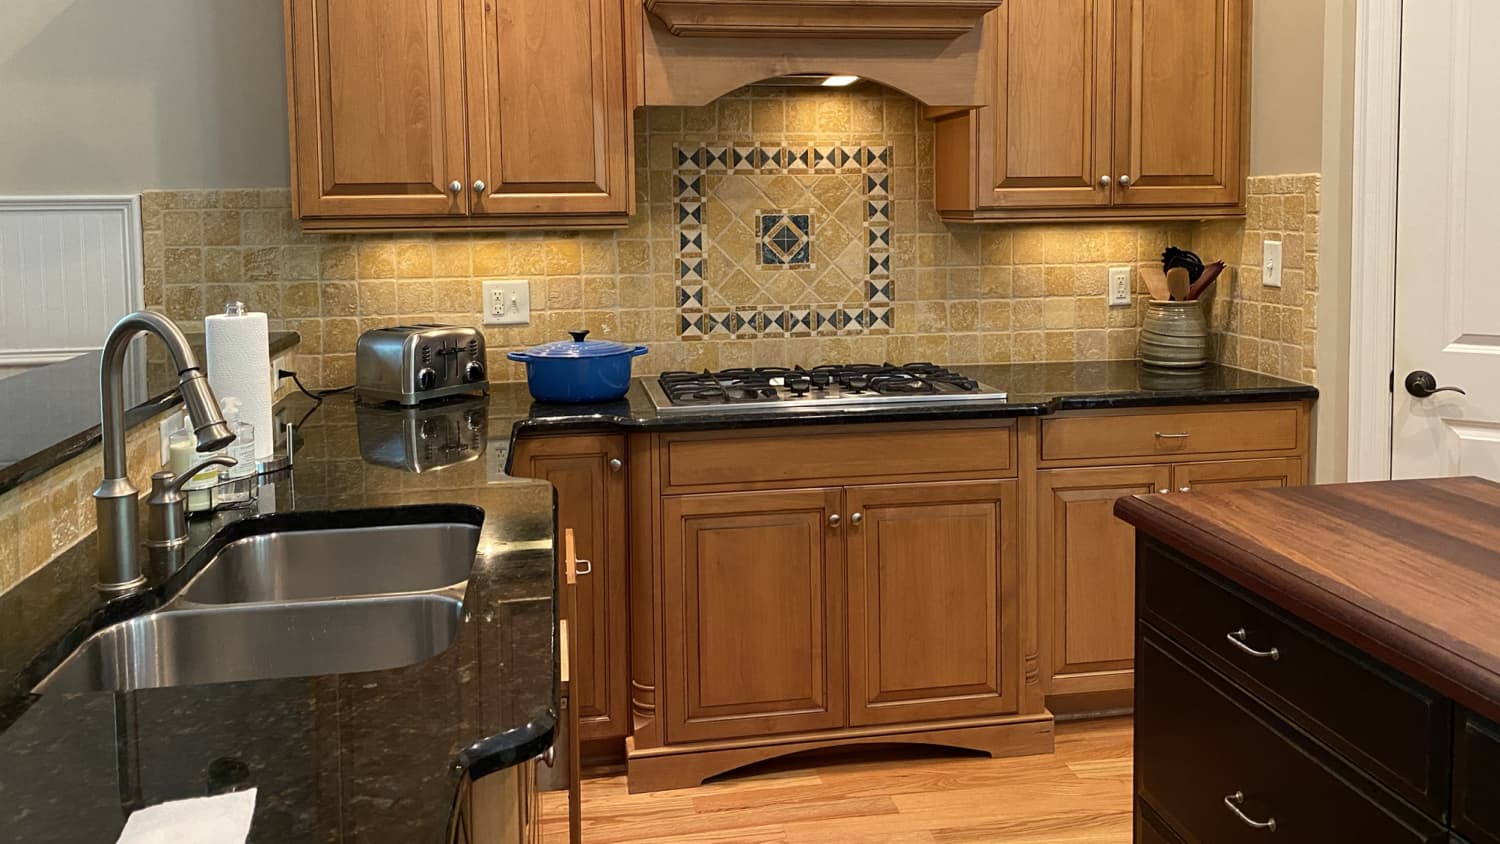
⭐ The One Thing
A backsplash medallion is a commitment. Before you start, run through this quick checklist:
- Verify Measurements: Have you double-checked the height and width of your medallion against the available space, accounting for a 1/8-inch grout line on all sides?
- Check for Obstacles: Is the installation area completely free of electrical outlets or switches? Relocating an outlet is a job for an electrician and needs to be factored into your timeline and budget.
- Confirm Your Focal Point: Are you certain the range is the true focal point of the wall? If your sink is more prominent, a medallion elsewhere can look awkward.
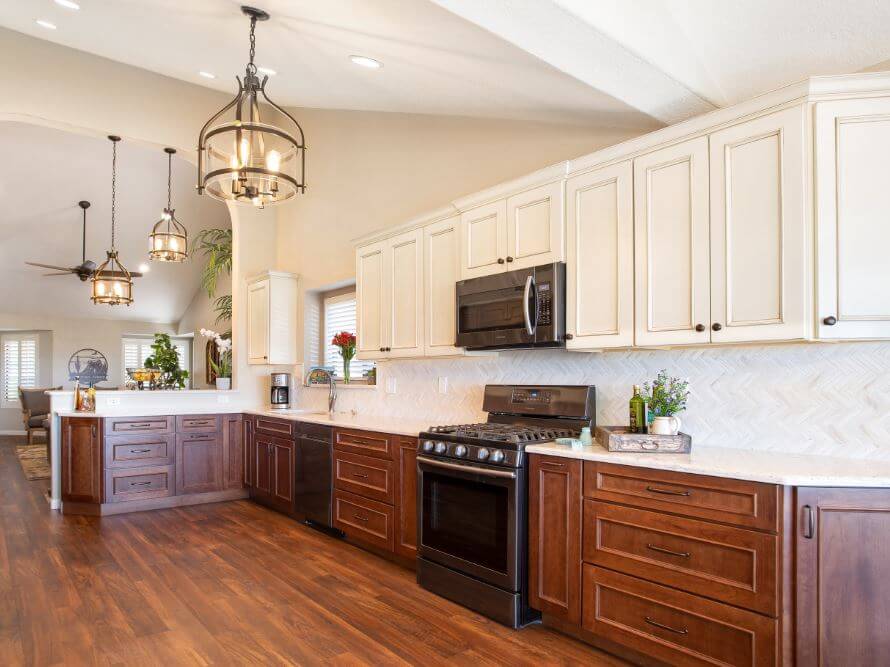
14. Honey Oak Cabinets with an Industrial Hood and Patterned Tile
This kitchen perfectly executes a mixed-style formula: 50% Traditional Warmth + 30% Modern Graphic + 20% Industrial Edge. The honey oak Shaker cabinets provide the traditional, welcoming base. The bold, circular-link backsplash tile brings in a strong, modern graphic element. And the clean lines of the stainless steel appliances and the stark black range hood provide that final, industrial touch. This isn’t a traditional kitchen with a weird hood; it’s a deliberate and successful blend of three distinct styles, all talking to each other.
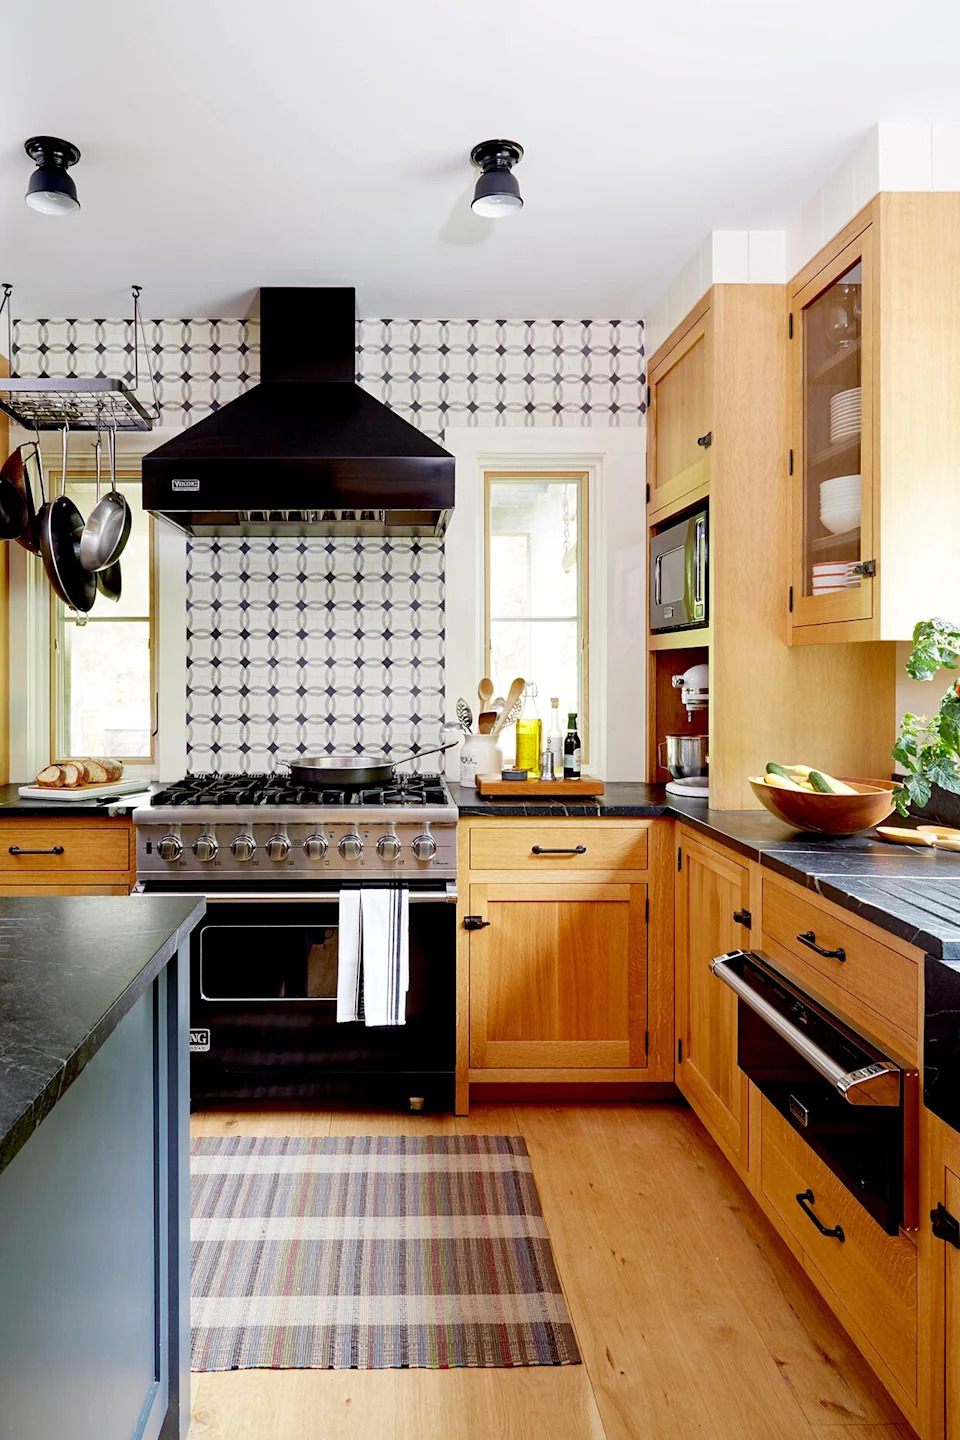
💰 Budget Breakdown
The secret to this successful style blend is the use of a strict, repeating color palette. The warm honey oak is the only wood tone. Every other major element is either black, white, or stainless steel. The black range hood talks to the black cabinet hardware and the dark lines in the tile. The white in the tile links to the white walls. The stainless steel of the range is a neutral industrial element. By keeping the color story simple and disciplined (wood, black, white), the mix of styles feels cohesive and intentional, not messy and accidental.
15. Timeless Honey Oak Kitchen with a Dark Green Island
The dark green island is the single element that elevates this kitchen from nice to truly special. With a matching oak island, the room would be a sea of warm wood—pleasant, but monotonous. By painting the island a deep, contrasting green and topping it with elegant marble, the designer created a sophisticated focal point. It anchors the room, breaks up the wood tones, and introduces a touch of classic color that feels both fresh and timeless. It proves that you don’t need to replace your oak cabinets to get a modern, updated look; you just need to pair them with something bold and beautiful.
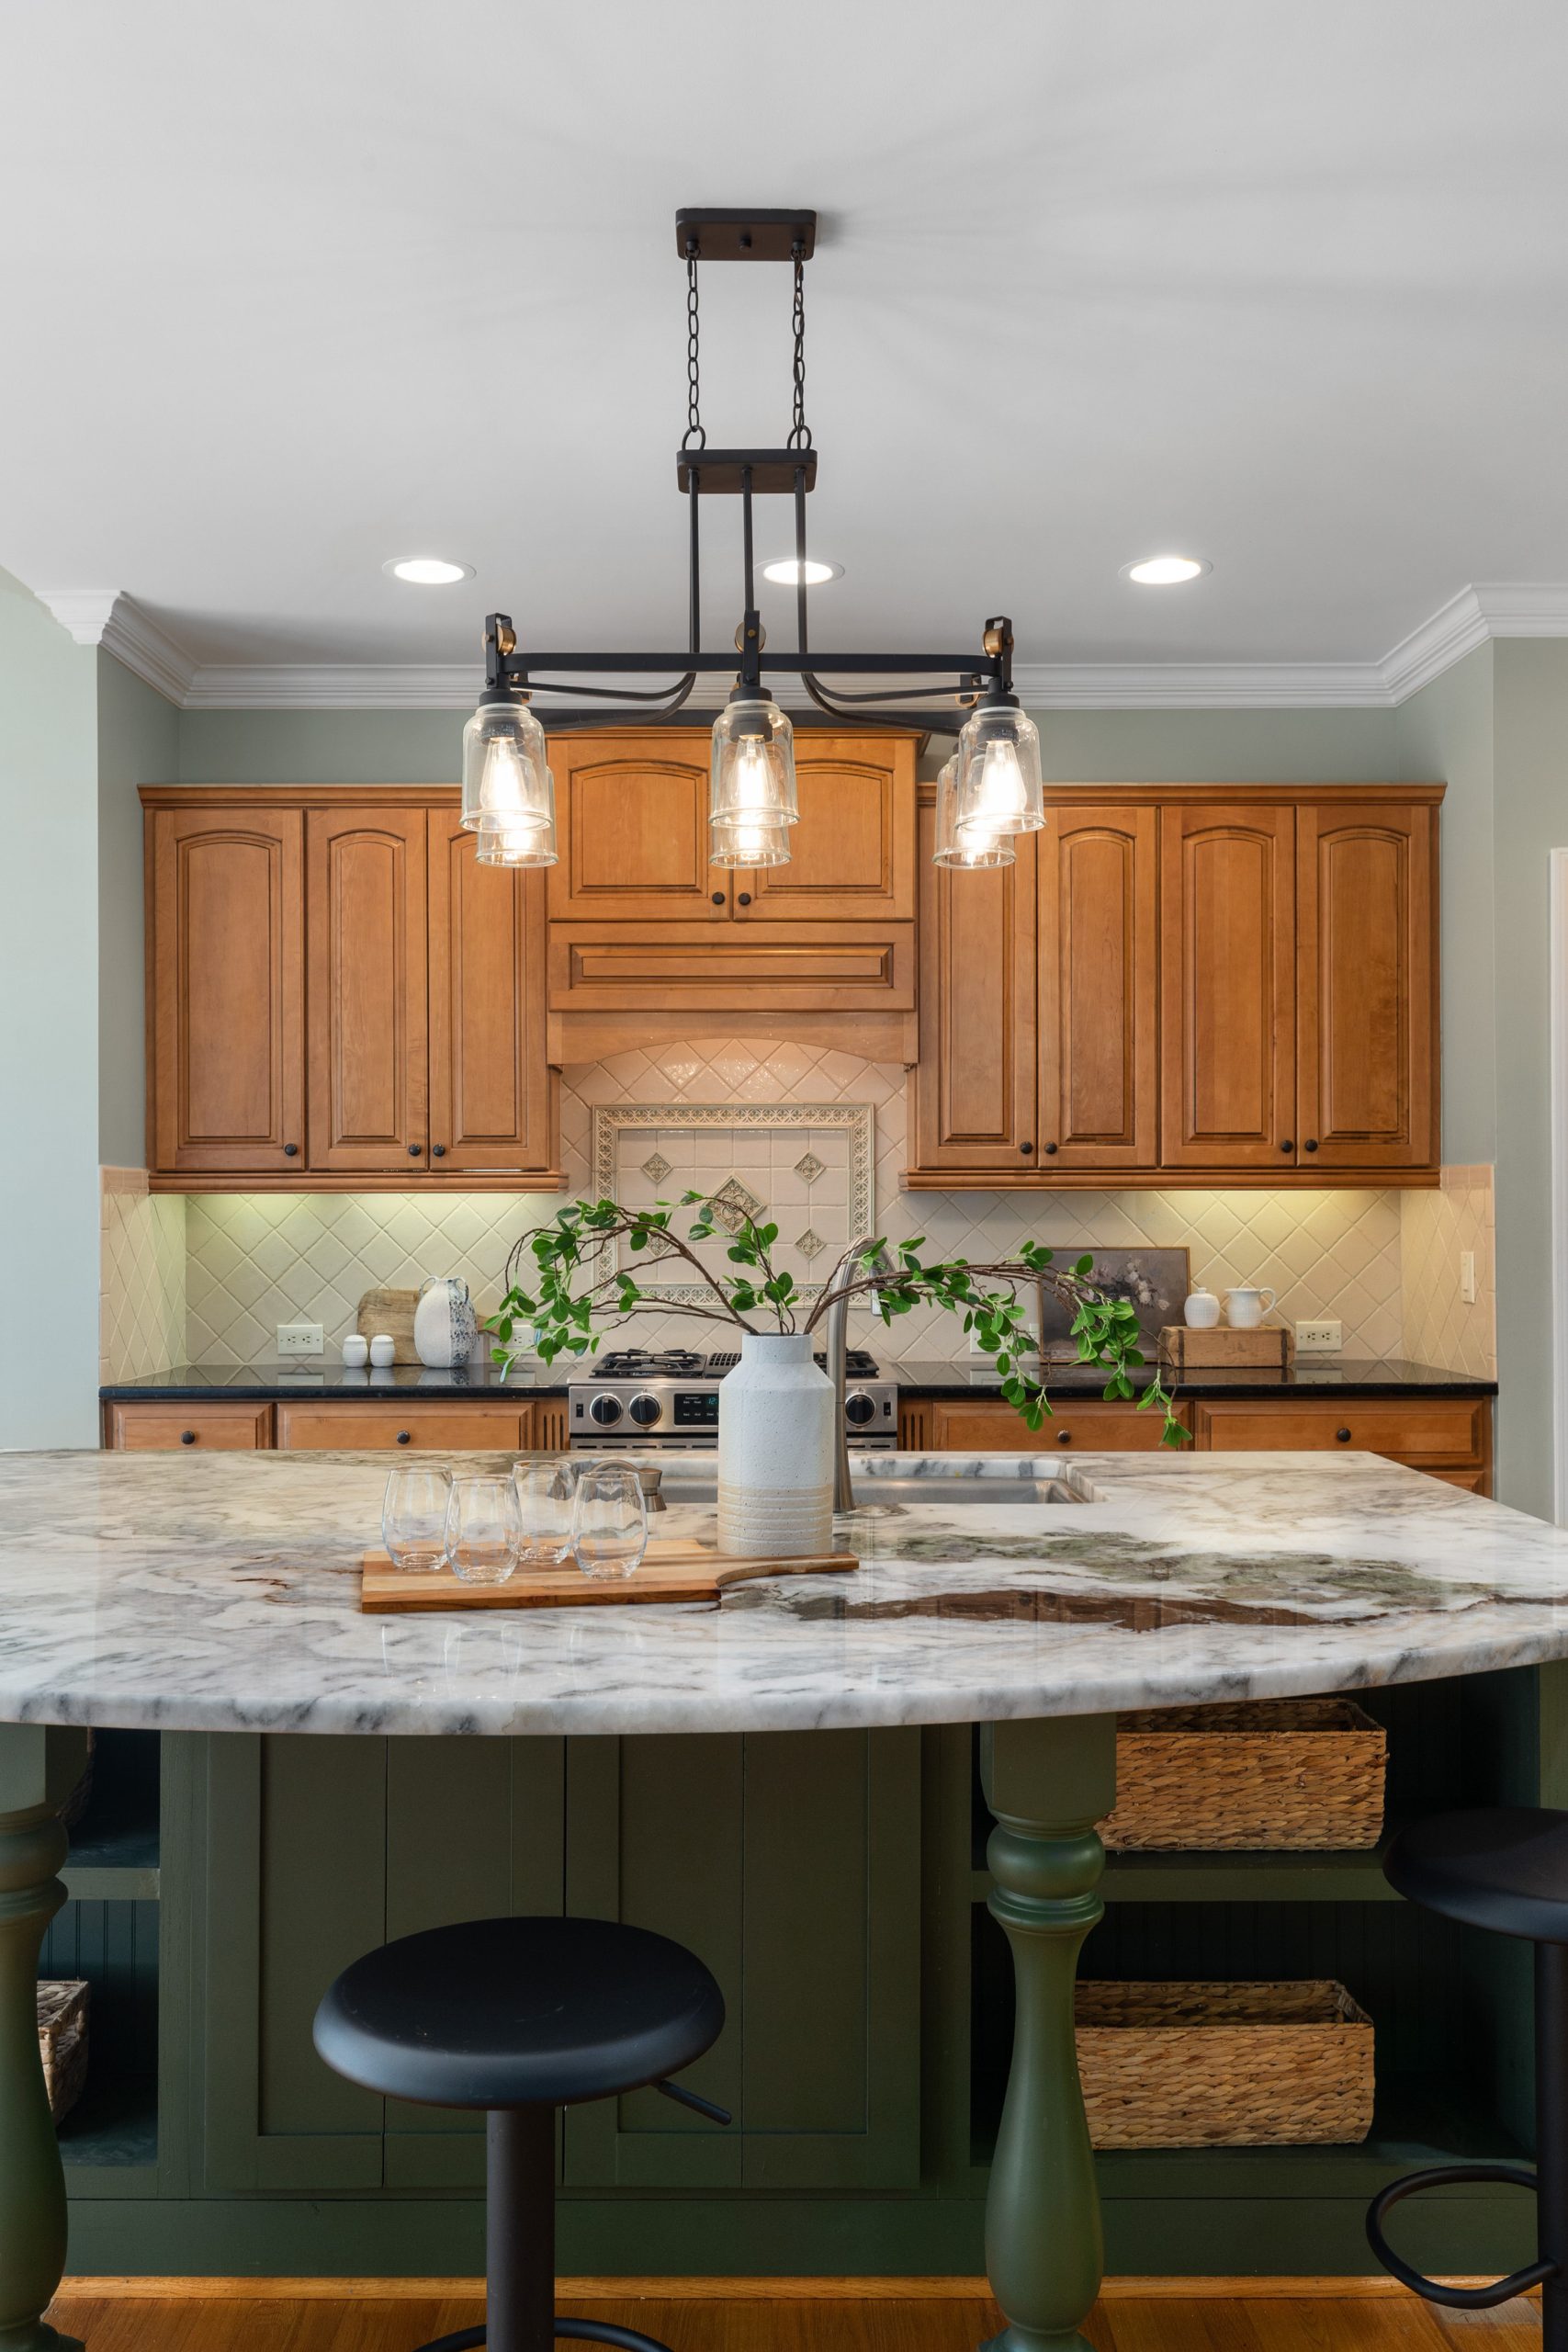
✅ Before You Start
Thinking of painting your kitchen island? It’s a high-impact DIY project. Here’s the brief:
- Prep is everything (Est. time: 3 hours): Remove all hardware. Clean the island thoroughly with a degreaser. Scuff sand all surfaces with 120-grit sandpaper to give the primer something to grip. Wipe away all dust.
- Prime (Est. time: 2 hours + dry time): Apply one to two coats of a high-quality bonding primer. This is non-negotiable for a durable finish.
- Paint (Est. time: 3 hours + dry time): Apply two thin coats of a durable cabinet-grade enamel paint (like Benjamin Moore ADVANCE or Sherwin-Williams Emerald Urethane). Let it dry completely between coats as directed.
- Cure and Reassemble (Wait time: 3-5 days): Let the paint cure for several days before reattaching hardware and resuming normal use. It will be dry to the touch much sooner, but you need it to harden completely to resist nicks and scratches.
16. Rustic-Inspired Kitchen with a Textured Stone Range Hood
This kitchen’s rustic charm comes from the masterful use of texture. The honey oak cabinets have a smooth finish. The dark granite countertops are polished and reflective. In contrast, the massive range hood has a rough, stucco-like texture with carved details, and the adjacent fireplace is made of uneven, natural stone. This textural opposition is what makes the space so compelling. The smooth surfaces keep it feeling like a functional kitchen, while the rough, rustic elements add warmth, history, and a commanding visual weight. It’s a beautiful example of the “smooth vs. rough” design principle.
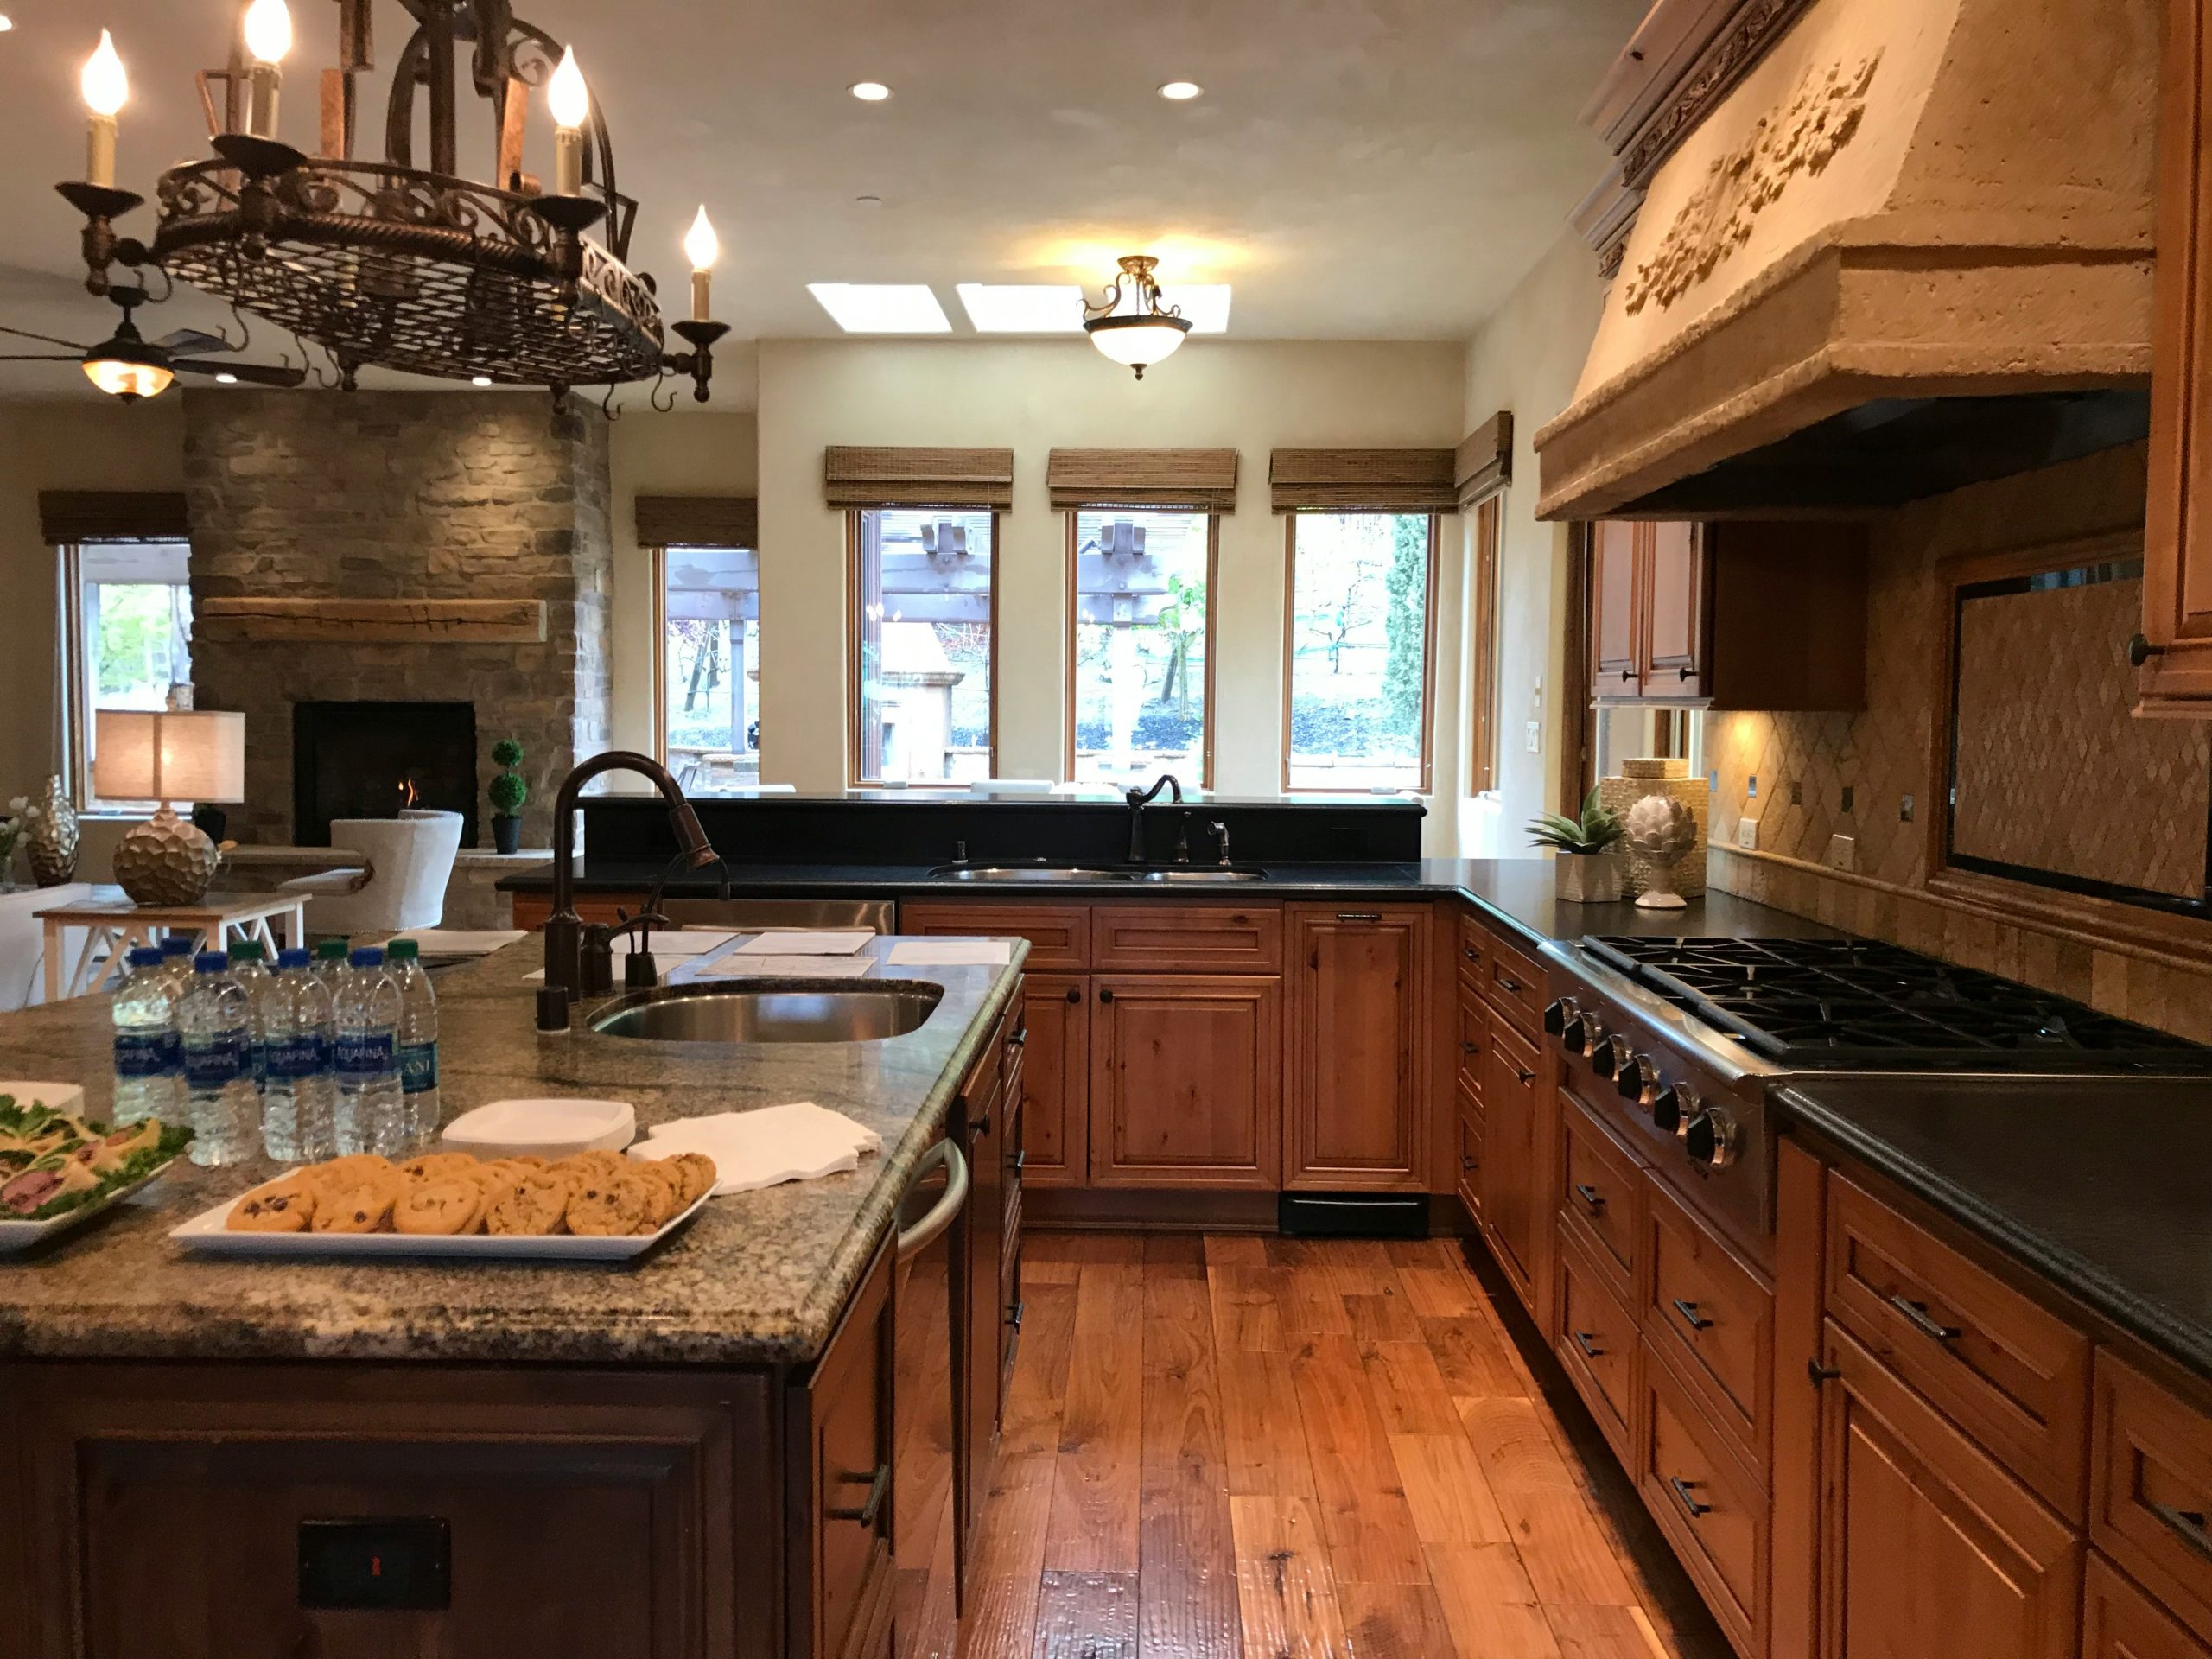
🔧 How-To Brief
A statement piece like this large, stone-clad range hood demands a room with generous proportions. To pull this off, you need high ceilings—at least 9 feet, but 10 feet or more is ideal. In a room with standard 8-foot ceilings, a hood this substantial would feel overwhelming and oppressive, visually lowering the ceiling height even further. The overall kitchen should also be quite large, over 200 square feet, to balance the visual weight of the stone. Compare this to the lighter, more open feel of Idea #2, which would work with lower ceilings.
17. Honey Oak Kitchen with a Simple White Square Tile Backsplash
This look is the definition of a smart, budget-conscious choice that stands the test of time. A simple 4×4 or 6×6 white ceramic tile is one of the most affordable backsplash materials available, often costing less than $2 per square foot. Pairing it with honey oak cabinets creates a clean, bright look that isn’t tied to a fleeting trend. If you have good-condition oak cabinets, combining them with this kind of simple, inexpensive backsplash and new hardware is one of the fastest and most cost-effective kitchen makeovers possible. It’s proof that you don’t need fancy materials to create a bright, functional, and inviting kitchen.

💡 Designer Tip
Under-cabinet lighting is one of the most functional upgrades you can make in a kitchen, but placement matters. For the best task lighting on your countertops, install the LED strips or pucks toward the *front* of the upper cabinets, not tucked back against the wall. This positioning casts the light down and slightly back, fully illuminating your work surface without creating harsh glare or shadows right where you’re chopping and prepping. It also highlights the depth of your countertop and makes the backsplash glow. It’s a small detail that makes a huge difference in usability.
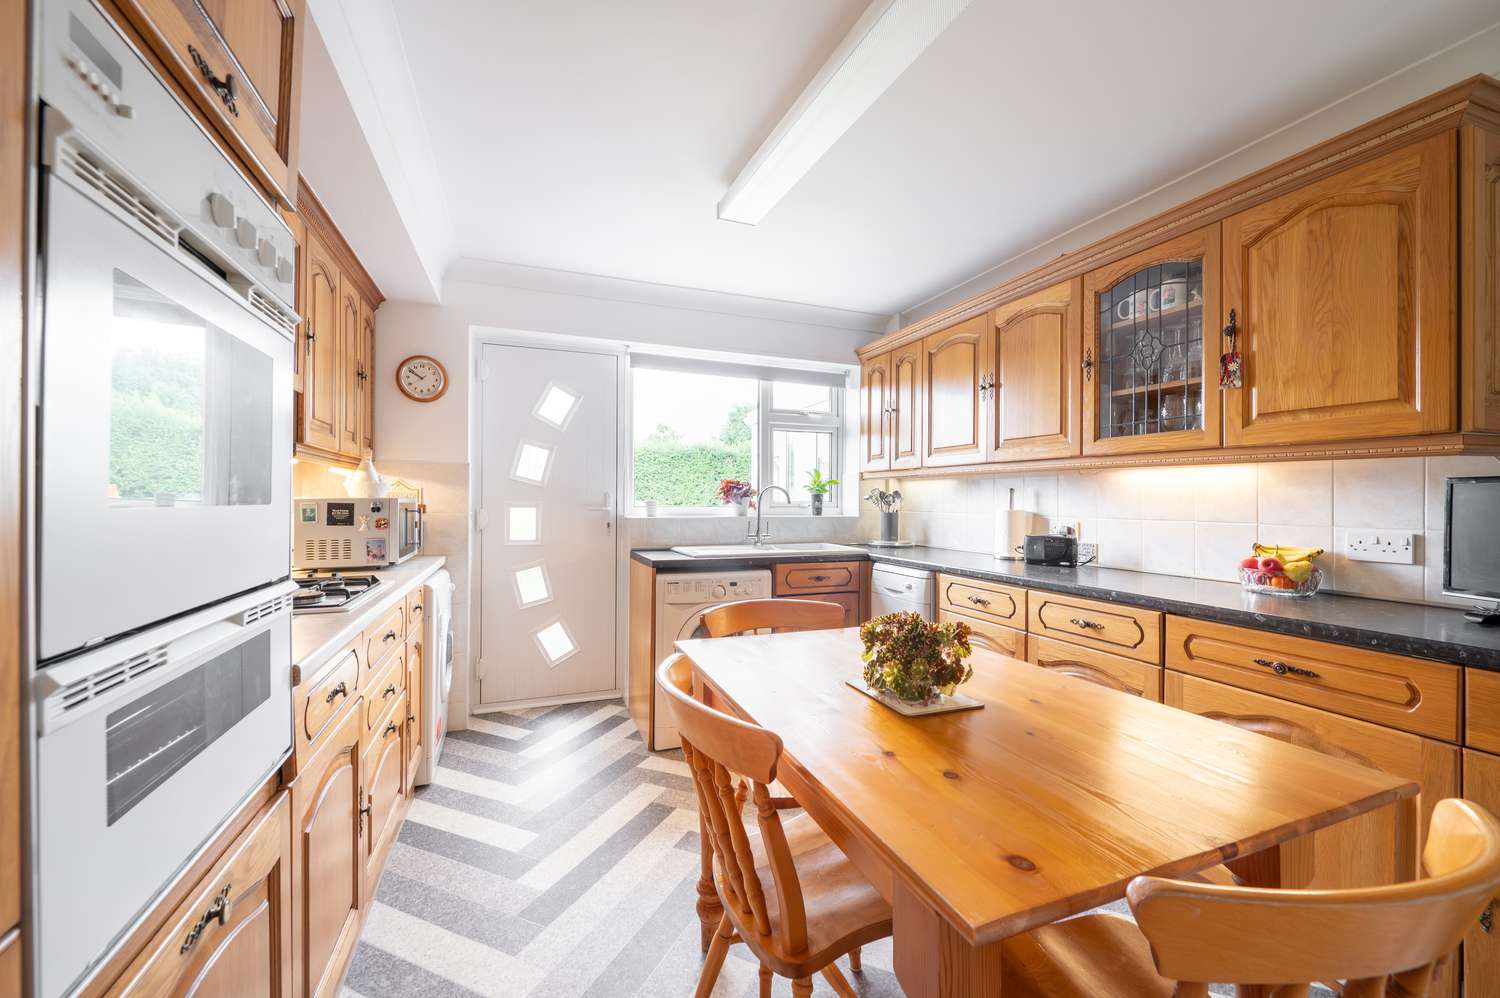
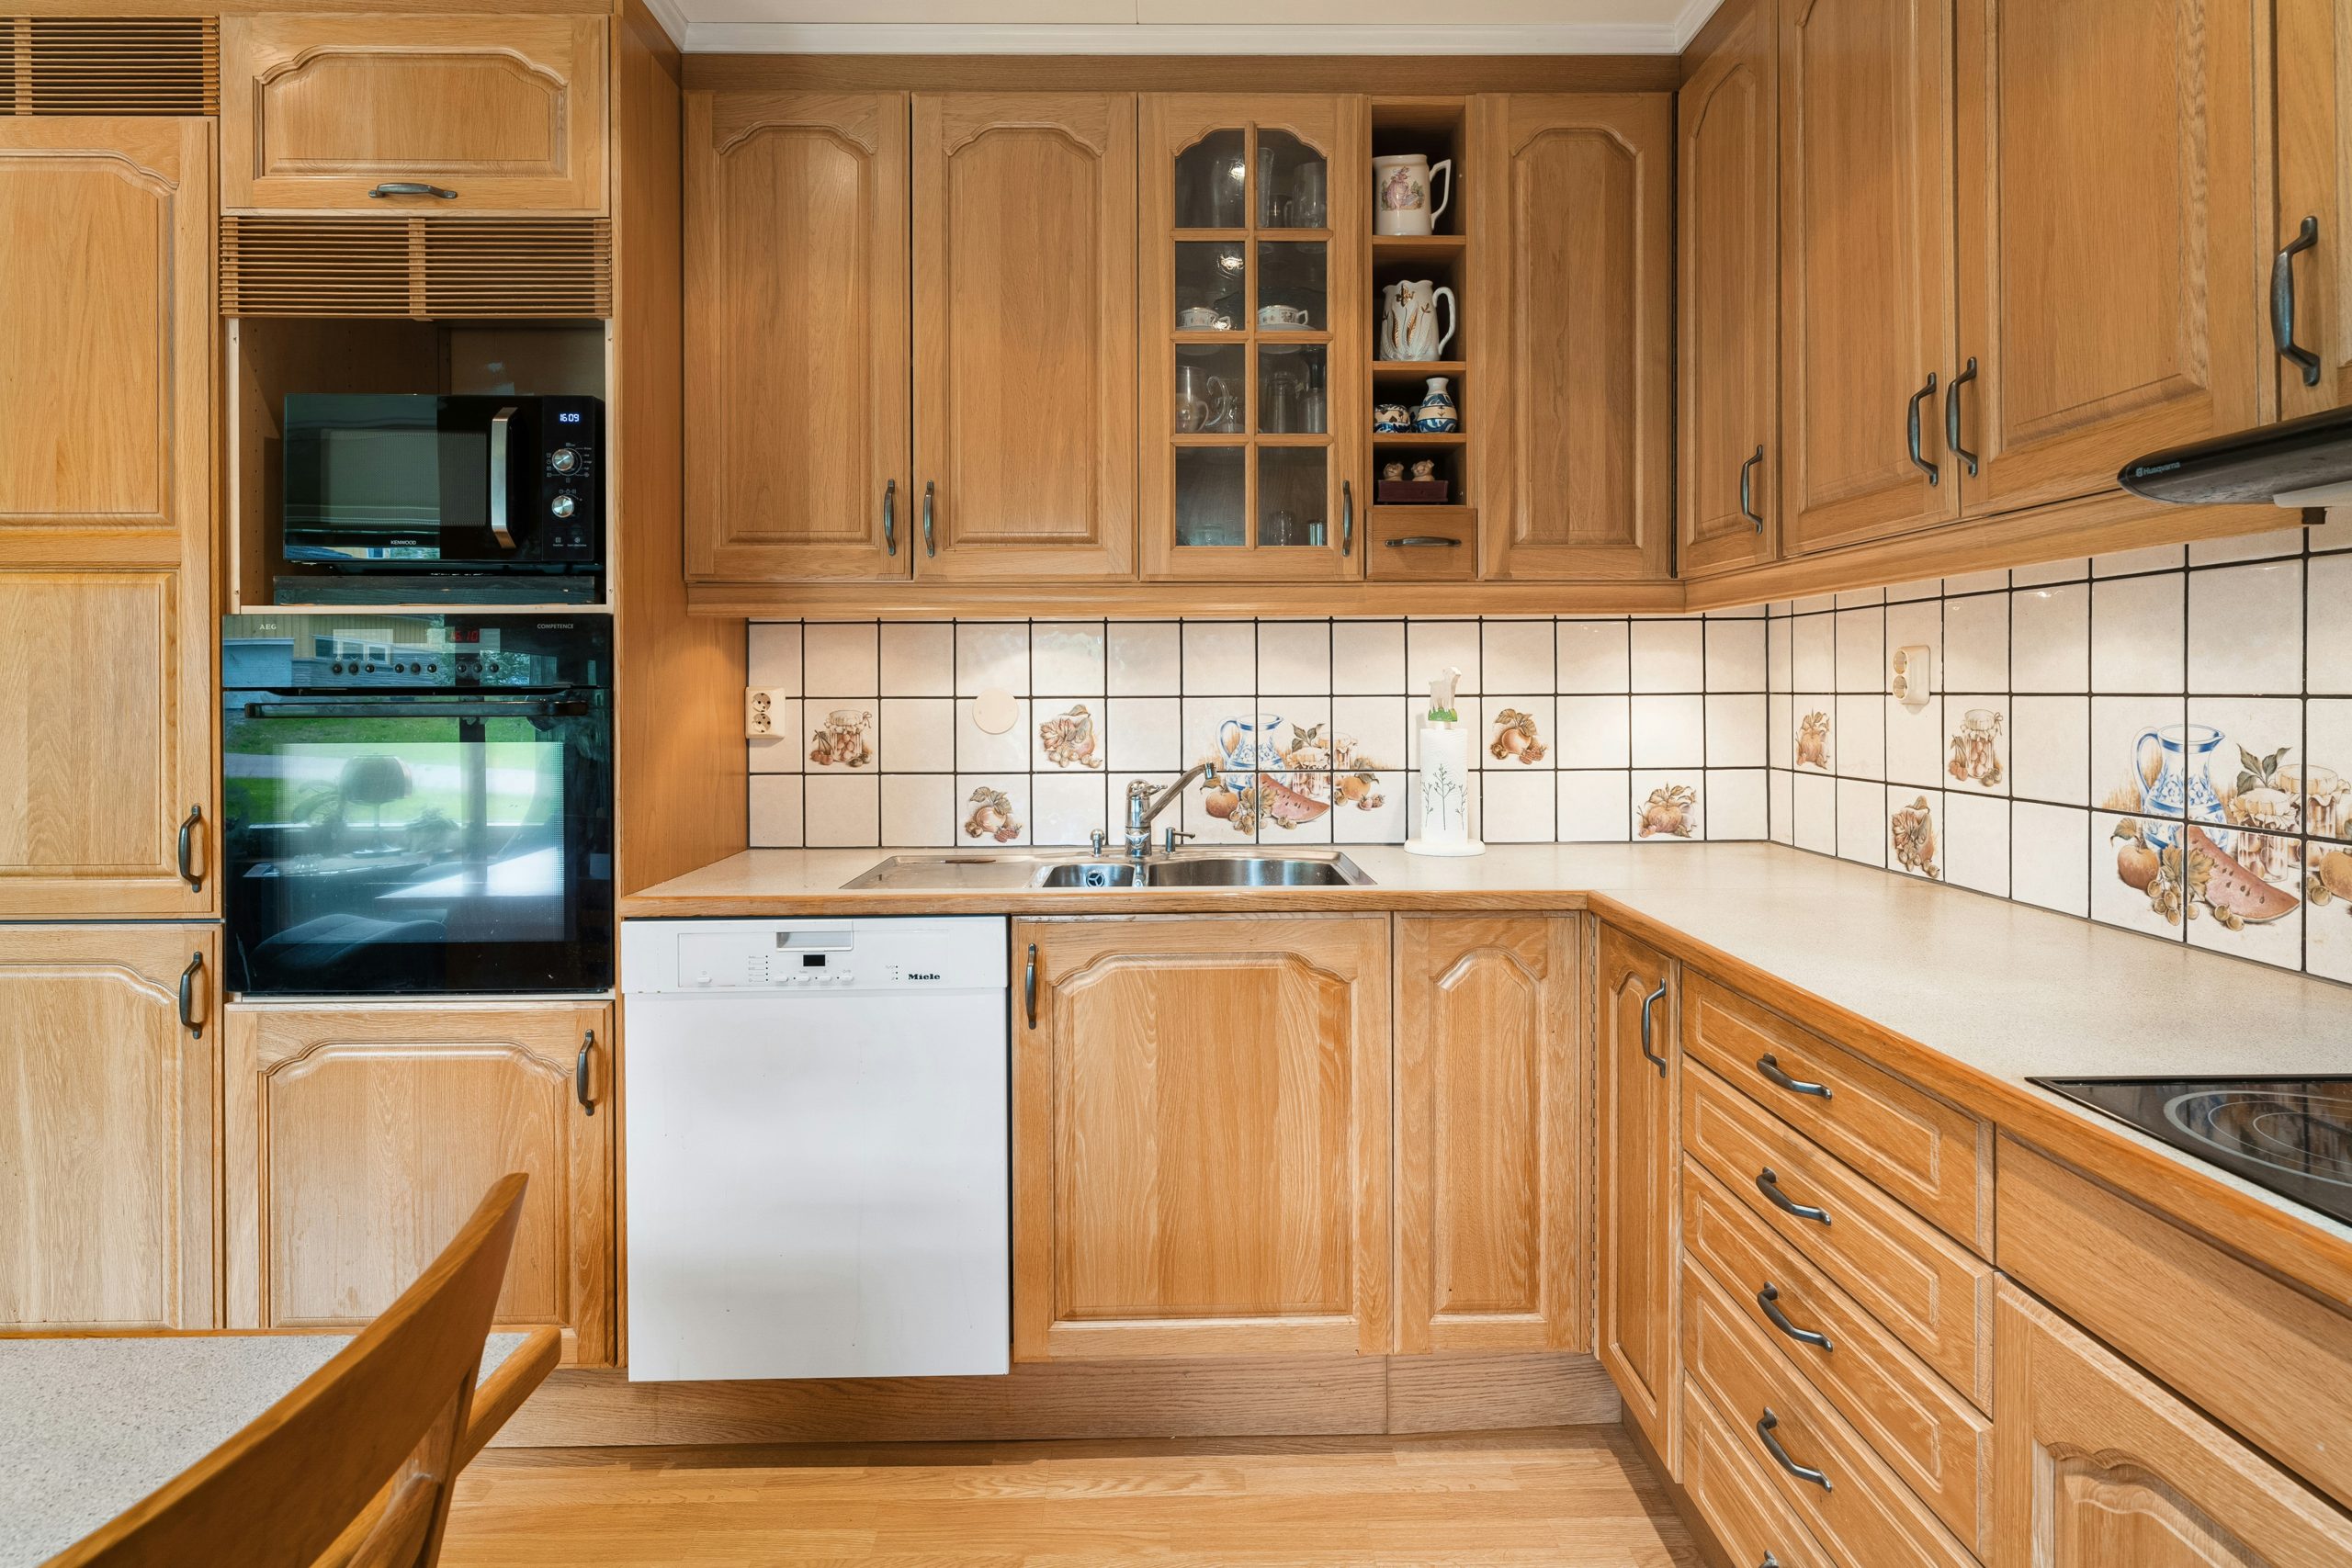
18. Timeless Honey Oak with Decorative Fruit-Motif Tiles
Here’s an honest take: highly specific, pictorial, decorative tiles are a major design risk. While the fruit and pitcher motifs in this backsplash contribute to a cozy, traditional, country-kitchen feel, they are also what can make a kitchen feel firmly planted in a specific era (in this case, the late 1990s or early 2000s). If you love this look, go for it! But if your goal is longevity and resale value, it’s often wiser to choose a more timeless field tile for the backsplash and bring in personality through less permanent items like art, textiles, or countertop accessories. Compare this to the more modern tile in Idea #14.

🧹 Maintenance Reality
Is this look due for a comeback? In a niche way, yes. With the rise of “Grandmacore” and “Cottagecore” aesthetics on Pinterest and Instagram, there’s a renewed appreciation for decor that feels personal, nostalgic, and a little bit kitschy. For someone fully embracing that vibe, a fruit-tile backsplash might feel charming and authentic. However, it’s unlikely to become a mainstream trend. This look is for the person who is confident in their personal style and isn’t concerned with following the latest design wave. It’s a choice you make for love, not for trendiness.
19. Light Natural Wood Cabinets with a White Apron Sink
The large, white apron-front sink (also known as a farmhouse sink) serves as the visual and functional heart of this kitchen. Its bright white color creates a crisp contrast against the warm, natural wood cabinetry, and its substantial size gives it a pleasing visual weight. Unlike a standard undermount sink, the exposed front panel breaks up the long run of lower cabinets, preventing visual monotony. It acts as a focal point, drawing the eye and reinforcing the kitchen’s traditional, slightly rustic character. The brass faucet completes the picture, turning the sink area into a beautiful vignette.
🔥 Trending Context
A white fireclay or cast iron apron sink is a beautiful, classic choice, but it requires a bit of mindfulness to keep it looking pristine. The biggest culprits are scuffs and scratches from heavy pots and pans. Always use a sink grid or basin rack—this is non-negotiable. This simple metal or silicone grid sits at the bottom of the sink, preventing your cookware from ever making direct contact with the surface. For cleaning, avoid abrasive powders or pads. A soft sponge with a bit of dish soap or a specialized cleanser like Bar Keepers Friend will remove most marks without damaging the finish.
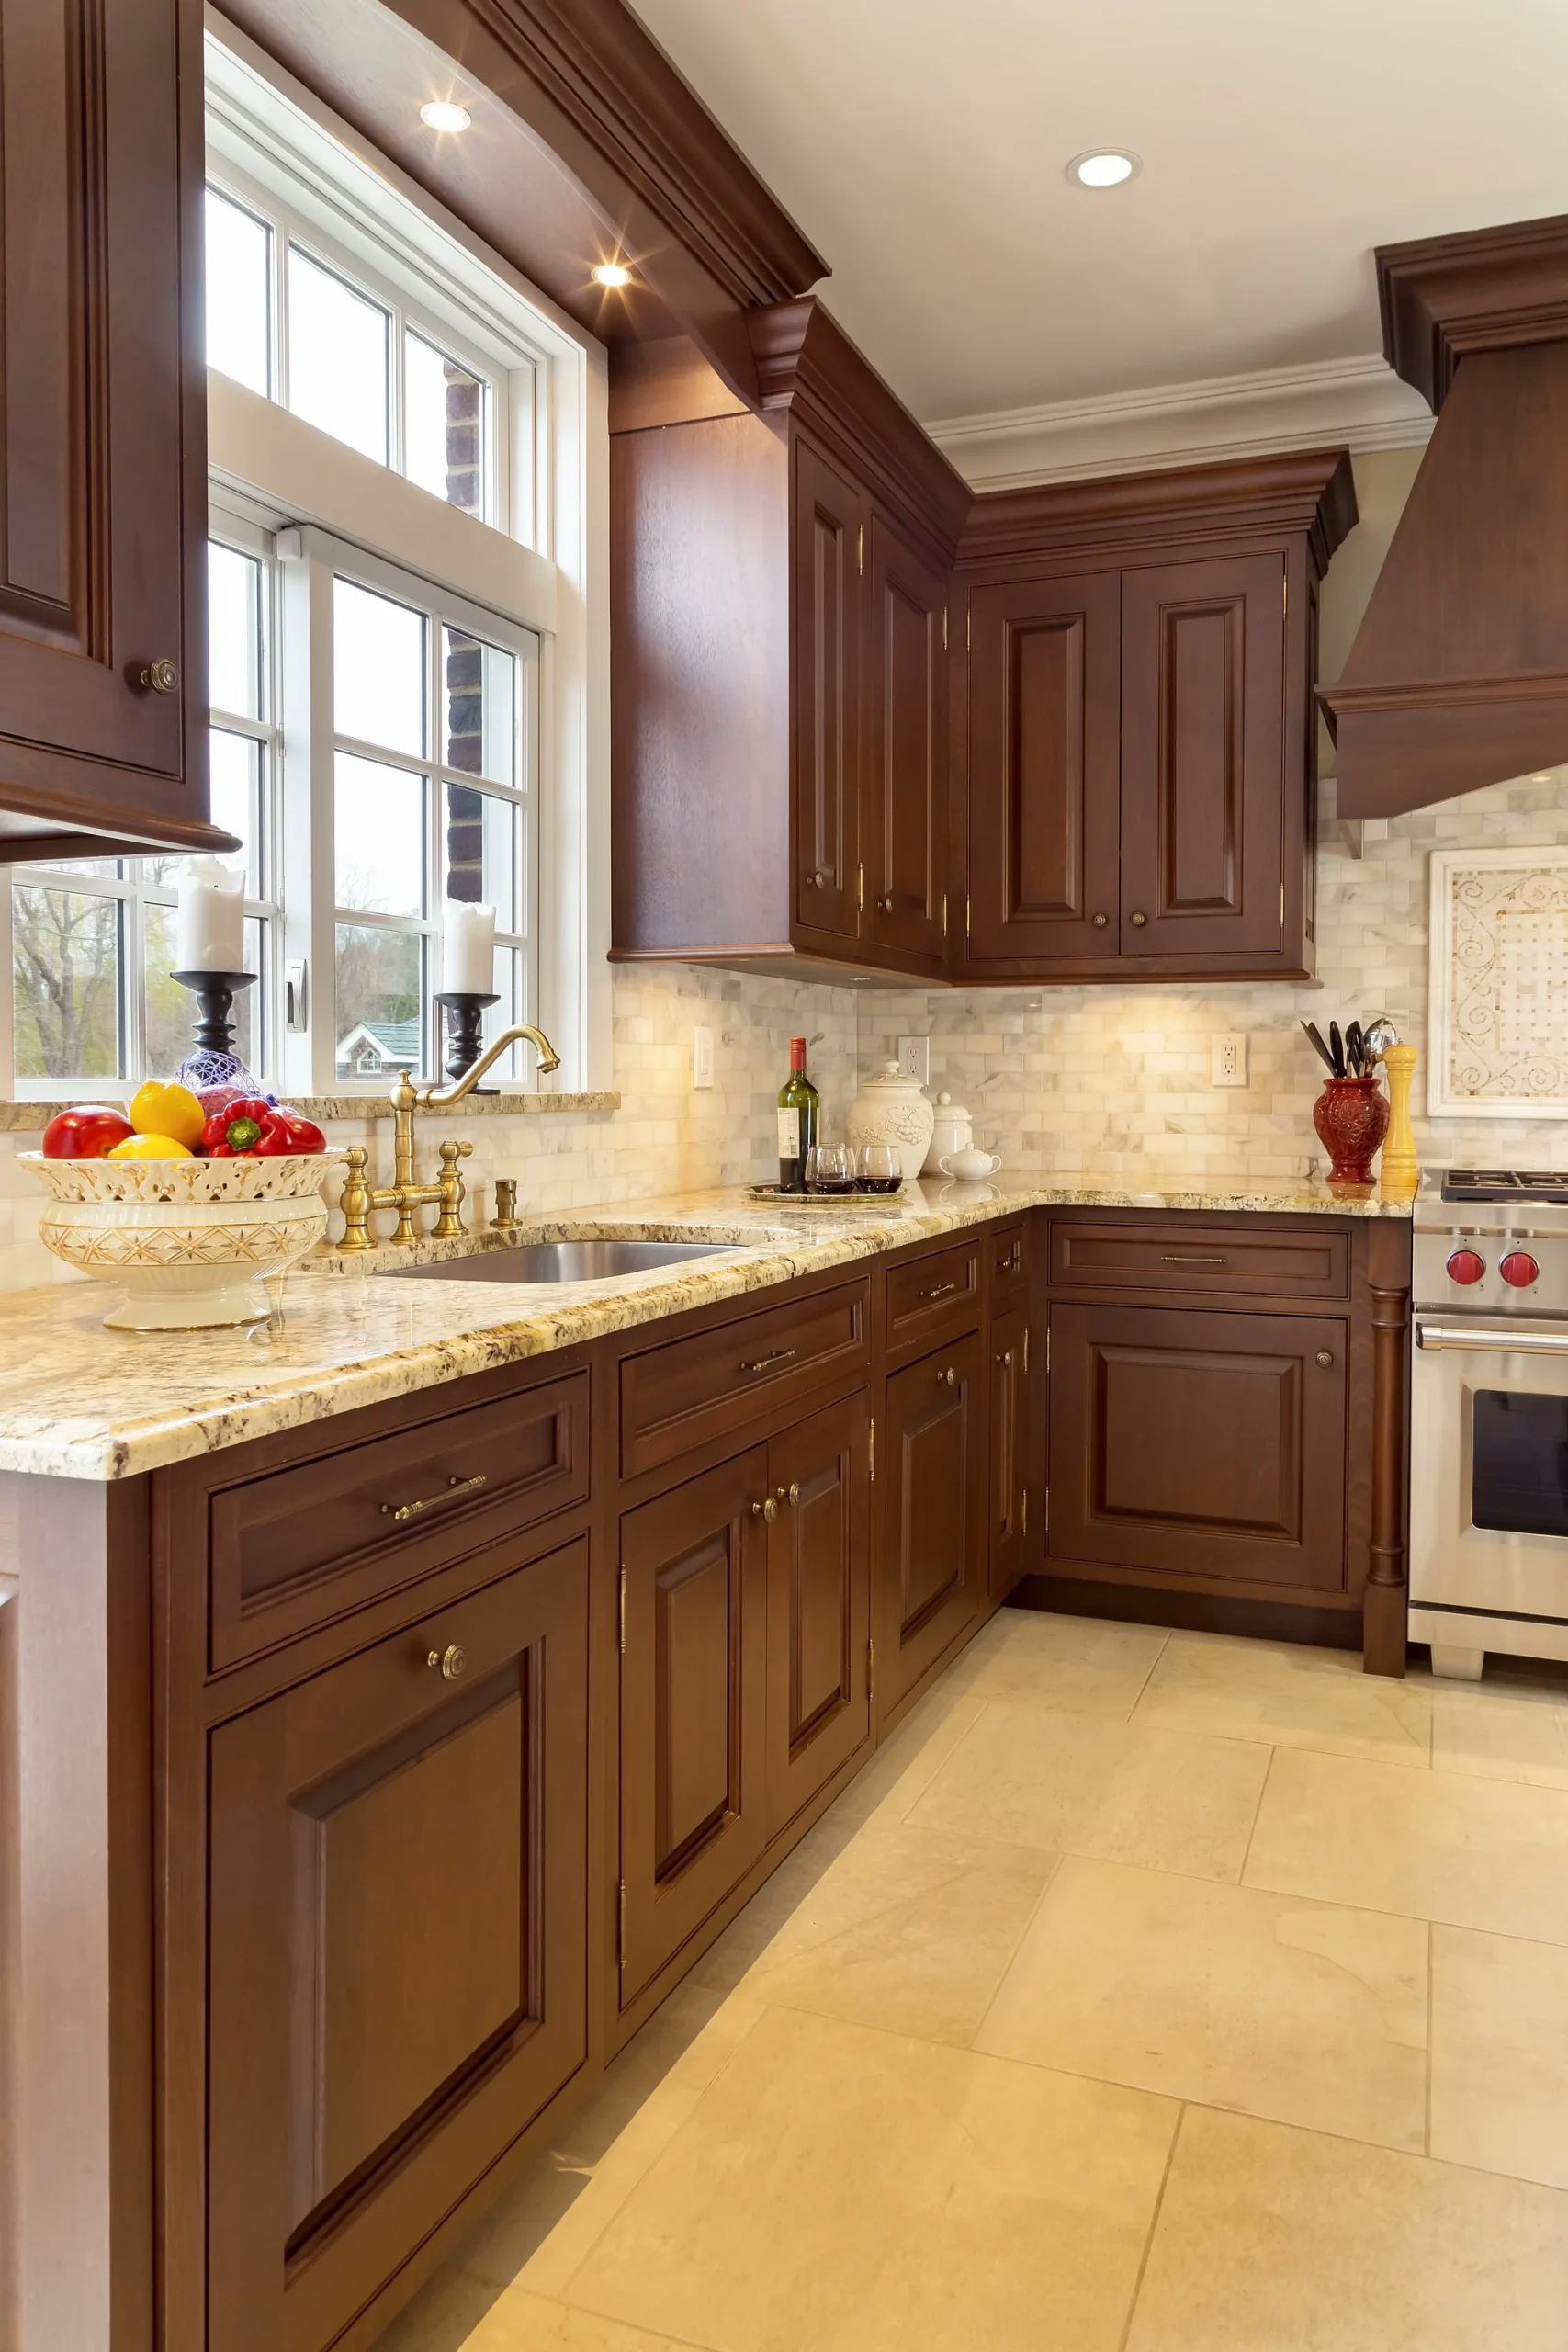
20. L-Shaped Kitchen with Cherry Wood Cabinets and Granite
This kitchen follows a tried-and-true formula for a classic, high-contrast look: 60% rich, dark wood + 40% light, bright surfaces. The deep, warm tones of the cherry wood cabinets provide a sense of substance and luxury. To keep the room from feeling too dark or heavy, the countertops and backsplash are a bright, light-reflecting white and cream. This balance is key. If the countertops were also dark, the room would feel much smaller and more somber. The light surfaces lift the space and create a clean, crisp effect that will never go out of style.
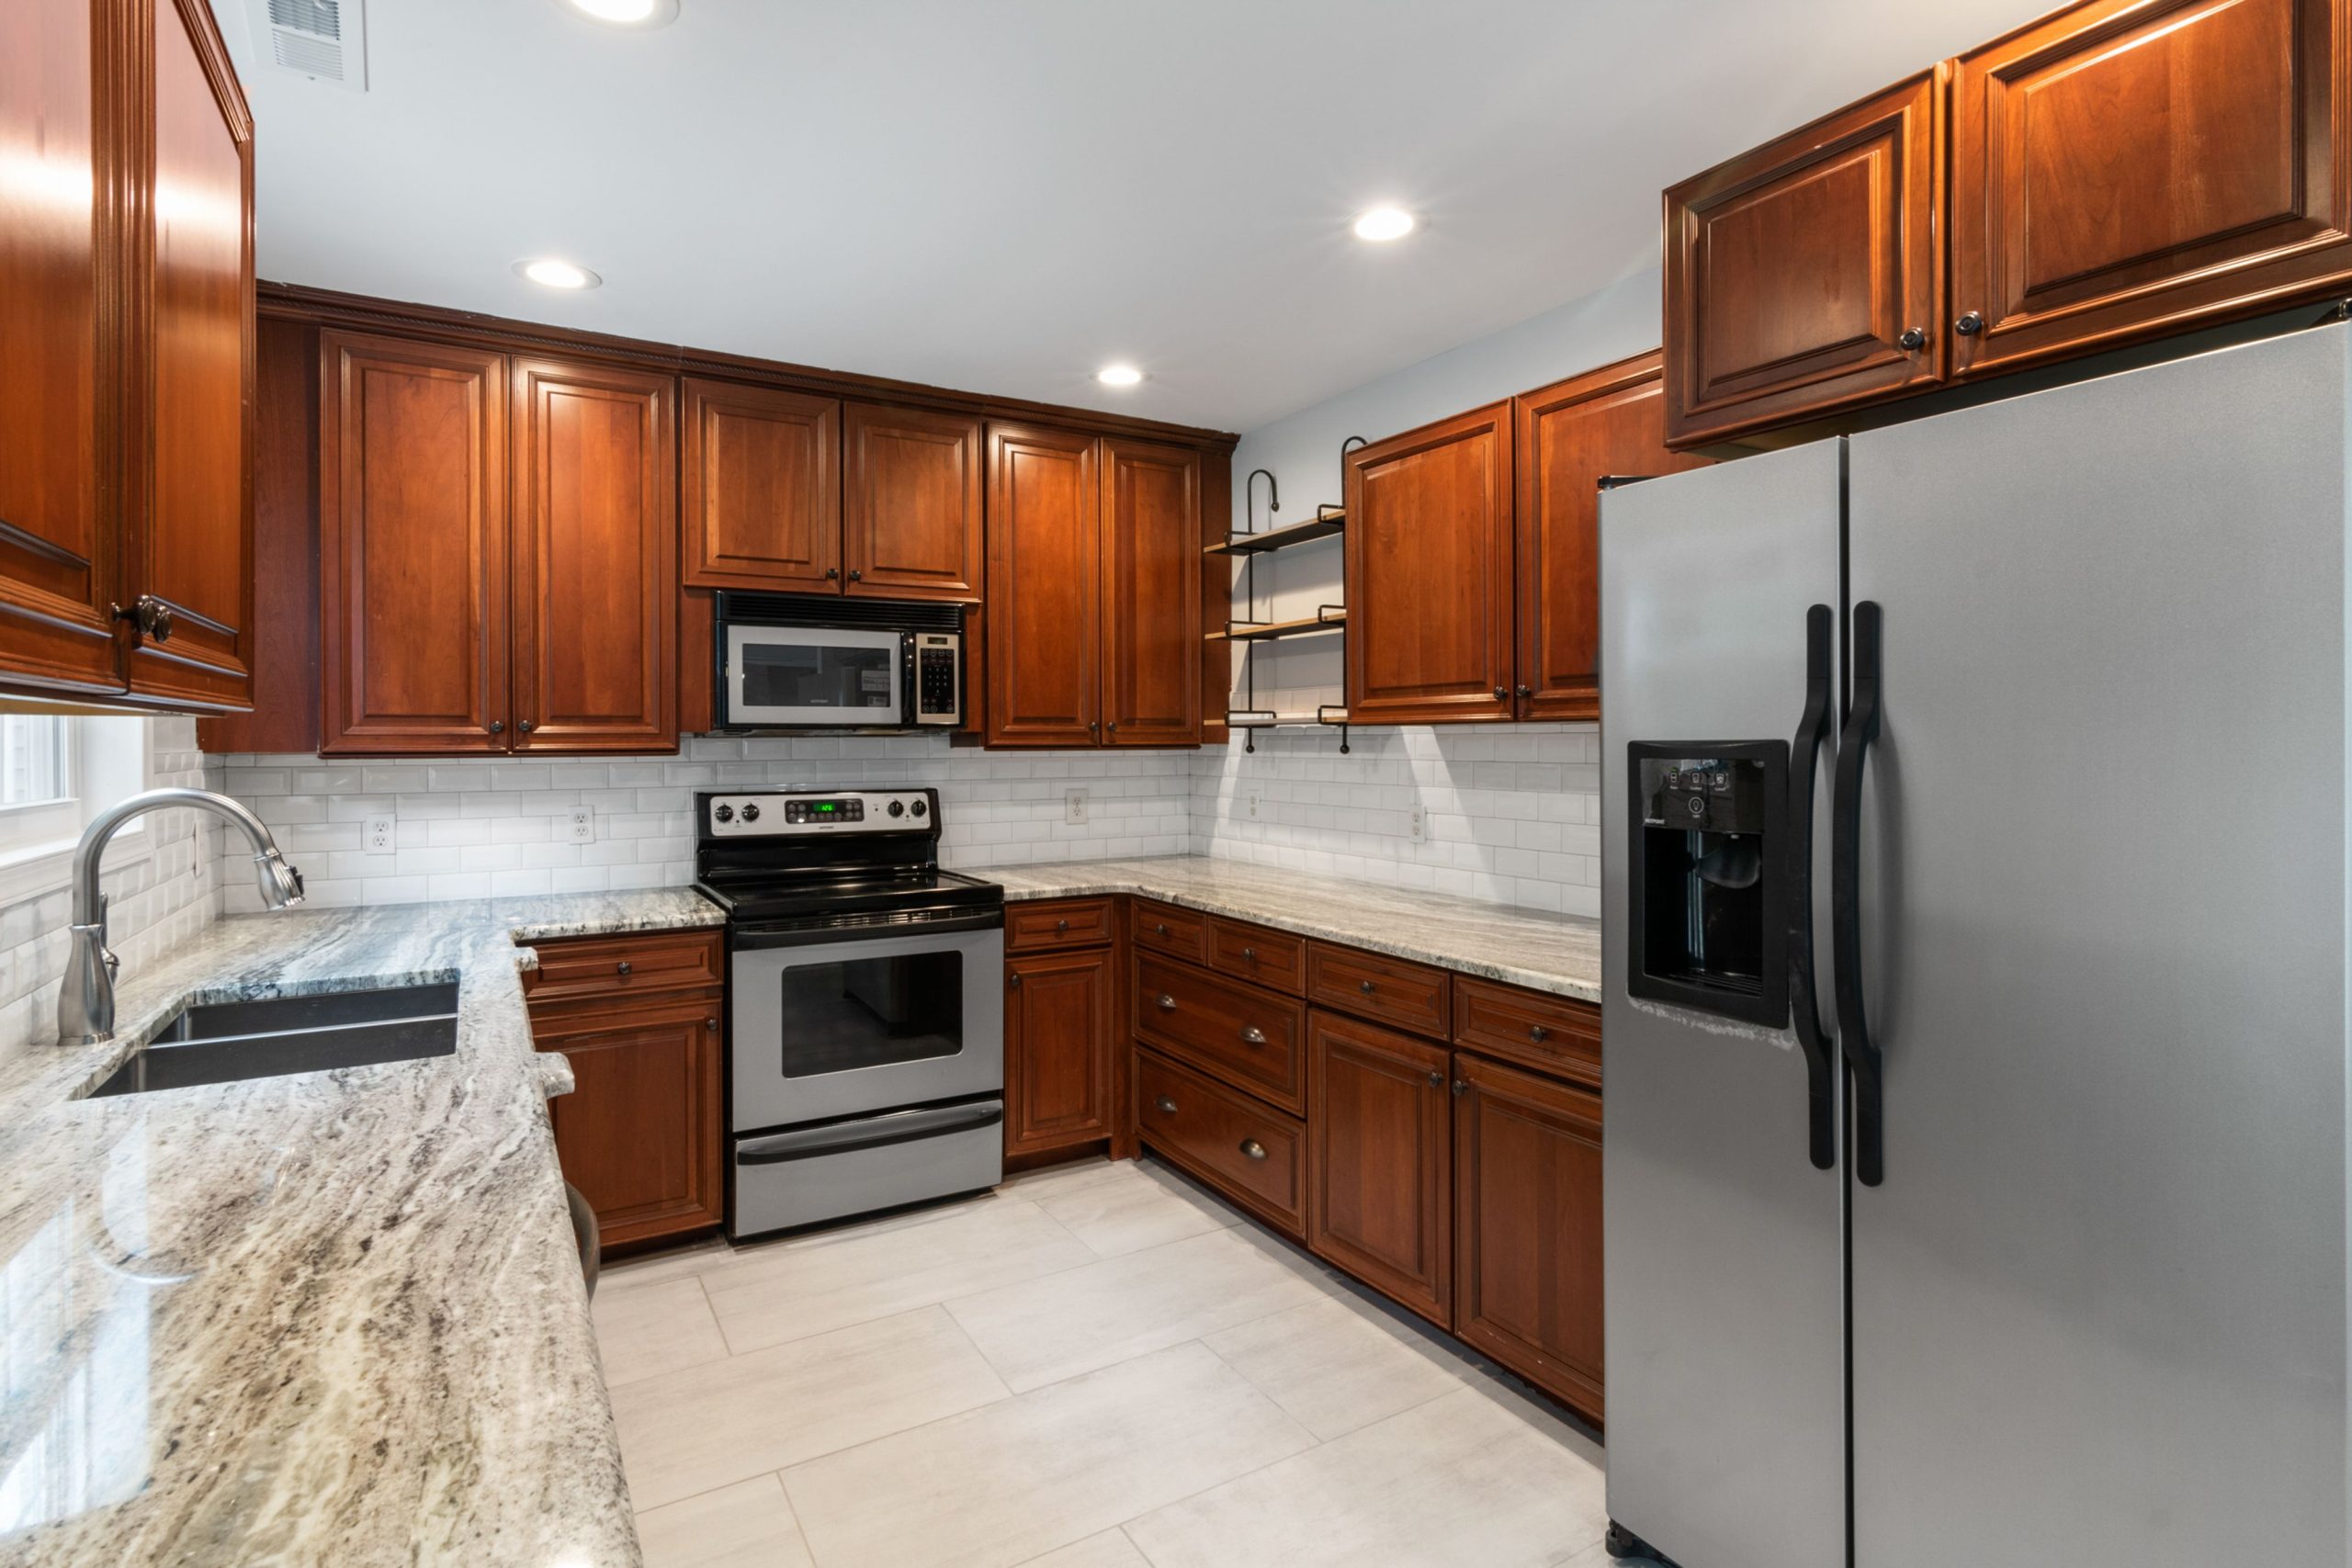
📐 Style Math
When you have a beautiful, veined granite countertop like this one, you have a choice for your backsplash: continue the granite up the wall for a seamless, dramatic look, or switch to a simpler material like subway tile. Continuing the granite is a high-end, custom look but comes with a significantly higher price tag and can feel very bold. Using a simple, inexpensive white subway tile, as shown here, is a more budget-friendly choice that allows the countertop to be the star without competition. It creates a brighter, more casual feel.
21. Honey Oak with Integrated Black Appliances and Fruit Tiles
Beyond the decorative tiles, the one thing that truly anchors this kitchen in a specific, traditional aesthetic is the set of integrated black appliances. Building the oven and microwave directly into the honey oak cabinetry creates a custom, built-in look that was very popular. The black finish provides a strong contrast to the wood and was often chosen to match the cooktop. This commitment to a fully integrated, matching set of appliances is a hallmark of a more formal, planned-out kitchen design from this era, differentiating it from a more casual kitchen with freestanding stainless steel appliances.
🎯 What Makes It Work
You can get a similar high-contrast, traditional feel without the expense of custom cabinetry and integrated appliances. Start with your existing oak cabinets. Instead of built-ins, look for a modern, black freestanding range and a matching black over-the-range microwave. To get the ‘built-in’ feel for less, you can have a carpenter build a simple MDF cabinet box around a standard black refrigerator to mimic a paneled look, and then paint it to match your wall color. This gives the illusion of custom integration for a fraction of the price.
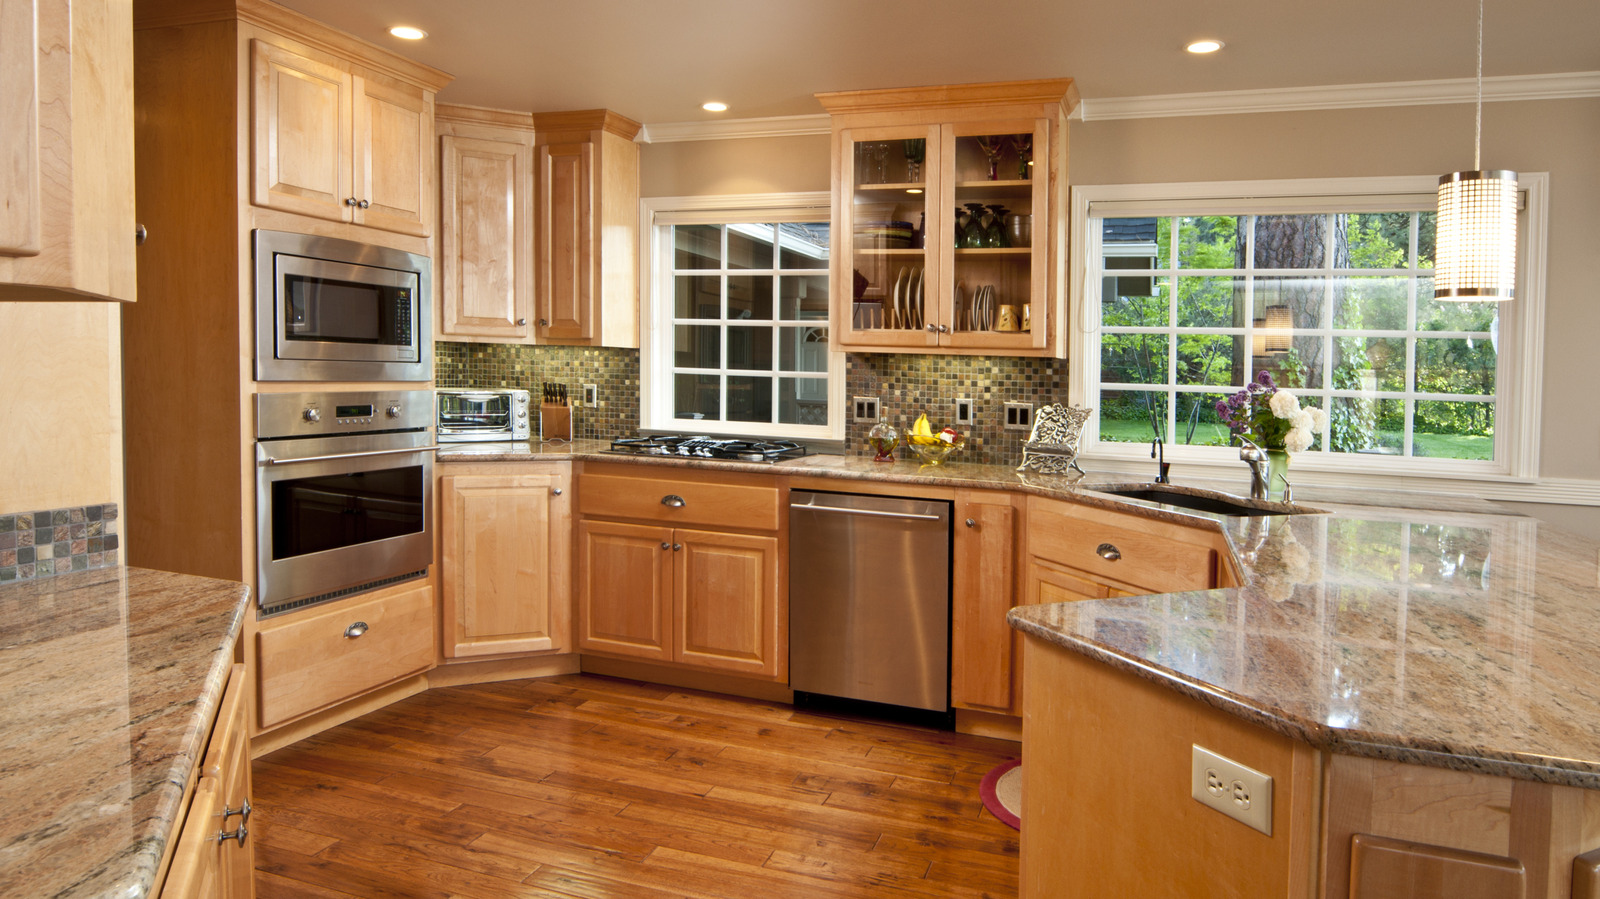
22. Coordinating Honey Oak Cabinets with Light Southwest-Style Floors
Pairing honey oak cabinets with a light-colored floor is a smart strategy to keep the kitchen from feeling too heavy or bottomed-out in one single wood tone. In a Southwest-inspired style, a floor of light-toned saltillo tile, travertine, or even a pale, sandy-colored wood would provide a beautiful, earthy contrast. The light floor reflects light upwards, brightening the space and making the warm, golden tones of the oak cabinets stand out. The key is balance: the warmth of the cabinets is complemented by the airiness of the floor, creating a look that’s both grounded and bright.
23. Modern Honey-Toned Flat-Panel Cabinets
The return of the flat-panel wood cabinet is a direct response to the minimalist and mid-century modern revivals. After a decade dominated by white Shaker doors, designers and homeowners are seeking warmth and texture without fussy details. These honey-toned slab fronts are perfect for that. They showcase the natural beauty and grain of the wood, creating a look that’s clean and unfussy but not sterile. It’s a sophisticated, architectural choice that pairs beautifully with simple hardware and high-quality countertop materials, feeling both organic and modern at the same time.
⚠️ Real Talk
Here’s a dose of reality about flat-panel cabinets: they show everything. Without any bevels or details to hide them, fingerprints, smudges, and water drips are much more noticeable, especially on a medium-toned wood with a satin finish. If you have young children or are simply not a fan of constant wipe-downs, you might want to consider a cabinet with a bit more detail or a finish that’s more forgiving. Also, be mindful of hardware choice. While going handle-free looks sleek, it means you’ll be touching the cabinet face itself every time you open it, increasing the cleaning workload.
24. Warm Wood Kitchen with Stainless Steel and a Mosaic Backsplash
Mosaic tile backsplashes, especially those with multiple colors and materials, can look very different in the store versus in your home. Never, ever buy a mosaic tile based on a single small sample board. You must buy one full sheet (usually a 12×12 square) and bring it home. Tape it to the wall in your kitchen and look at it at different times of day: in the bright morning light, in the afternoon, and at night with your kitchen lights on. The way the light hits the small pieces of glass, stone, or metal can dramatically change the overall color and feel. What looked like a soft olive green in the store might look muddy brown in your home’s lighting.
💸 Get This Look For Less
This is a high-end look with materials to match. The combination of custom cabinetry, granite countertops, and a detailed mosaic tile backsplash puts this firmly in the upper-mid to high budget range.
- Cabinetry (Light Wood): $8,000 – $18,000
- Countertops (Granite): $5,000 – $9,000
- Backsplash (Mosaic Tile): $1,500 – $4,000 (tile and installation)
- Appliances (Stainless Steel, Integrated): $4,000 – $10,000
- TOTAL: $18,500 – $41,000
- Budget alternative: Use a peel-and-stick mosaic tile over a painted wall and opt for laminate countertops with a granite look. Cost: $4,000 – $9,000.
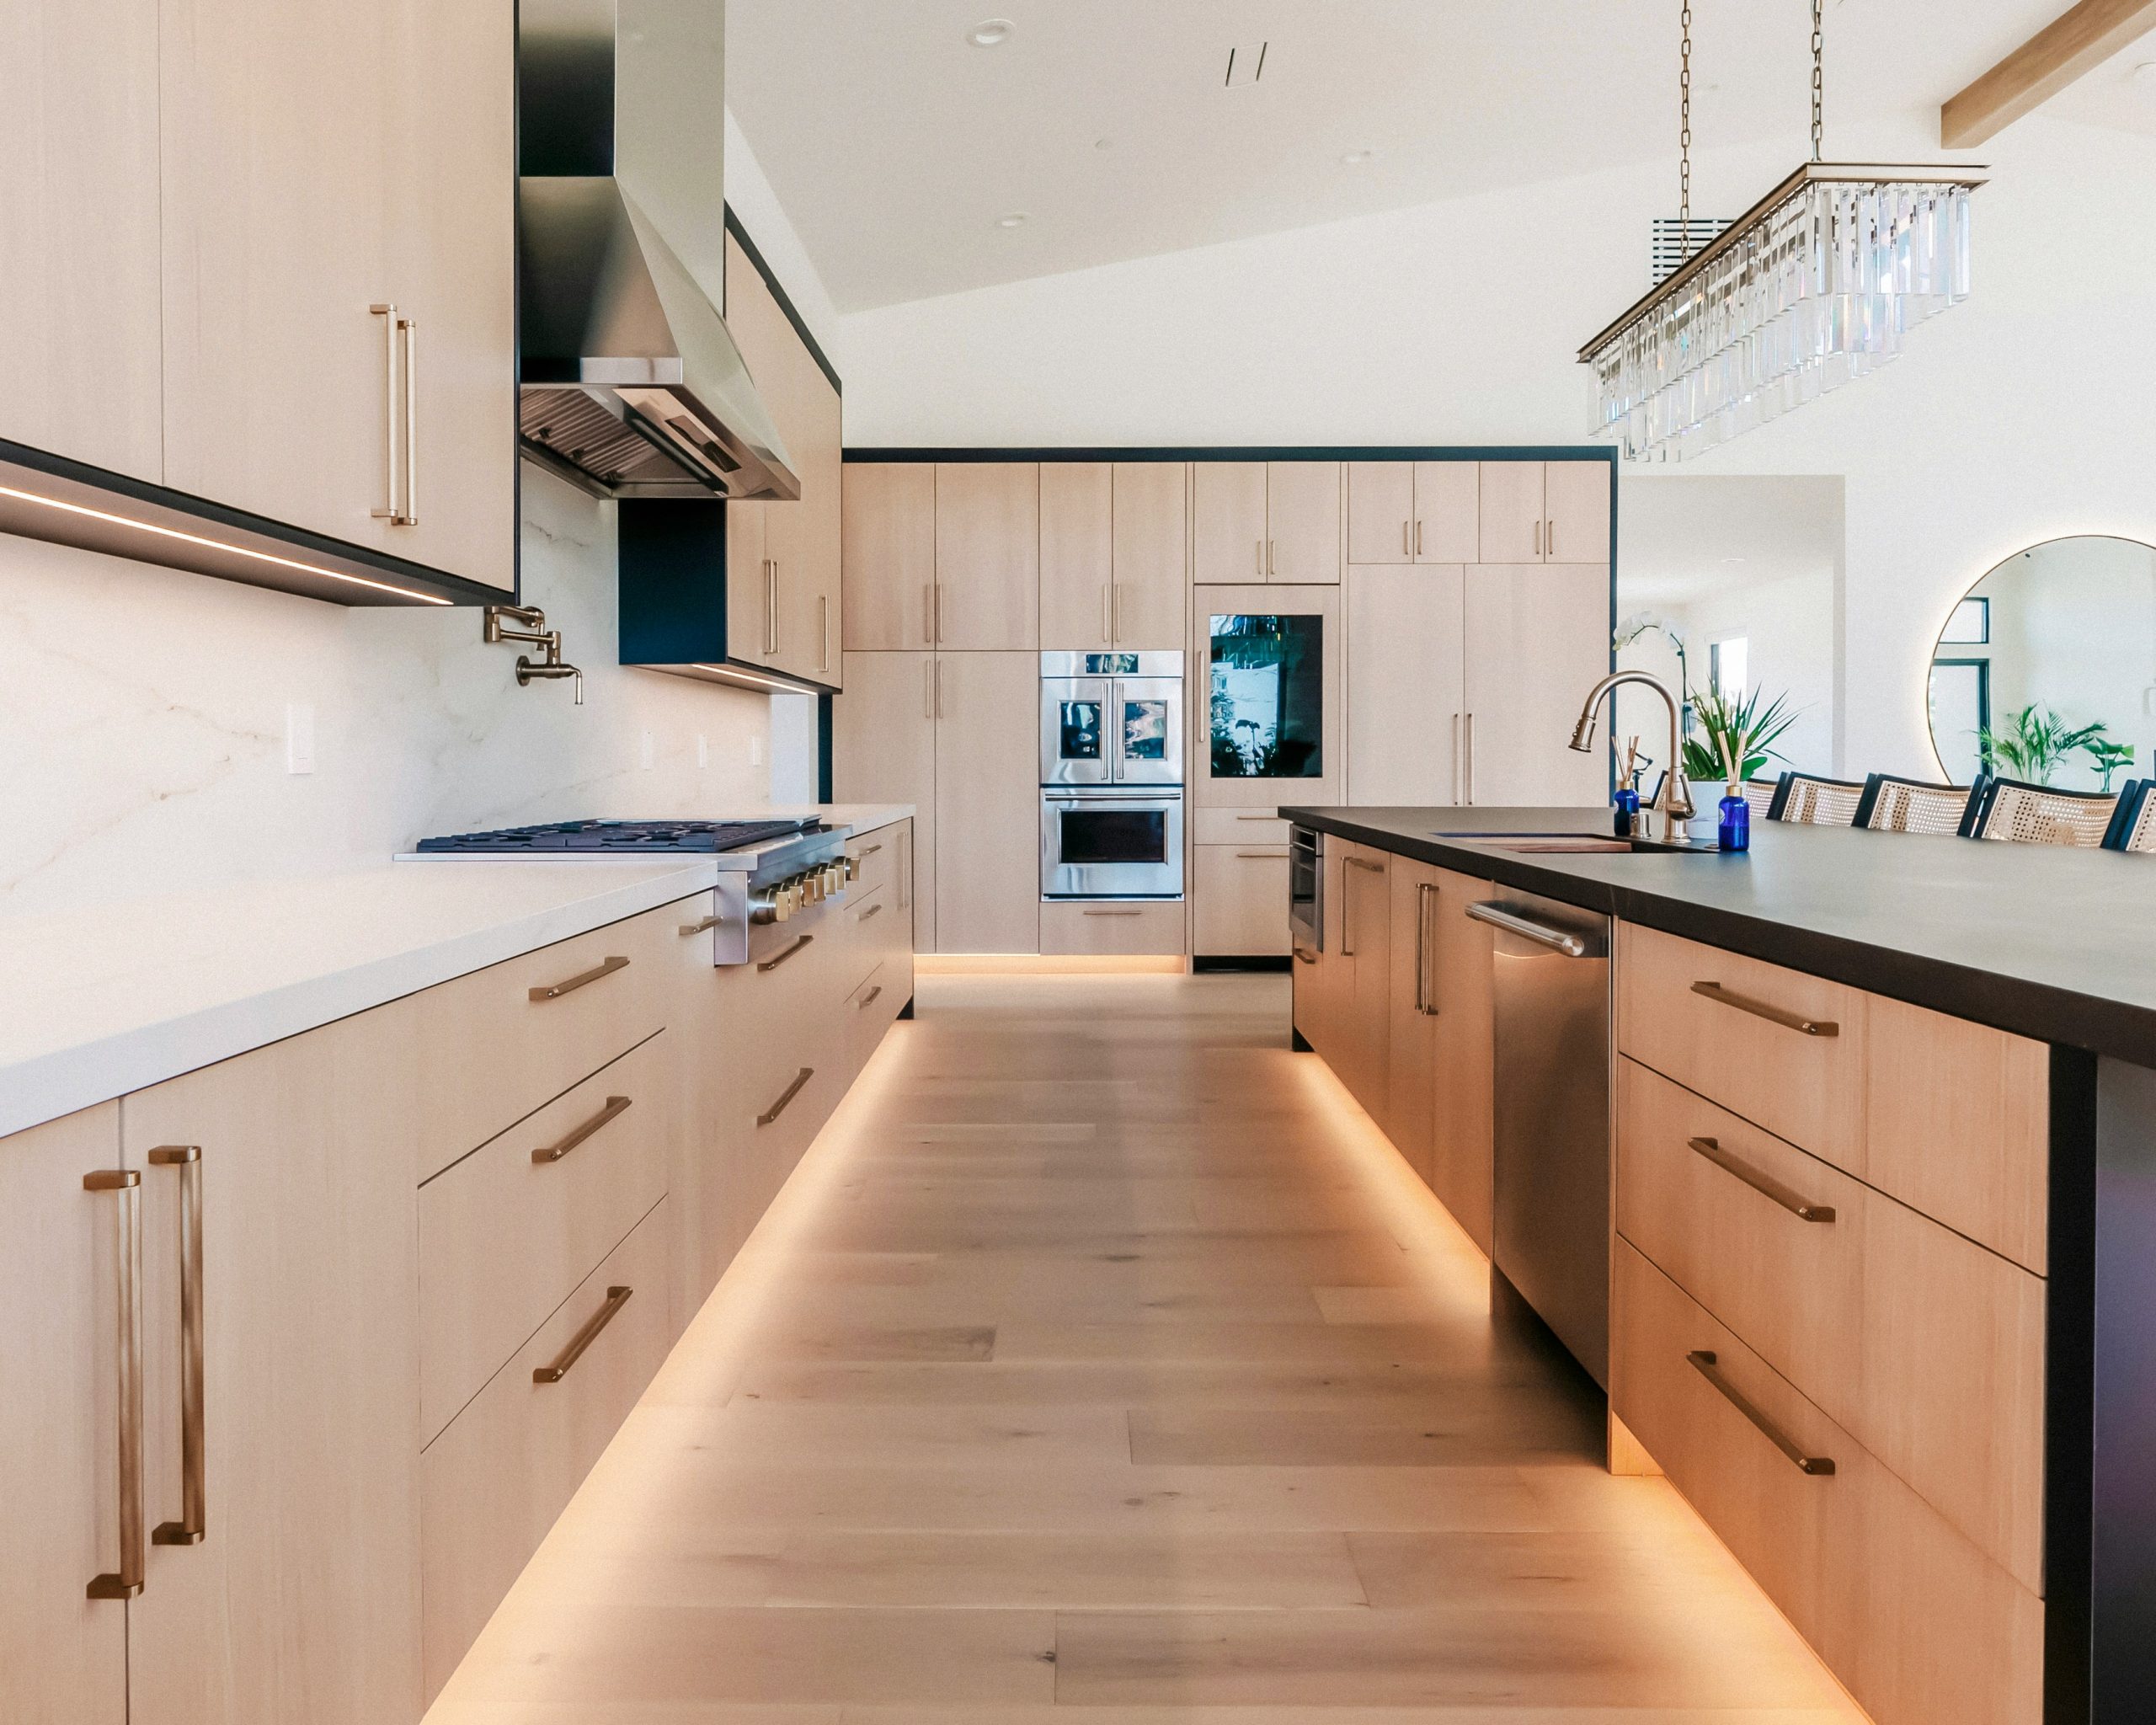
25. Modern Light Wood with Dark Trim and Toe-Kick Lighting
The single thing that takes this kitchen from merely modern to exceptionally cool is the toe-kick lighting. It’s a detail that many people overlook, but it has a massive impact. The warm glow at the floor level makes the cabinets appear to float, creating a sense of lightness and drama. Functionally, it serves as a fantastic night light, allowing for safe passage through the kitchen without turning on harsh overhead lights. Aesthetically, it’s a high-end, custom feature that makes the entire room feel more luxurious and thoughtfully designed. It is, quite literally, a brilliant idea.
⭐ The One Thing
Installing LED strip lighting under your toe-kicks is a surprisingly manageable DIY project. Here’s a quick guide:
- Time & Cost: 2-4 hours, $50-$150.
- Materials: LED light strip kit (with power supply), measuring tape, scissors, cleaning cloth.
- Measure and Cut: Measure the length of your cabinet toe-kicks. Cut the LED strip (only at the designated cut marks) to fit each section.
- Prep the Surface: Thoroughly clean the underside of your cabinet frame where the toe-kick is recessed. The surface must be clean and dry for the adhesive to stick.
- Adhere the Strip: Peel the backing off the LED strip and press it firmly into place, tucking it up and out of sight.
- Connect and Power: Connect the strips to each other using the kit’s connectors and plug the power supply into a nearby outlet (often the one for the dishwasher or fridge).
26. Mixed Finishes: Honey Oak Lowers and Taupe Uppers
The two-tone kitchen trend is a fantastic way to create a custom look, and this kitchen follows the classic formula: 60% Warm Wood Base + 40% Light Neutral Upper. Using the honey oak for the base cabinets and the large island grounds the space with warmth and texture. The light gray/taupe upper cabinets then lighten the mood, preventing the wood from feeling too heavy or dominant. This approach keeps the kitchen feeling airy and bright while still benefiting from the richness of the oak. The marble countertop acts as a perfect bridge, containing both the warm browns and cool grays.
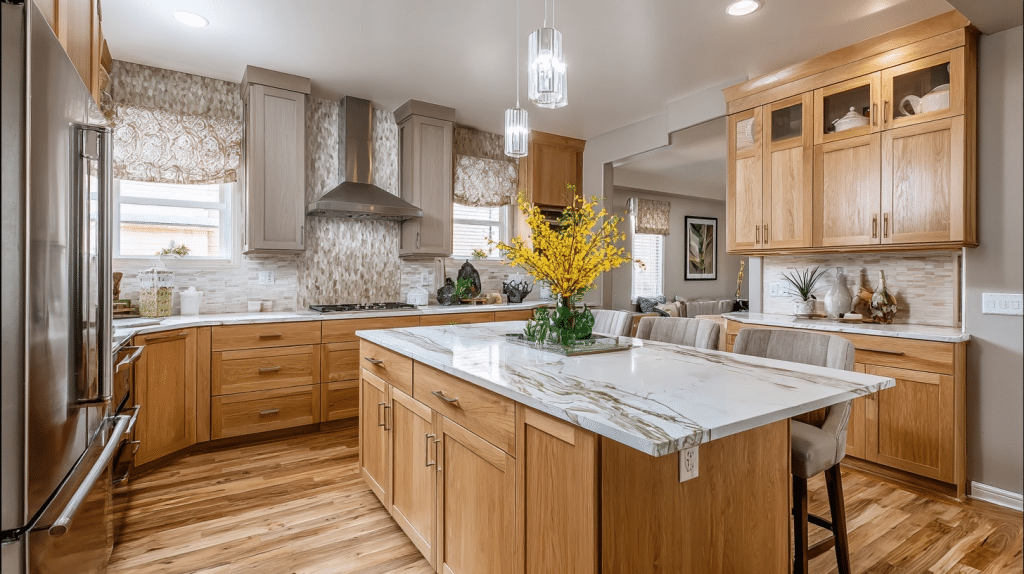
💰 Budget Breakdown
Using a lighter color for the upper cabinets is a classic designer trick to make a kitchen feel larger and the ceilings seem higher. This technique is especially effective in kitchens with average or low ceiling heights (8 to 9 feet). The darker base cabinets anchor the room, while the lighter upper cabinets blend into the wall and ceiling, drawing the eye upward and creating an illusion of spaciousness. If you have a smaller kitchen or worry about it feeling closed-in, this two-tone approach is a smarter choice than using honey oak for all your cabinets. Compare this to the full-wood effect in Idea #9.
27. Traditional Cherry Cabinetry with Antique Brass Hardware
The choice of antique brass for the hardware is what makes this traditional kitchen feel so cohesive and warm. The deep, warm tones of the cherry wood are perfectly complemented by the soft, aged glow of the brass. A cooler metal, like chrome or stainless steel, would create a jarring contrast and feel too modern for the cabinet style. The brass, on the other hand, feels like it belongs. It reinforces the classic, established character of the room and enhances the richness of the wood, proving that hardware should never be an afterthought—it’s the jewelry of the kitchen.
✅ Before You Start
Brass hardware comes in two main types, and the maintenance is very different. Lacquered brass has a clear protective coating that prevents it from tarnishing; you simply clean it with a soft, damp cloth. Unlacquered brass, however, is a “living finish.” It will darken and develop a unique patina over time as it reacts to the oils in your hands and the environment. Many people love this evolving, aged look. If you prefer to keep it shiny, you will need to polish it periodically with a specialized brass cleaner. Be sure you know which type you are buying.
28. Oak Cabinets with Black Granite and Light Wood Floors
This high-contrast, classic look is very achievable on a budget. Instead of black granite, which can cost $60-$100+ per square foot, opt for a high-quality laminate countertop in a matte black or soapstone finish. Modern laminates are incredibly durable and can look remarkably like real stone for a fraction of the price (around $20-$40 per square foot). For the flooring, luxury vinyl plank (LVP) offers the look of light wood with the benefits of being waterproof and highly scratch-resistant, making it a perfect, affordable choice for a kitchen. You can achieve this entire aesthetic for 40-60% less than using natural materials.
🔧 How-To Brief
Pairing wood cabinets with wood floors can be tricky. If the tones are too similar, the kitchen can look like a monotonous wooden box. The key is to create either clear contrast or perfect harmony. For contrast, if your cabinets are a medium-toned honey oak, choose a floor that is significantly lighter (like pale maple or birch) or significantly darker (like walnut). For harmony, ensure the undertones match. If your oak has golden/yellow undertones, your floor should too. Avoid pairing yellow-toned oak with a pink or red-toned cherry floor, as the undertones will clash and look ‘off’.
29. Honey Oak with a Light Blue Backsplash and Brass Accents
The formula for this cheerful kitchen is a designer favorite: Warm Wood + Cool Complementary Color + Metallic Accent. The honey oak cabinets provide the warm, inviting foundation. The light blue subway tile serves as the perfect cool counterpart, hitting a complementary note on the color wheel that is inherently pleasing to the eye. The final layer is the brushed brass hardware, which echoes the warmth of the cabinets and adds a touch of understated luxury. It’s a three-part harmony that feels balanced, intentional, and full of personality. Compare this to the similar warm/cool combo using green in Idea #8.
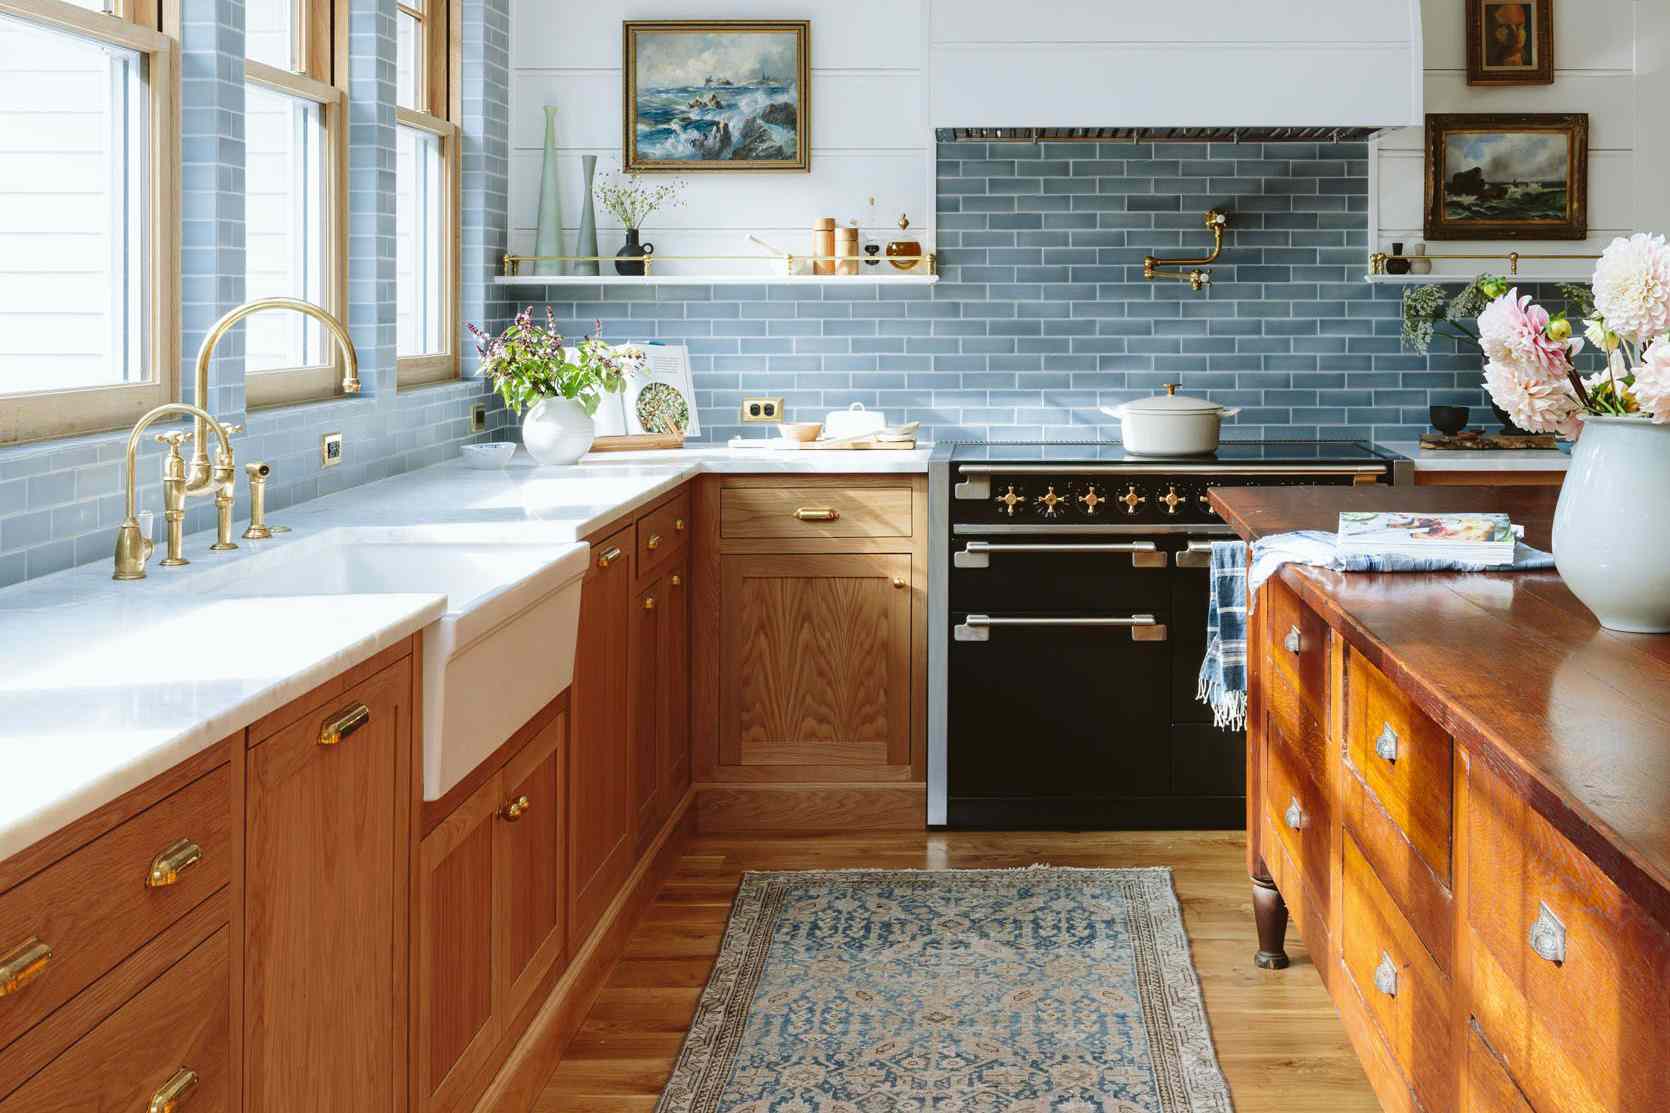
💡 Designer Tip
Color theory is the secret behind this kitchen’s success. Orange and blue are complementary colors, meaning they sit opposite each other on the color wheel. The yellowish-orange tones in the honey oak are being paired with the light blue of the backsplash. This creates a natural, vibrant tension. The contrast makes both colors appear cleaner and more vivid. The blue stops the oak from looking too yellow, and the oak stops the blue from feeling too cold. It’s a dynamic and timeless pairing that stimulates the eye in a pleasing way.
30. Modern Galley Kitchen with Blonde Wood and Marble
A galley layout is the ultimate space-saver, perfect for narrow rooms, apartments, and condos. For maximum efficiency, the corridor between the two parallel runs of cabinets should be between 4 and 6 feet wide. Less than 4 feet, and you won’t have enough space to comfortably open appliance doors or have two people pass each other. More than 6 feet, and you start losing the efficiency of the classic kitchen work triangle, as you’ll have to take too many steps between the sink, refrigerator, and stove. This kitchen gets it just right, creating a functional and ergonomic workspace.
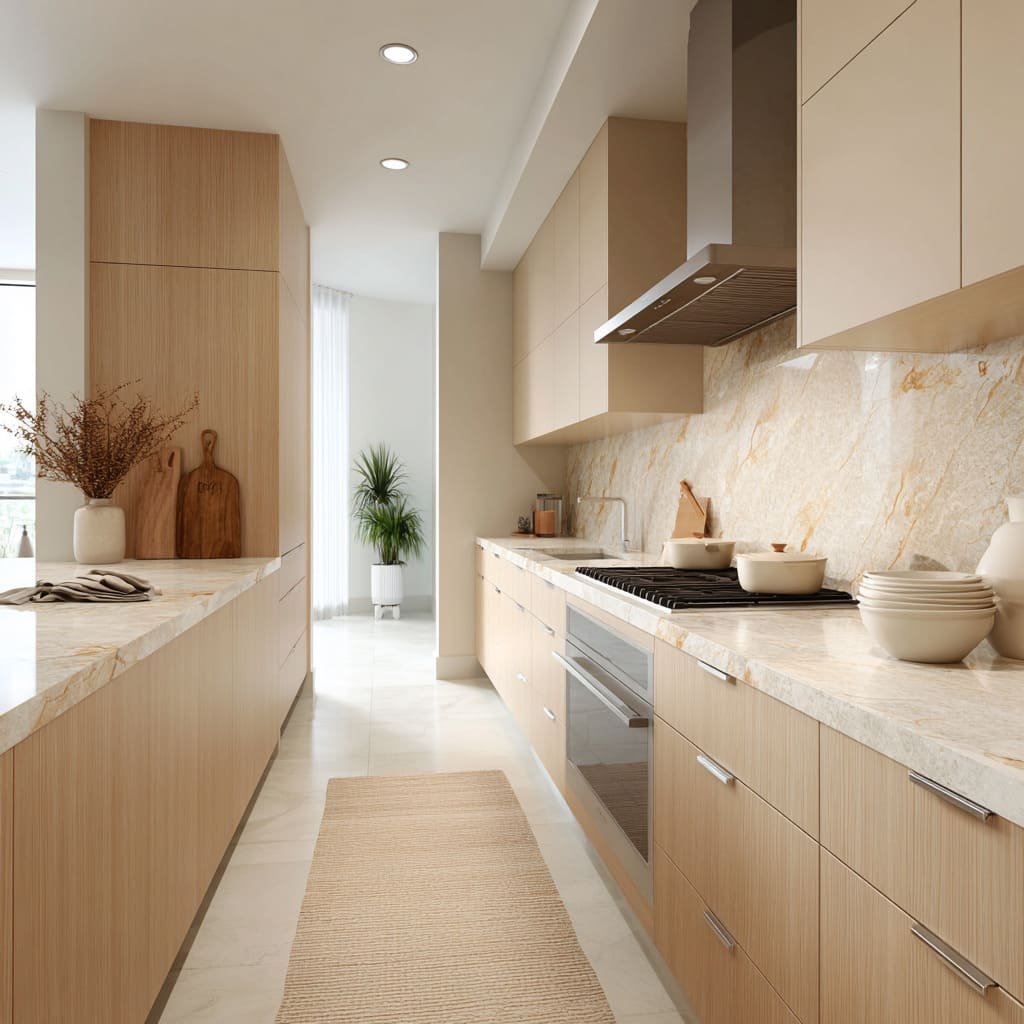
🧹 Maintenance Reality
This kitchen is a perfect example of the ‘Quiet Luxury’ or ‘Stealth Wealth’ trend. There are no loud patterns or flashy colors. Instead, the luxury comes from the quality and beauty of the materials themselves. The focus is on the rich veining of the marble, which is used for both the countertop and the full-height backsplash, and the clean, vertical grain of the light blonde wood cabinets. It’s a minimalist aesthetic that communicates high-end design through restraint and a deep appreciation for natural materials. It feels expensive because it’s composed of beautiful things, simply presented.
Your Honey Oak Story Starts Here
See? Honey oak is anything but a design dead-end. With the right countertops, hardware, and styling, it can be the foundation of a warm, timeless, and totally current kitchen. Your perfect space is waiting in one of these ideas. Now, go open up that Pinterest board and start planning with confidence.