You know that feeling when you finally find the storage ideas for small spaces 2026 that looks exactly right for your space? It feels like a lightbulb moment. After filtering through hundreds of options across IKEA, The Container Store, and Target, we narrowed it down to 27 ideas that actually deliver. We’re talking real homes, real solutions, and designs that work for every budget. In this curated guide, you’ll find 27 clever ideas covering everything from modern minimalism to cozy and rustic styles. The big takeaway for 2026 is integration—making storage a beautiful, seamless part of your home, not an awkward afterthought. And stay until the end — we break down the most common mistakes that can ruin these looks. 📌 Save this to Pinterest for later — you’ll want to revisit these ideas.
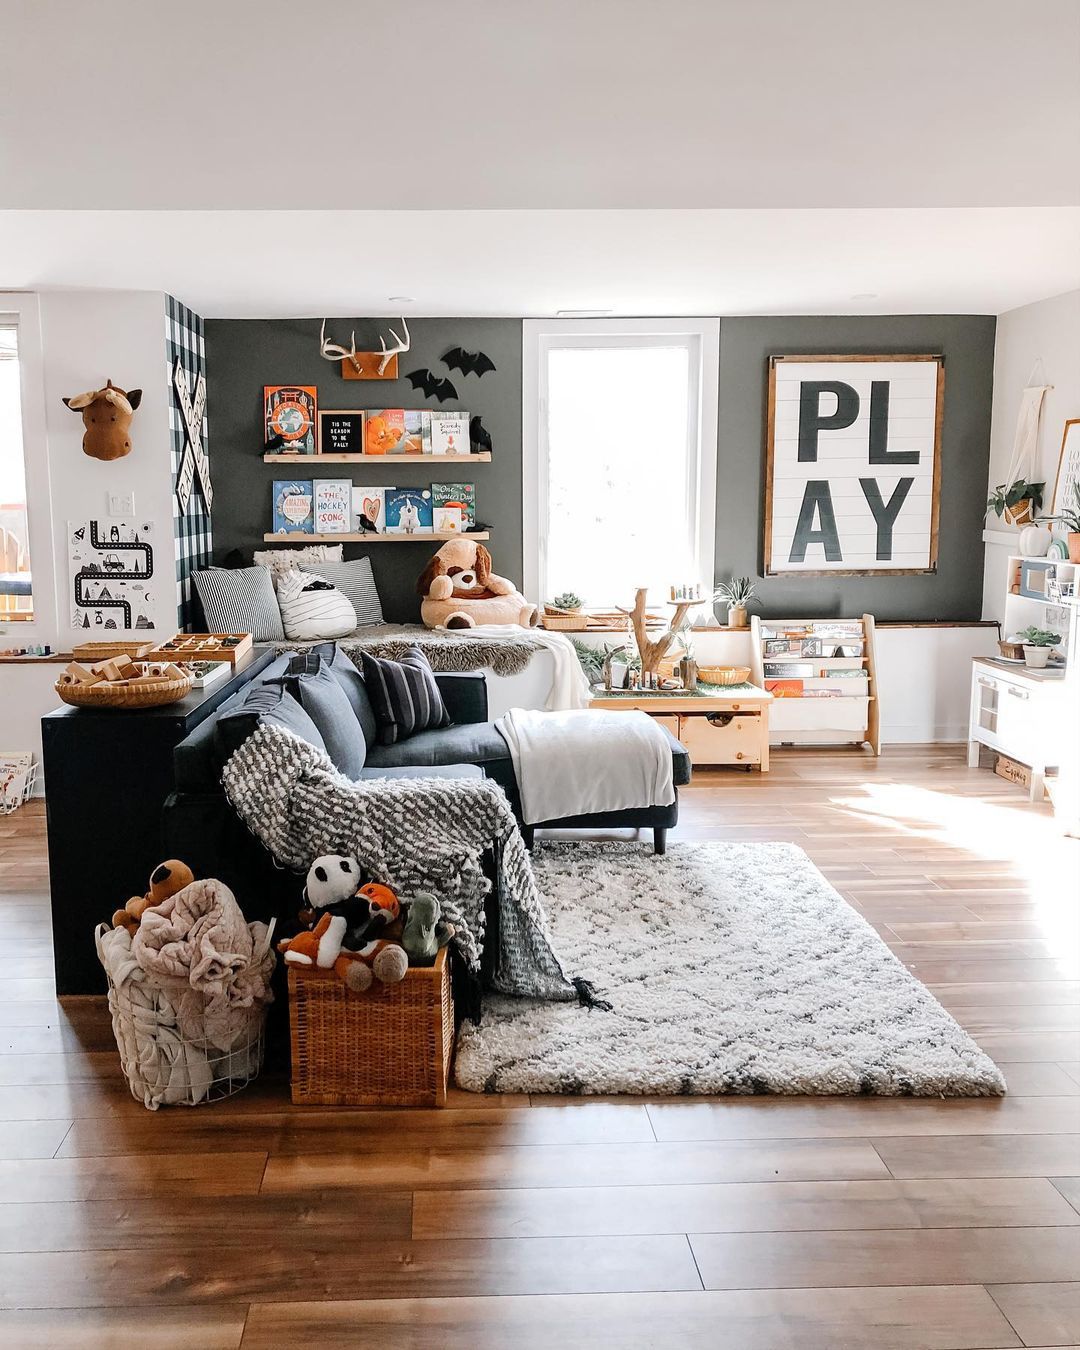
1. Combine Play and Practicality with Wall-Mounted Bookshelves
The high-contrast color scheme is what makes this work. The dark gray accent wall makes the light wood shelves and the colorful book covers pop, turning everyday storage into a dynamic focal point. Without that bold backdrop, the shelves would just be shelves. Here, they become a piece of art that’s also incredibly functional. It proves that you don’t need to shy away from deep colors in a small room, especially when you use them to highlight something you want to show off.
💰 Budget Breakdown
Recreating this cozy and playful corner has a surprisingly manageable price tag. The key is in mixing affordable basics with a few standout pieces. You can find similar items at a range of price points to fit what you’re willing to spend.
- Wall Shelves: $80 – $200
- Baskets (Wire & Wicker): $50 – $120
- Decorative Sign (‘PLAY’): $30 – $70
- Accent Paint: $40 – $80
- TOTAL: $200 – $470
- Budget alternative: Get the look for about 40-50% less by using IKEA LACK shelves and thrifting your baskets.
2. Integrate Shoe Storage with a Stone Accent Wall
This design succeeds because it blends texture and function. The rugged, stacked grey stone wall adds a natural, tactile element that prevents the white cubby system from feeling sterile. The concealed lighting is another key player, washing down the stone to highlight its texture and create a warm, welcoming glow. It’s a masterful use of architectural detail to elevate a simple storage unit into a custom feature.

💡 Designer Tip
When using accent materials like stacked stone or wood paneling, always consider lighting. A simple LED strip hidden in a soffit or along the top edge of a shelf, like the one here, can transform the feature. Aim for a warm light (2700K-3000K) to bring out the material’s texture. For a 4-foot wide accent wall, you’ll need about 4 feet of LED strip lighting, which costs around $30-$50 and is a straightforward DIY installation for many.
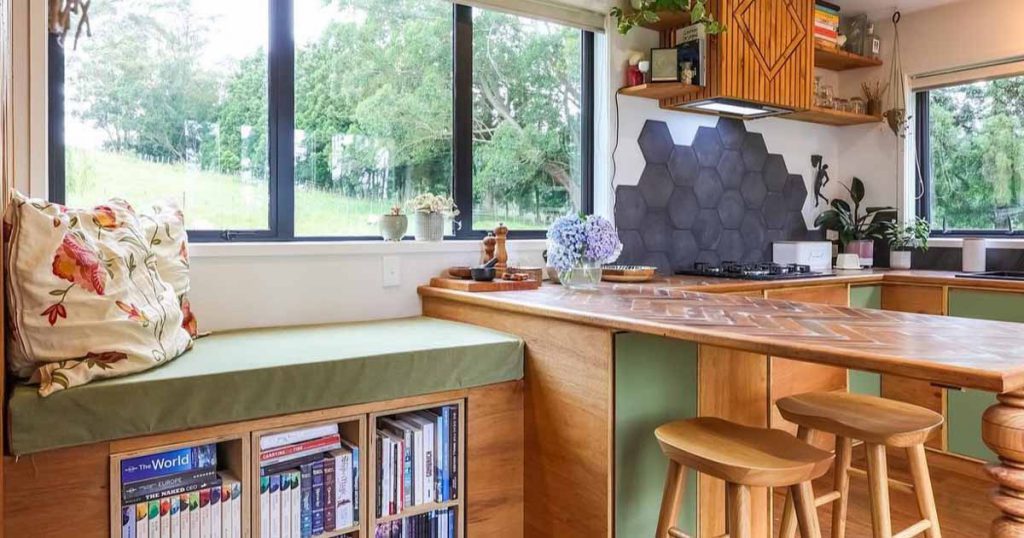
3. Double-Duty Design: A Window Bench with Built-in Book Storage
This look is all about seamless integration. The formula is approximately 50% natural wood + 30% neutral base (white walls) + 20% accent color/texture (olive green panels and dark hexagonal tiles). The herringbone wood countertop is the hero, tying the dining bench to the kitchen prep space. You could swap the olive green for a deep navy or terracotta and still maintain the same warm, functional vibe, as long as the wood and white base remains dominant.
⭐ The One Thing
A built-in feature like this is gorgeous, but it’s a commitment. This isn’t a weekend project unless you’re a skilled carpenter. The custom fit required to merge a bench, bookshelf, and kitchen counter is complex. If your floors aren’t perfectly level, it can become a real headache. Be prepared for the cost and time of a professional job to get these seamless results. Also, an open bookshelf right at floor level is a magnet for dust and pet hair.
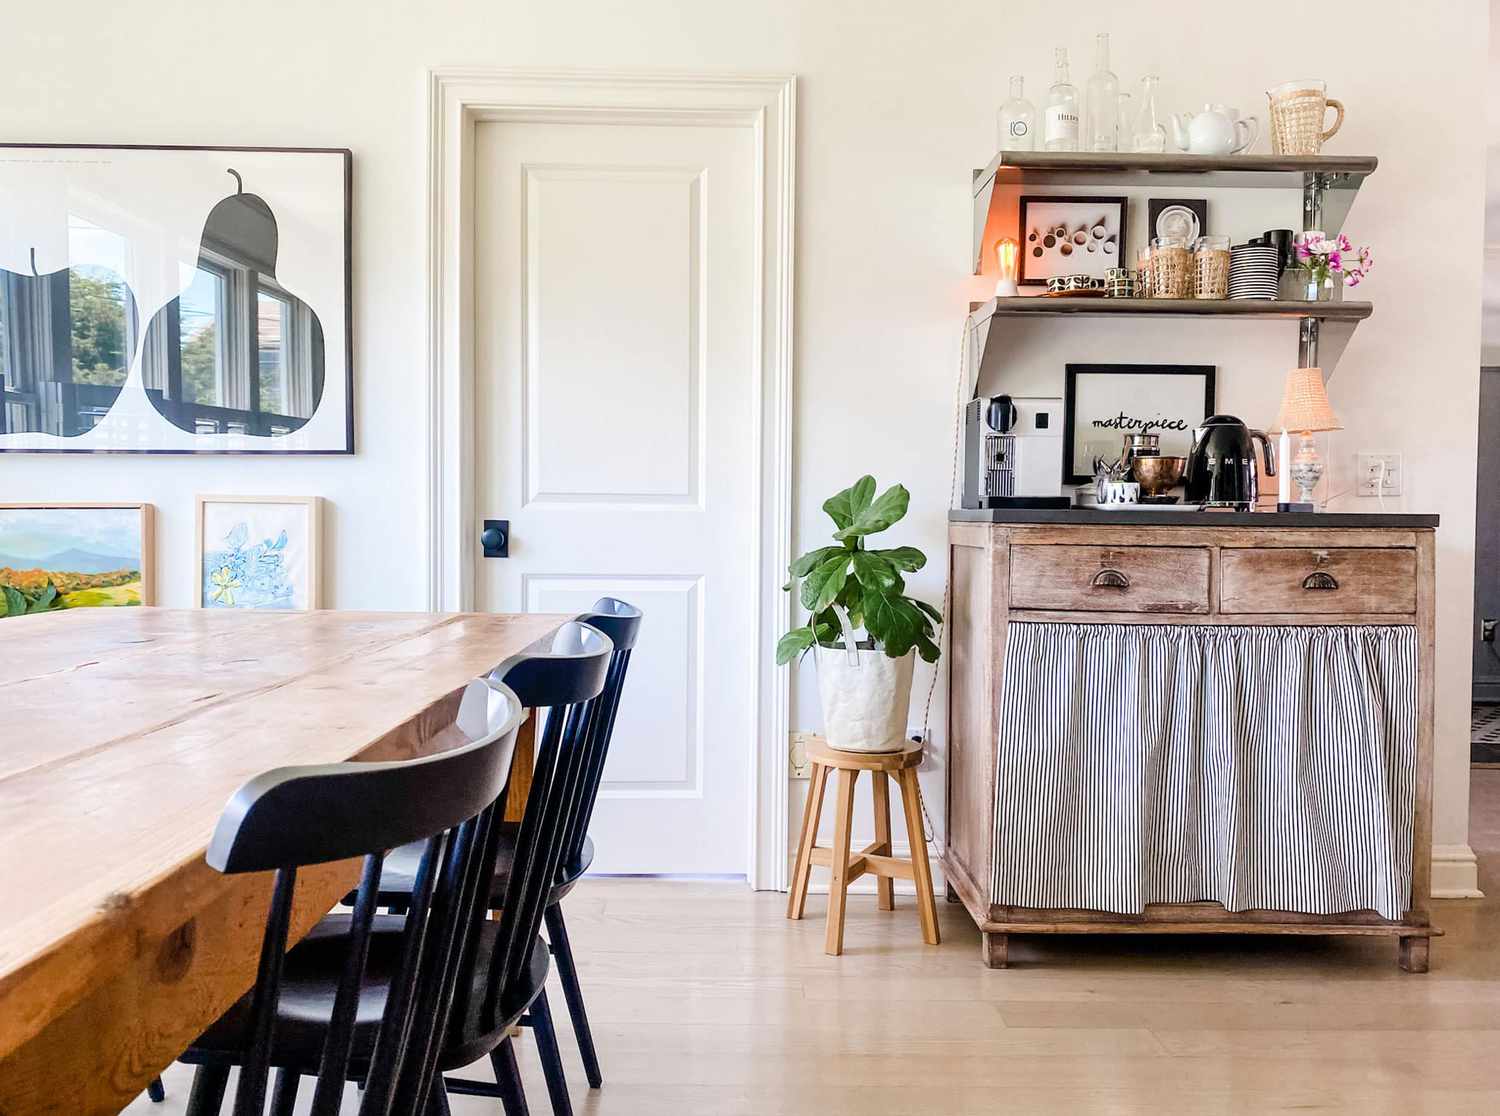
4. Create a Charming Farmhouse Beverage Station
You absolutely do not need to buy a fancy new console to get this rustic coffee bar look. The star of the show is the combination of open shelving and a skirted table. Scour Facebook Marketplace or a thrift store for a small wooden desk or console table for under $50. A simple tension rod and a couple yards of black-and-white striped fabric (around $15 from a craft store) creates the skirt. IKEA’s EKBY JÄRPEN / EKBY VALTER shelves offer a very similar look for about $25 each.
🔧 How-To Brief
Create the fabric skirt for the console table. Time: 1 hour. Cost: $20-$30.
- Measure the height from the bottom of the console’s top to the floor, and the width of the front. Add 2 inches to the height for hems and 1.5x the width for gathering.
- Cut your fabric to these dimensions.
- Sew a simple 1-inch hem along the bottom edge.
- Fold the top edge over by 1 inch and press. Fold it over again by 1.5 inches to create a pocket for the tension rod and sew it down.
- Insert a tension rod (get one from Target or Walmart for ~$10) into the pocket.
- Fit the tension rod snugly under the console top to hang the skirt.
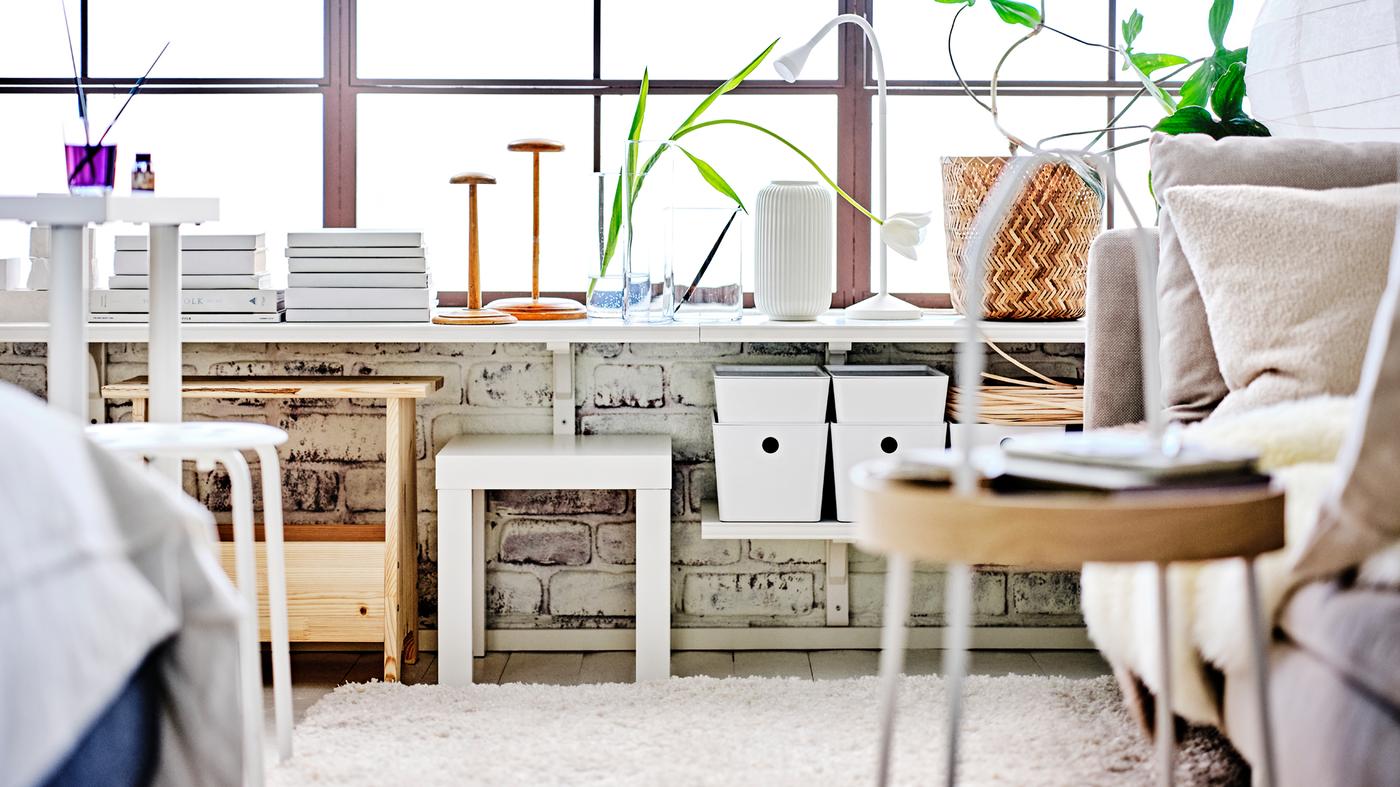
5. A Neutral Small Kitchen with Smart Wall-Mounted Rails
The stainless steel wall-mounted rail system is the anchor of this kitchen’s functionality. It single-handedly gets bulky utensils, spices, and even small pots off the limited counter space. By using the vertical surface between the counter and the upper cabinets, it unlocks a huge amount of storage potential that would otherwise be wasted. It’s a solution that works ten times harder than a simple utensil crock ever could. Compare this with the more decorative ladder shelf in Idea #25.

✅ Before You Start
This setup is perfect for galley kitchens or small apartment kitchens with at least 24-36 inches of countertop space to spare. The rails themselves are low-profile, but you need enough clearance to hang items without them dangling in your prep area or hitting the backsplash. Your ceiling height isn’t a major factor here, but the distance between your countertop and the bottom of your upper cabinets should be at least 18 inches to accommodate most rail systems and hanging accessories.
6. Integrate a Desk into a Bright Kitchen Cabinet Wall
This little corner is successful because it fully commits to its dual purpose. The design cleverly uses color to define the zones: crisp white for the storage cabinets and a cheerful robin’s egg blue for the desk alcove. This visual separation makes the area feel intentional, not just like a desk shoved into a kitchen. The continuity of the white shaker-style cabinetry from the kitchen into this zone makes the whole space feel larger and more cohesive.
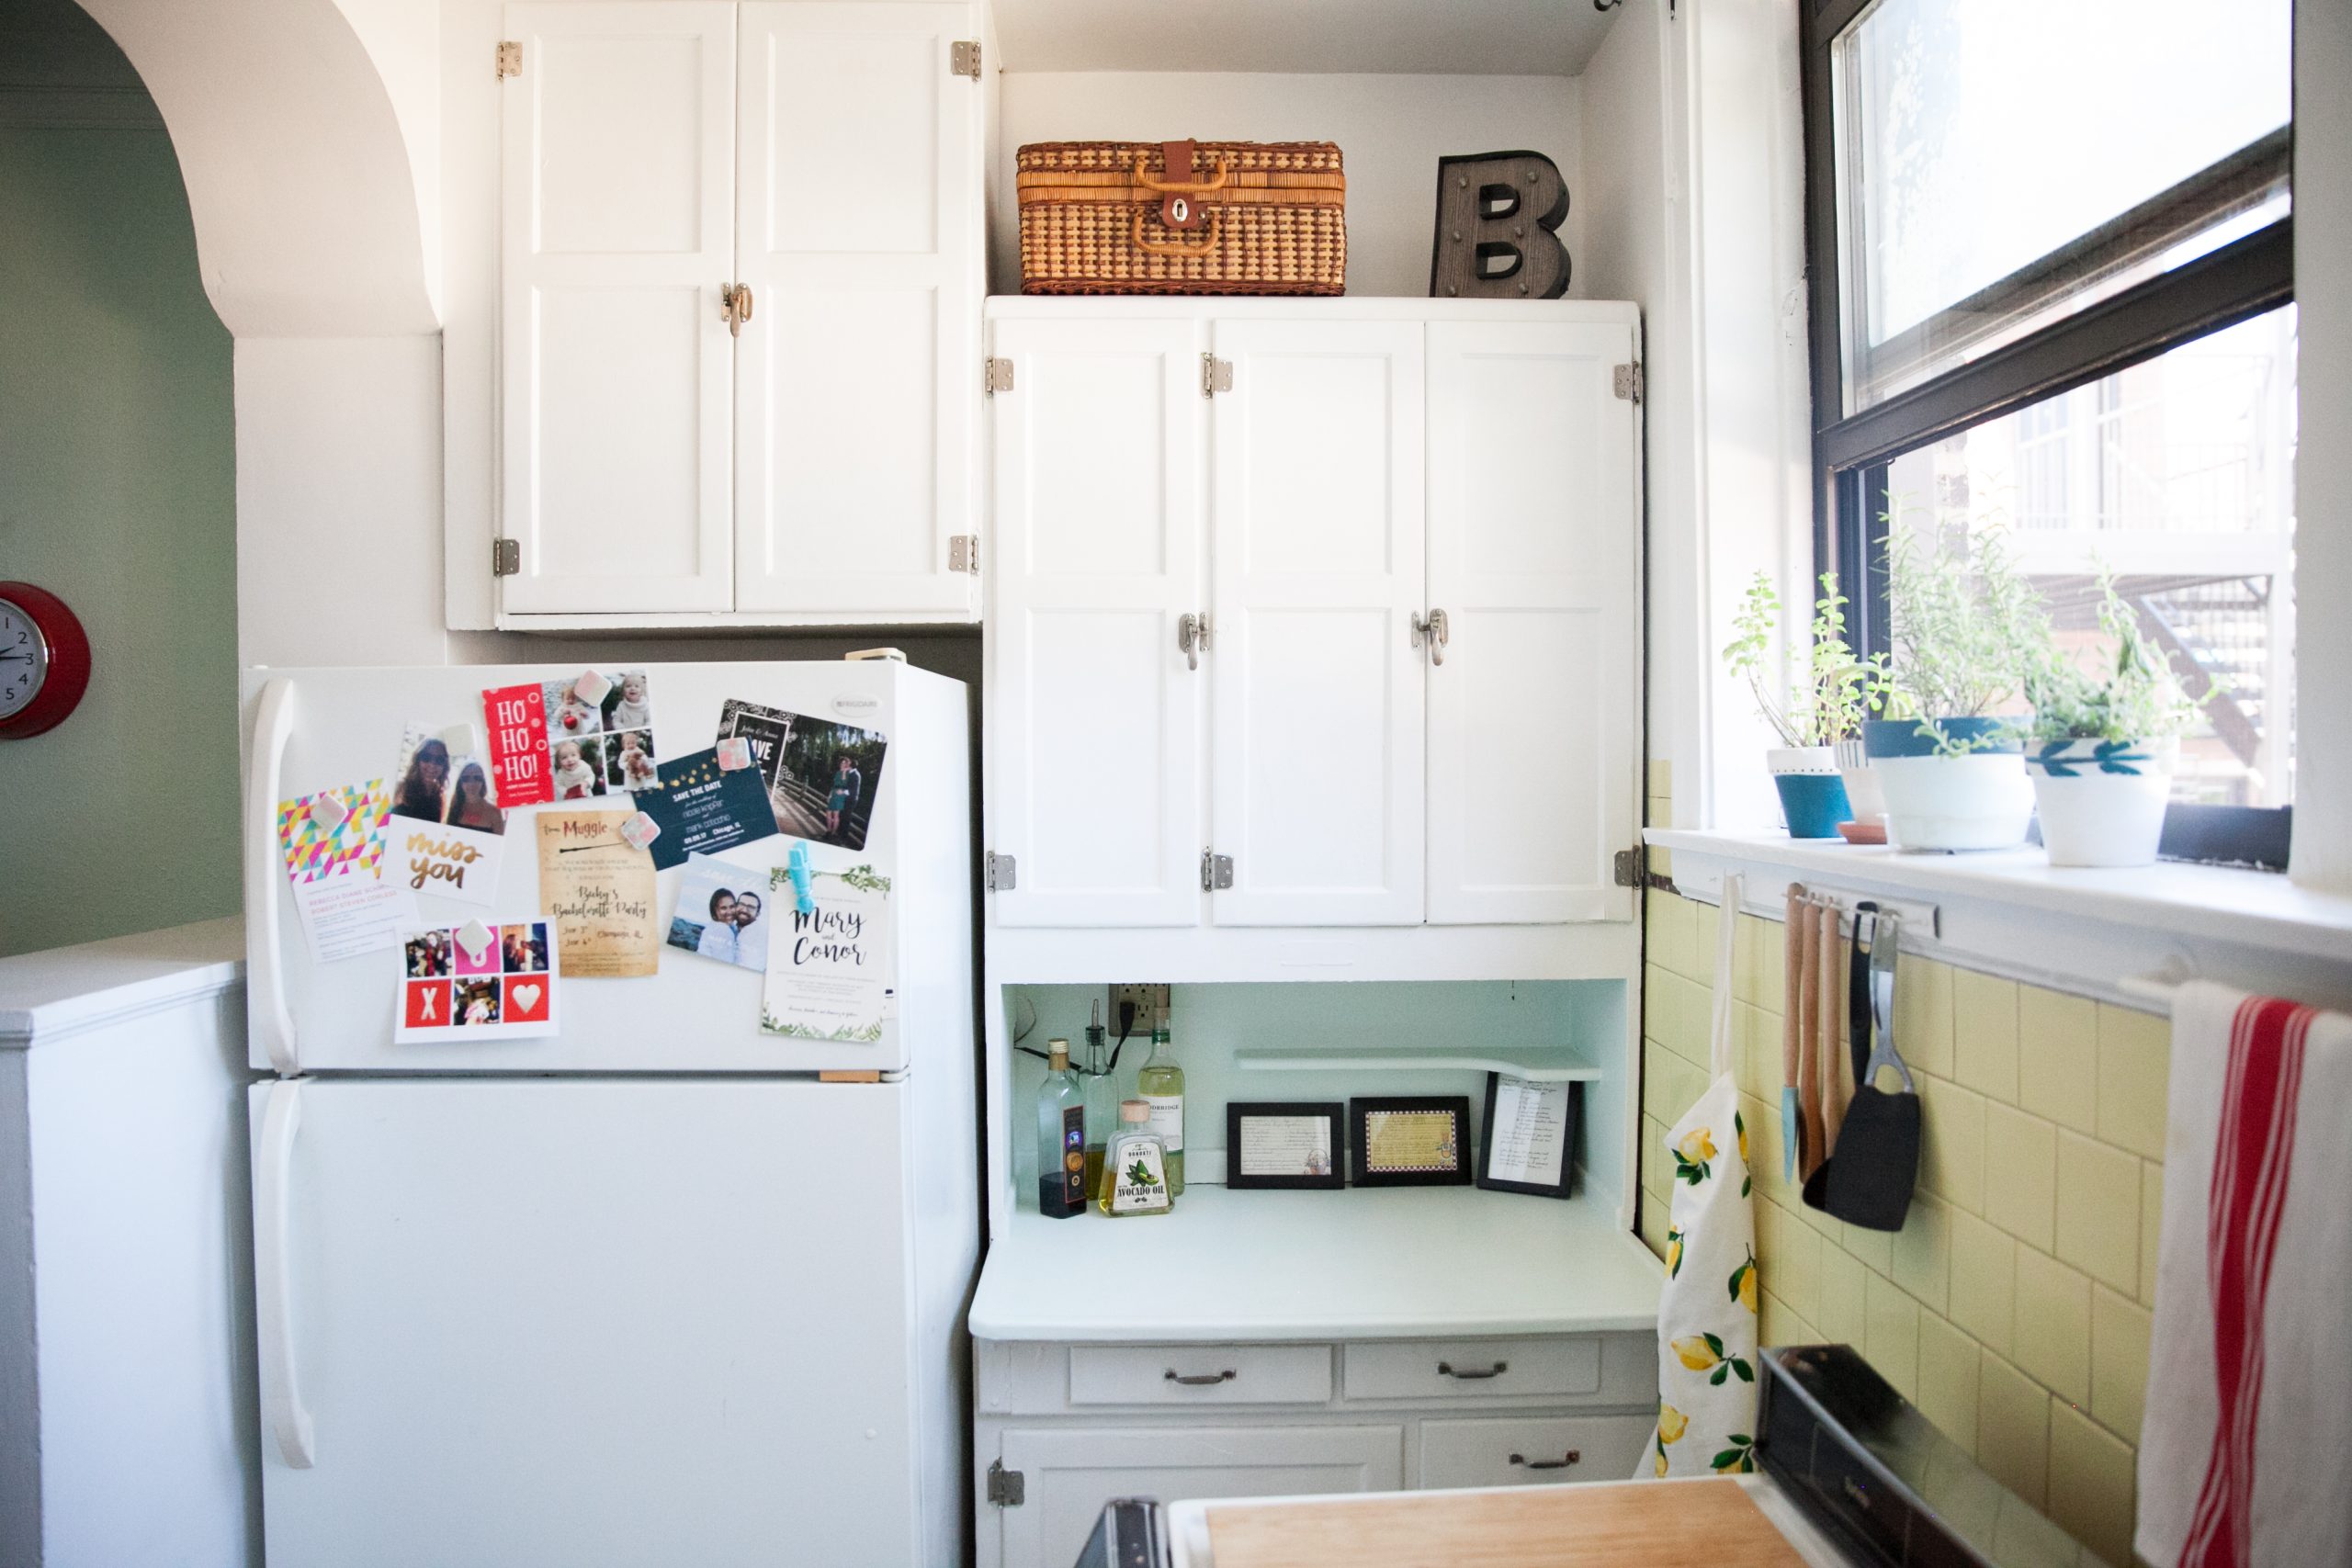
🔥 Trending Context
A desk in the kitchen sounds great for multitasking, but be honest with yourself about how you live. This is a high-traffic, high-splatter zone. If you have papers, a laptop, and other work items spread out, they are at risk from spills, steam, and cooking grease. This setup works best as a family command center for paying bills or checking recipes, rather than a full-time work-from-home office. And that beautiful light-colored grout on the backsplash will require regular cleaning to stay fresh.
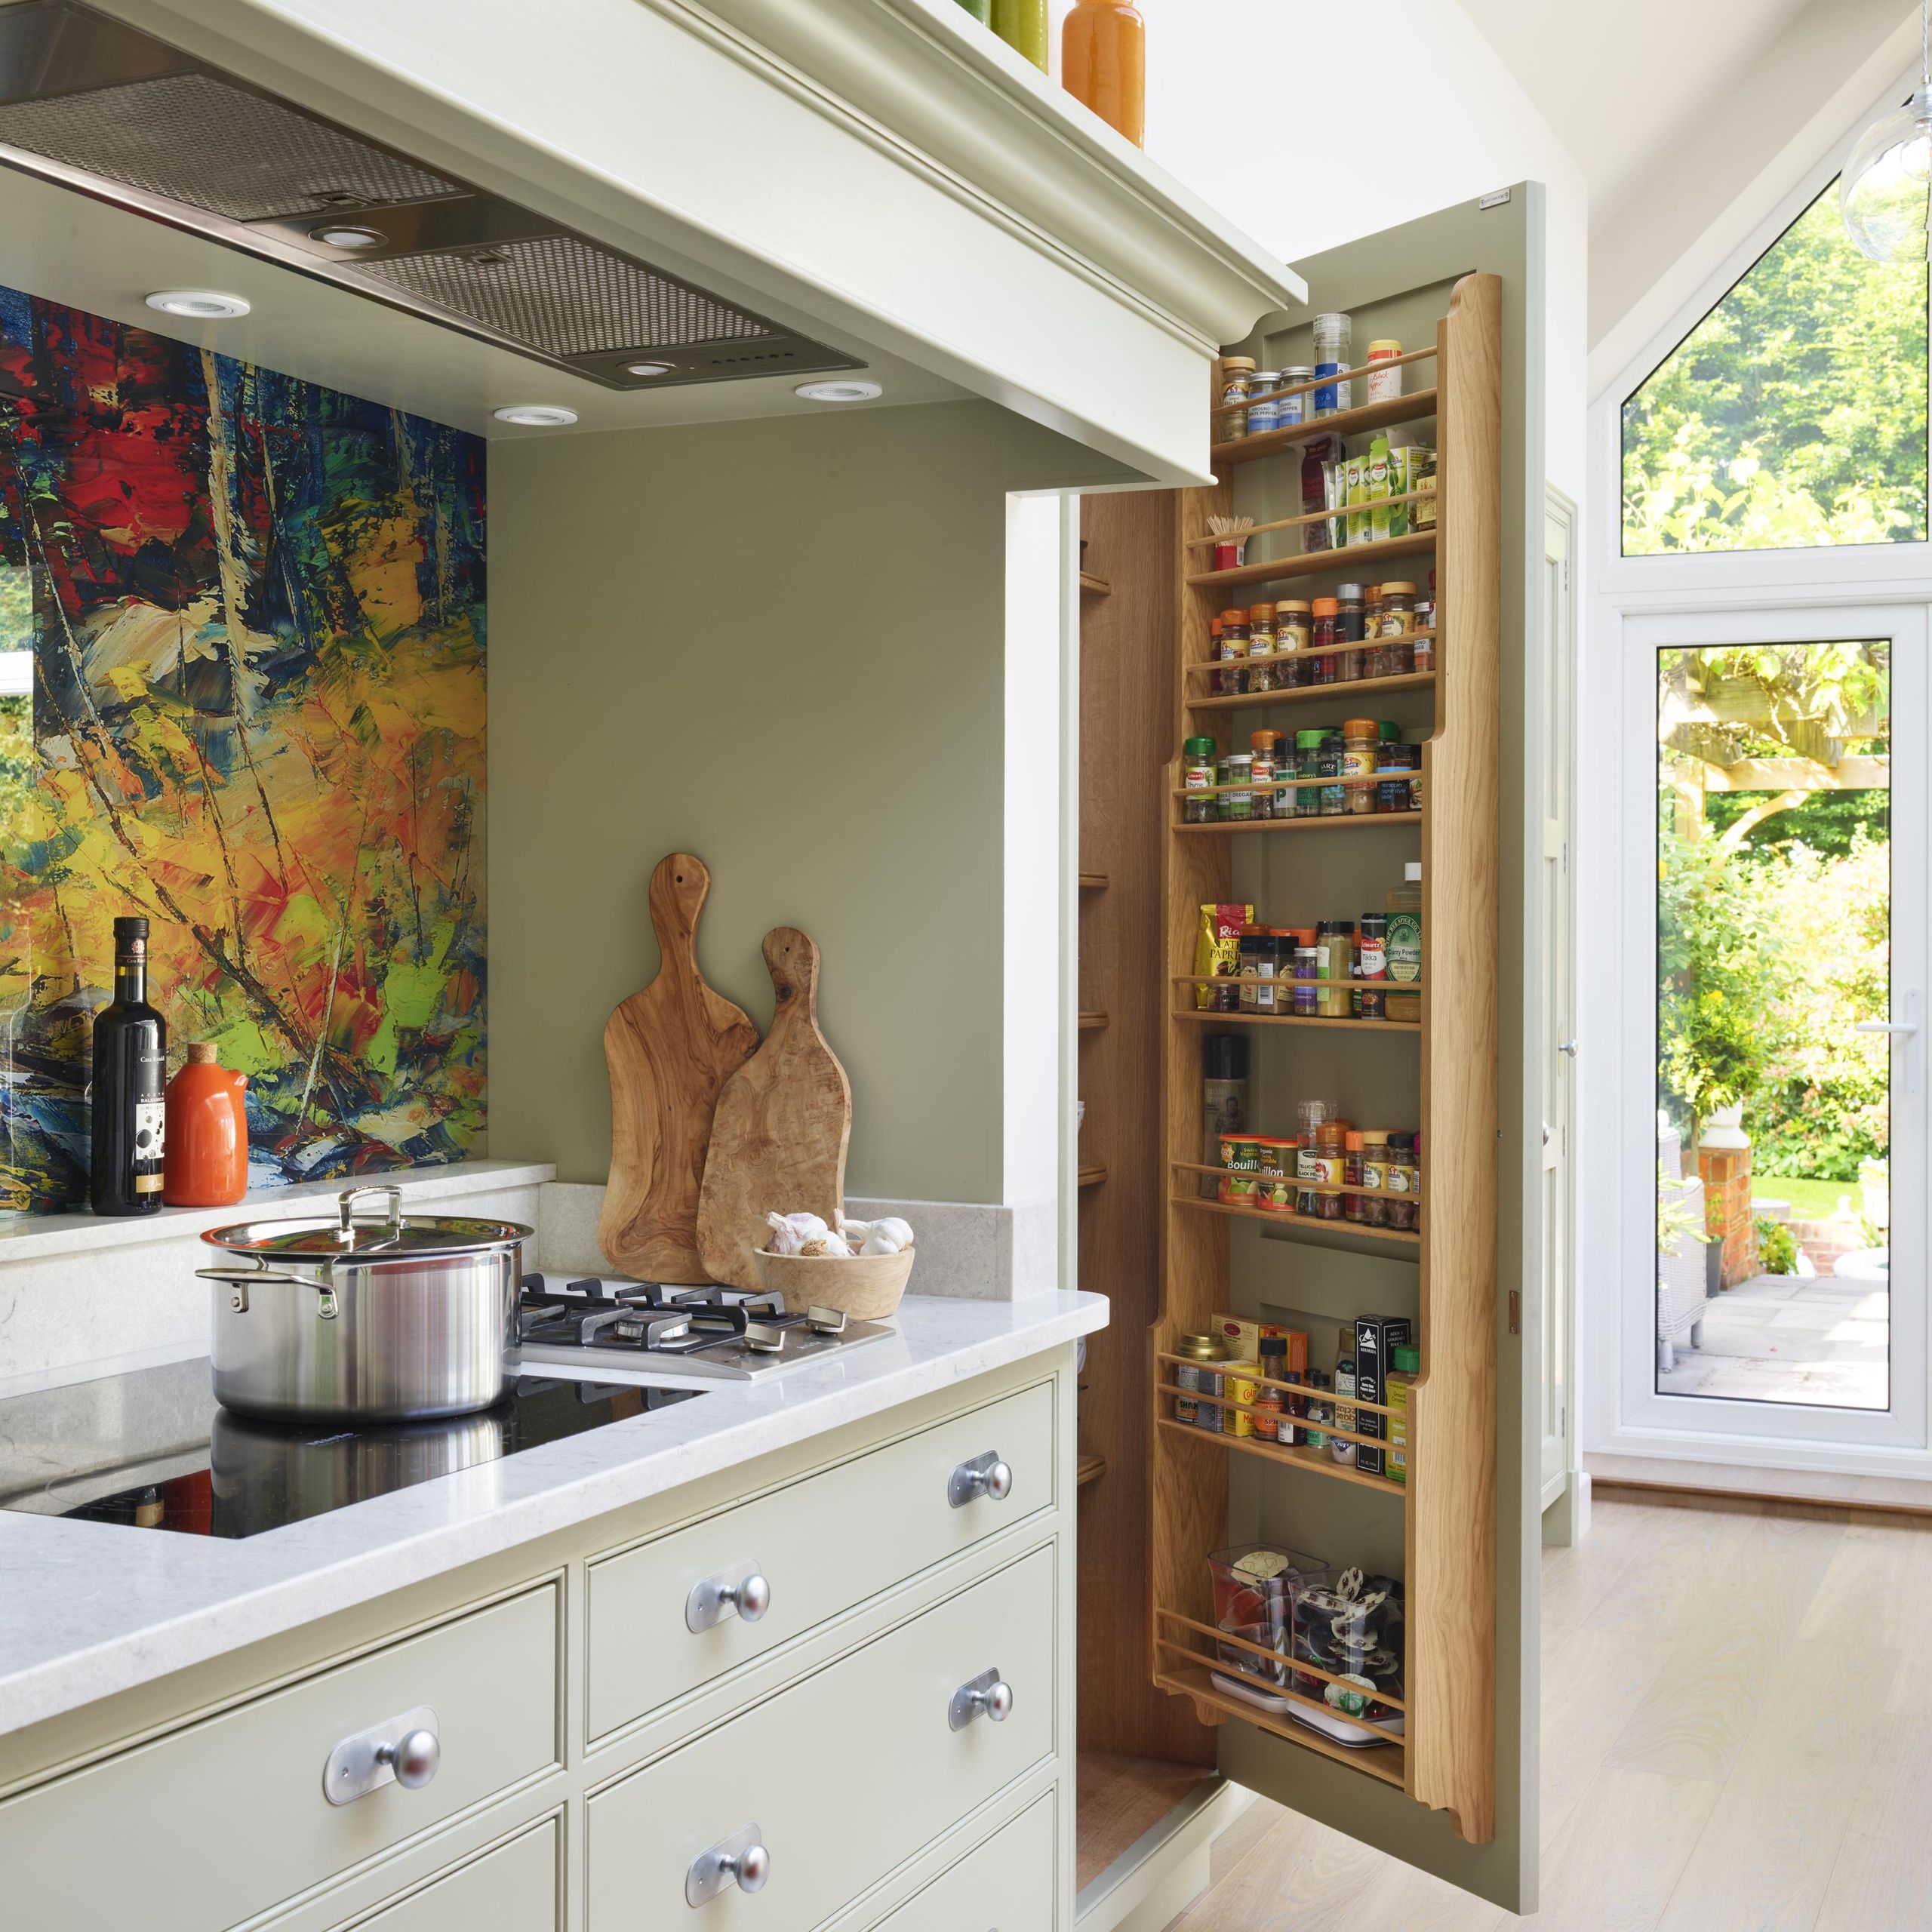
7. Add a Slim Pull-Out Pantry Next to the Refrigerator
A narrow pull-out pantry is one of the most efficient uses of space in a kitchen. That awkward 6-to-9-inch gap often left next to a refrigerator is the perfect spot for one. When planning, opt for adjustable shelves. This allows you to customize the interior to fit tall oil bottles on one shelf and short spice jars on another, maximizing every square inch. A professional can integrate this into existing cabinetry, or you can find standalone units from hardware companies like Rev-A-Shelf.

🧹 Maintenance Reality
The demand for hyper-organized, “clutter-core” interiors is on the rise, and this pull-out pantry is a prime example. After years of minimalist open shelving, people are craving smart, concealed storage that keeps the visual noise down. Pinterest searches for “hidden pantry” and “kitchen organization hacks” are up significantly. This trend isn’t just about being tidy; it’s about creating a sense of calm and control in our home environments, and this clever cabinet does exactly that.
8. Maximize a Narrow Bathroom with an Oak Vanity and Vertical Shelving
This combination of a compact vanity and a tall, narrow shelving unit works best in bathrooms with a footprint of around 35 to 50 square feet. The key is the vertical orientation. The shelving tower draws the eye upward, making the room feel taller. The vanity itself should be no wider than 24 inches. This leaves enough room for circulation without feeling cramped. This is a great solution for powder rooms or small guest baths. Have an even smaller space? Check out the conceptual approach in Idea #10.

💸 Get This Look For Less
That light oak vanity is beautiful, but wood in a bathroom requires care. It needs to be sealed properly with a polyurethane or marine varnish to protect it from moisture and humidity, which can cause warping or water spots. Wipe up any splashes immediately. The open shelves are great for access, but they will collect dust and hair, especially the lower ones. Plan for a quick wipe-down once a week to keep them looking fresh and clean.
9. Use Open Shelves and Woven Baskets Above the Toilet
This idea is successful because of its simplicity and smart use of materials. The light wood shelves add warmth and a natural touch that contrasts nicely with the crisp white tile and walls. Using woven wicker baskets for storage is a brilliant move—they hide the clutter of extra toilet paper or toiletries while adding great texture. The decorative cream brackets elevate the simple shelves, making them feel like a thoughtful design element rather than just a storage afterthought.
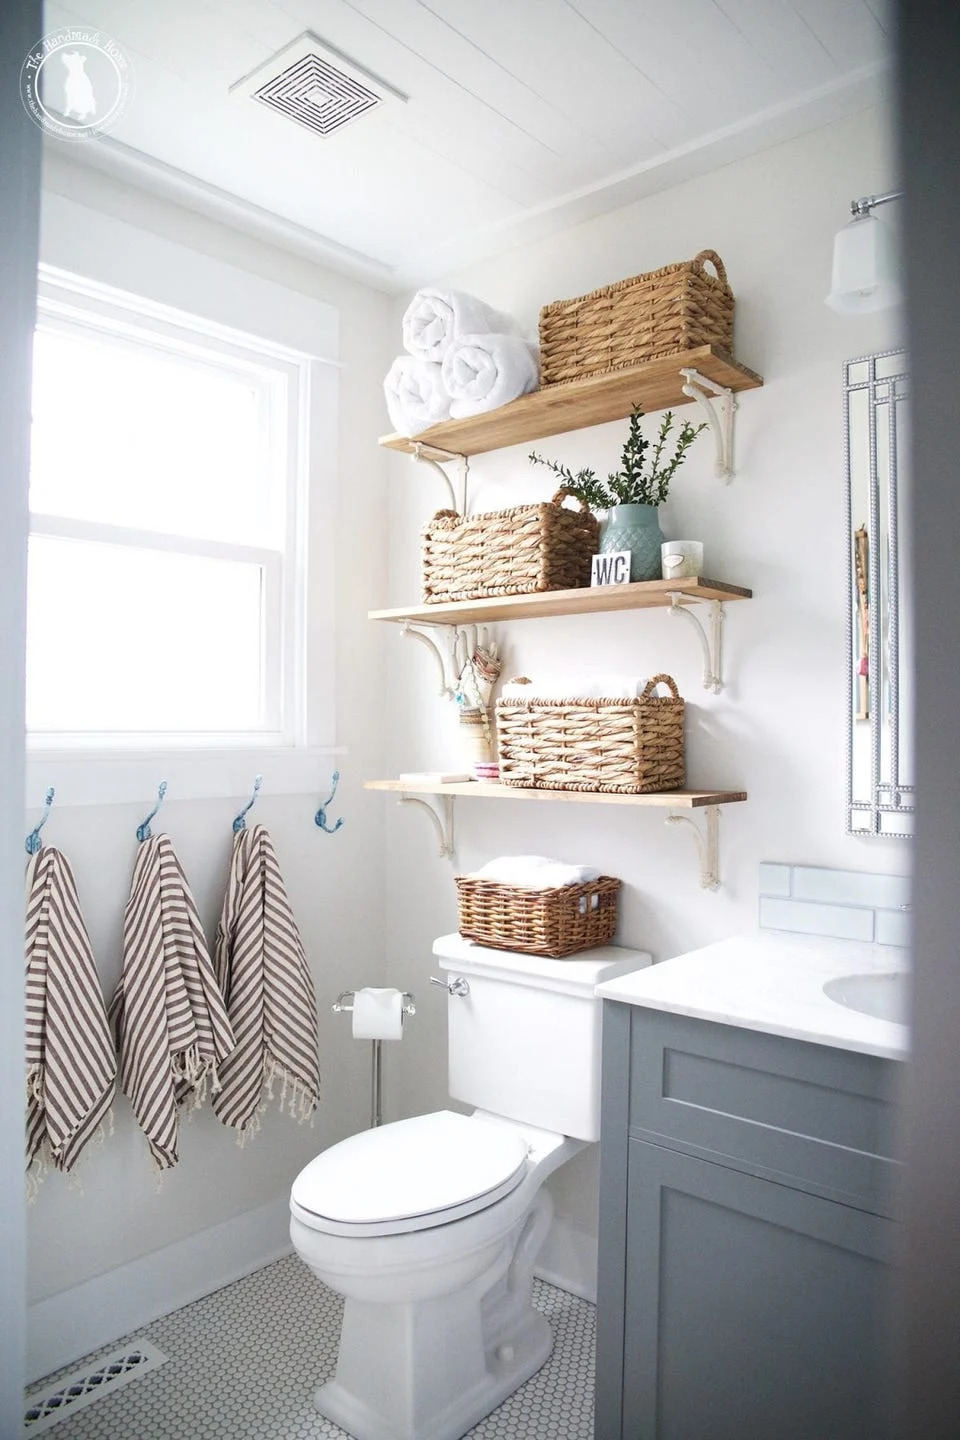
📏 Scale Guide
This is an incredibly budget-friendly project. You can get everything you need for under $100. Head to a big box store like Home Depot for a pine board, which they can often cut to your desired length for free. A set of decorative brackets will run you $15-$25. The real savings come from the baskets: check out Target’s Bullseye’s Playground or a craft store like Michael’s, where you can often find stylish woven baskets for $5-$10 each, especially if you catch a sale.
10. The Art of Clever Bathroom Storage: A Concept
We’re going to be honest, sometimes a photo online looks like the perfect solution, but the reality is more complicated. Without seeing the exact details of this space, it’s hard to recommend a specific product. Be wary of “one size fits all” bathroom storage solutions. The space around your toilet, the height of your sink, and the location of your outlets are all unique. This idea is more of a prompt to think creatively about your own specific needs rather than a direct copy-paste solution.

🎯 What Makes It Work
The single most effective principle for small bathroom storage is to go vertical. Whether it’s with narrow freestanding shelves, wall-mounted cabinets, or an over-the-toilet étagère, using the wall space above waist-level is crucial. Measure the vertical space you have available before you even start shopping. For over-the-toilet units, ensure you have at least 3-4 inches of clearance behind the tank and that the lowest shelf is high enough not to interfere with the tank lid or flusher.
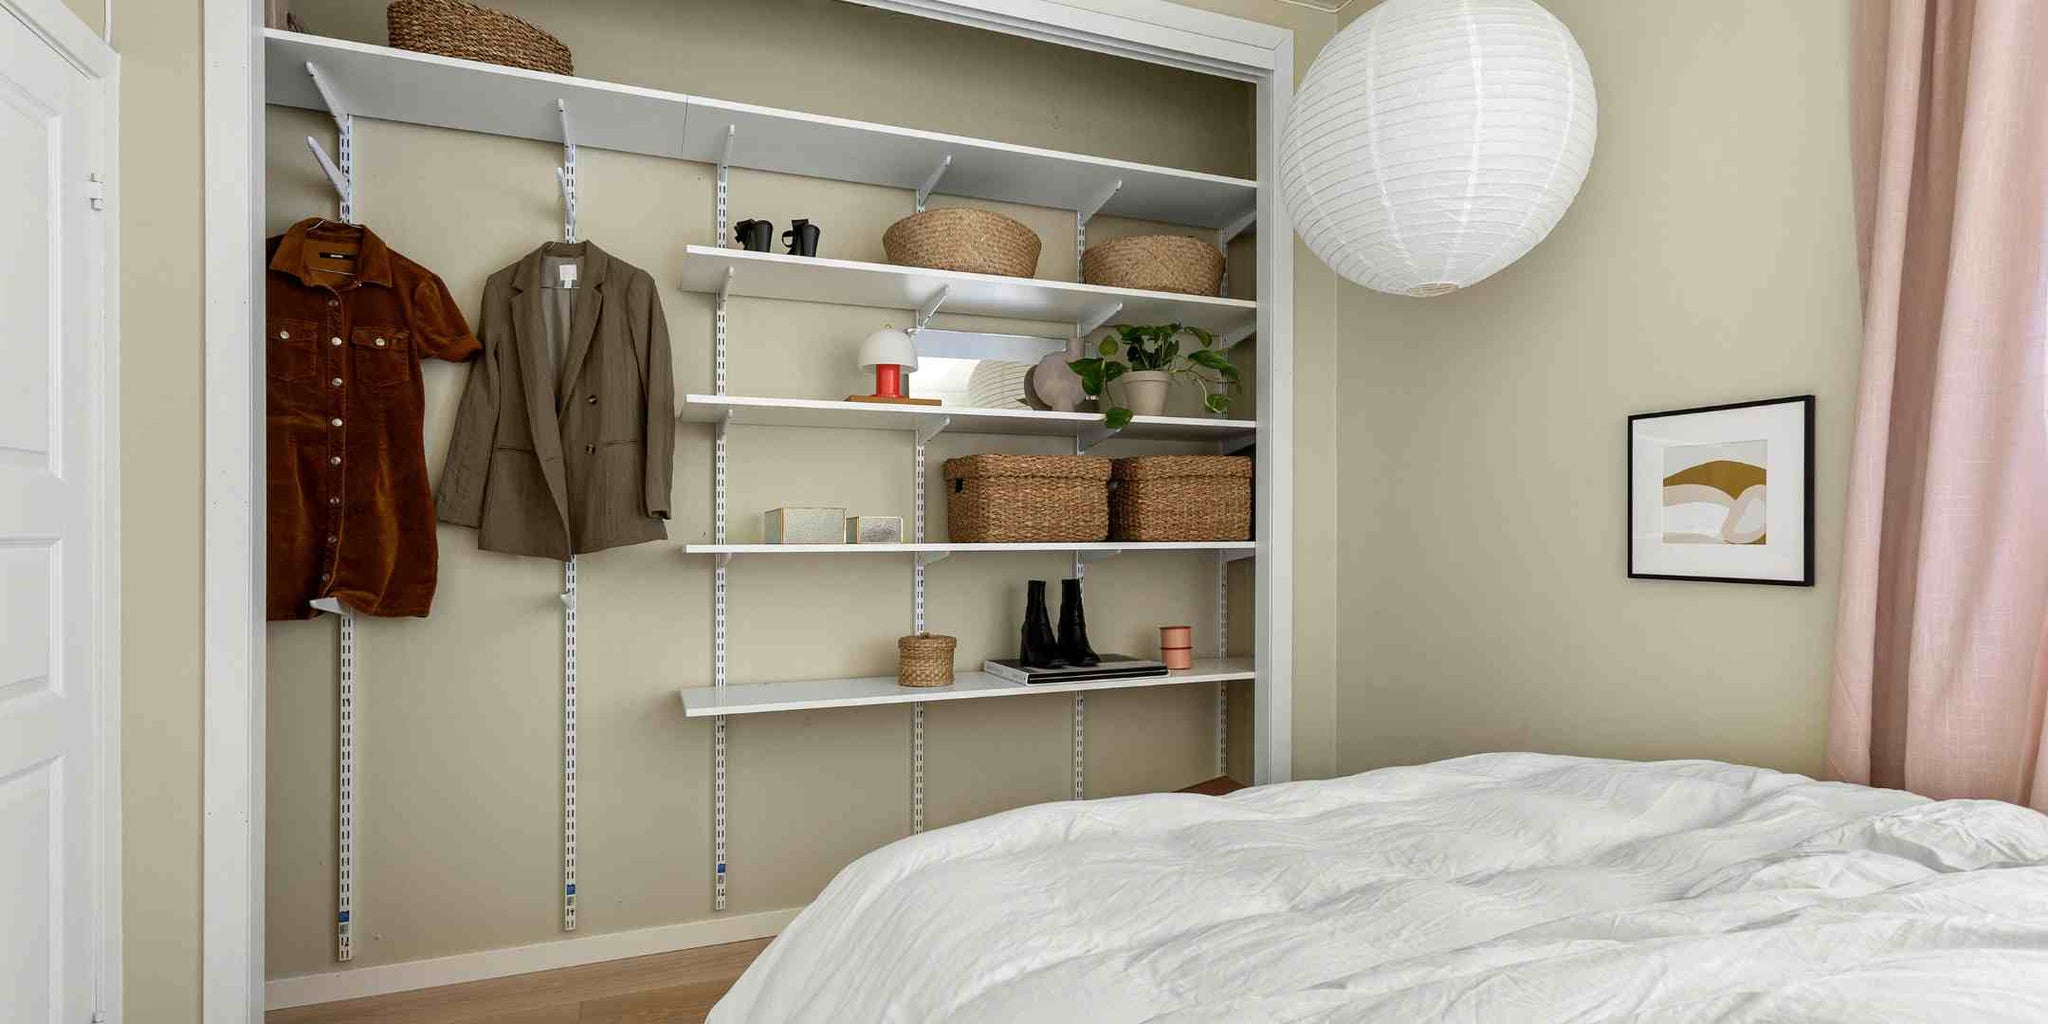
11. Create a Flexible Closet Nook with an Adjustable Shelving System
This entire look screams IKEA. You can replicate this serene and organized closet nook for a surprisingly low cost. The core of this system is an adjustable track shelving system, like IKEA’s BOAXEL or ALGOT systems, or similar versions from The Container Store or Lowe’s. A basic setup with a few shelves and a hanging rail can cost as little as $100-$150. Wicker baskets from Target or Walmart will give you the same aesthetic for hidden storage without the high-end price tag. Compare this flexible approach to the more rigid built-ins in Idea #19.
📐 Style Math
Installing a Track-Based Shelving System. Time: 2-3 hours. Cost: $100-$250.
- Use a stud finder to locate the studs in your wall. This is critical for ensuring the system is secure. Mark them with a pencil.
- Mount the horizontal top track first, making sure it’s a perfectly level. Use a level for this! Drill pilot holes into the studs.
- Hang the vertical uprights from the top track, spacing them according to your plan.
- Secure the uprights to the wall, again drilling into studs wherever possible. Use drywall anchors for any screws that don’t hit a stud.
- Click the brackets into the uprights at your desired heights.
- Place the shelves and any other accessories (like hanging rails) onto the brackets.
12. The Ultimate Space-Saver: A Built-In Bed with Bookshelves and Drawers
The under-bed drawers are the secret weapon here. While the surrounding bookshelves are beautiful and functional for display, the deep, oversized drawers provide the bulk of the hidden storage. This is where you can store bulky items like extra bedding, seasonal clothes, or shoes, keeping the room visually serene. The high-contrast cup pulls also add a touch of classic, almost nautical charm that elevates the whole built-in from simple shelving to a piece of custom furniture.

⚠️ Real Talk
This type of built-in is a dream for dormer rooms, attic bedrooms, or any room with a challenging nook, typically under 120 square feet. It works best when you can tuck it into an existing alcove that’s between 6.5 and 8 feet wide (the length of a standard mattress plus a little wiggle room). A ceiling height of at least 7 feet is ideal to avoid feeling too cramped. This comprehensive solution is a great contrast to the more modular approach seen in Idea #26.
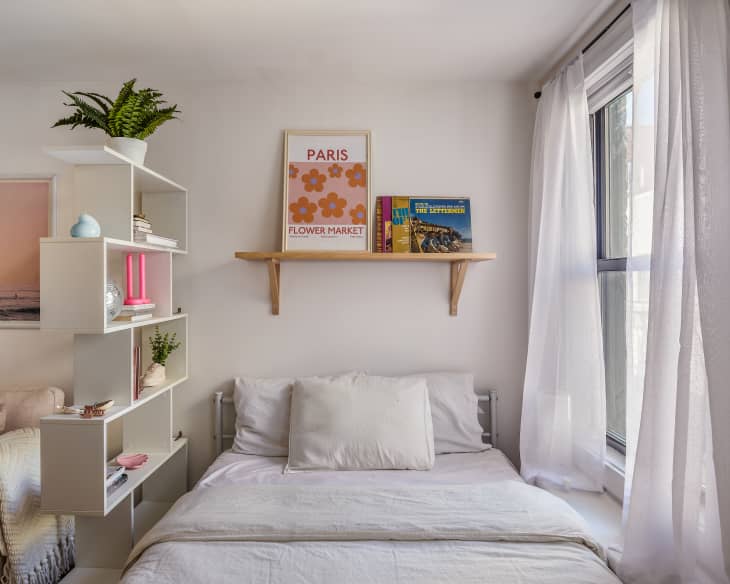
13. A Modern Bedroom with an Asymmetrical Bookshelf
The formula for this light and airy room is simple: 70% crisp white + 20% natural wood + 10% soft color accents (like the peach and green). The white provides a gallery-like backdrop, making the room feel larger and brighter. The wood floating shelf adds warmth and a necessary organic touch. The magic is in the asymmetry—the tall, geometric bookshelf on one side creates dynamic tension with the simple, horizontal floating shelf on the other. It’s a balanced imbalance.
💰 Budget Breakdown
This design is successful due to its brilliant use of scale and geometry. The floor-to-ceiling asymmetrical bookshelf draws the eye upward, maximizing the sense of height in the room. Its varied cubby sizes create visual interest and prevent it from looking like a monolithic block. This is contrasted by the simple, clean line of the single floating shelf above the bed. The interplay between the complex grid on the left and the simple line on the right feels sophisticated and intentional.
14. Display Your Reading List on a Wall-Mounted Magazine Rack
A vertical book or magazine rack like this is a fantastic solution for narrow spaces where a traditional bookshelf would be too deep. Look for one that’s no more than 6-8 inches deep. The key to making it look styled, not cluttered, is to mix up the orientation. Stand some magazines up to show off their covers, and stack some books horizontally. This creates rhythm and breaks up the monotony. Also, don’t be afraid to leave some empty space—it gives the items room to breathe.
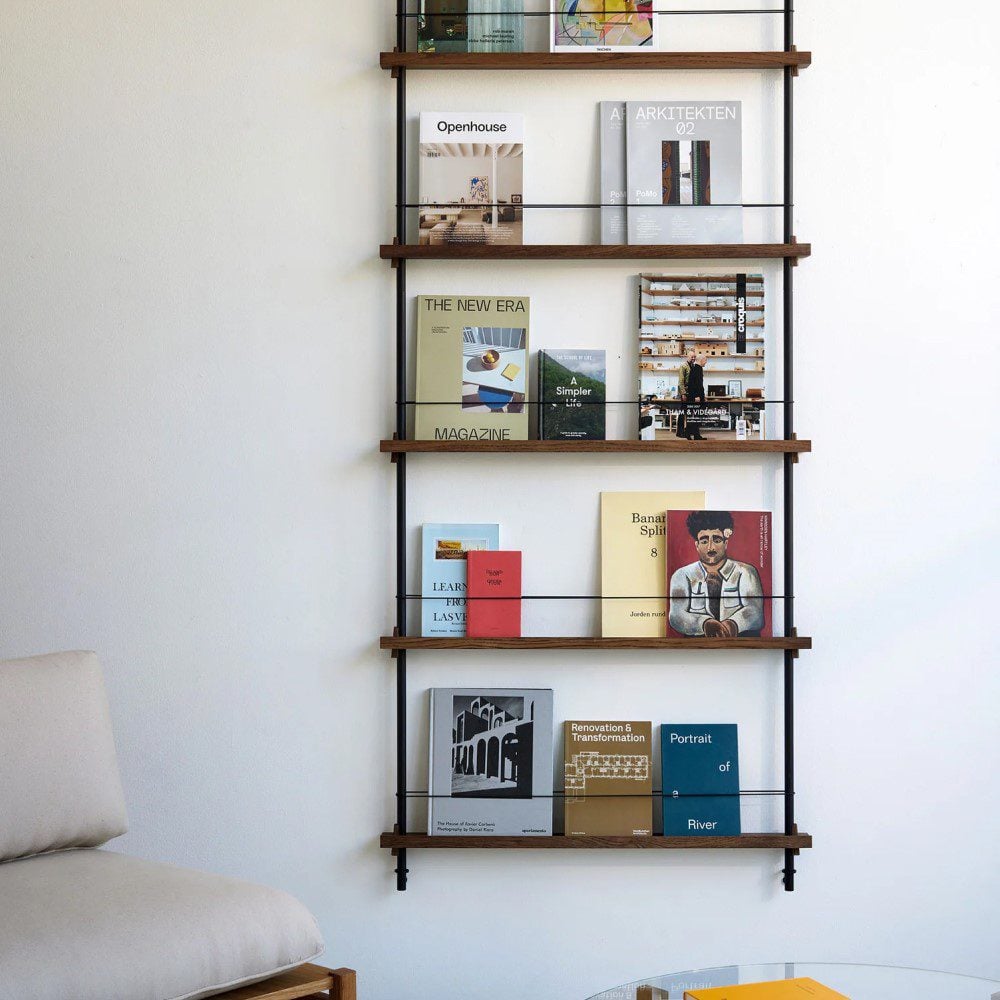
💡 Designer Tip
While this looks incredibly chic, remember that gravity is not your friend with this style of shelf. Books and magazines can easily slump, bend, or slide. It’s not ideal for precious or rare books that need proper support. This is best for your current rotation of magazines and paperbacks. Also, the open nature means it’s a dust collector. Be prepared to take everything off for a proper dusting a few times a year. This is a high-style, medium-maintenance solution.
15. A Cozy Bunk Bed with Integrated Wall Shelving
This isn’t just a bunk bed; it’s a self-contained micro-room. It works because the storage is fully integrated into the structure itself, rather than being added on. The multi-compartment wall shelves are part of the same wooden unit as the bed, creating a seamless, custom look. The color palette is also key: the warm wood provides a cozy, cabin-like feel, while the deep navy blue mattress and gray pillows add a sophisticated, modern touch that keeps it from feeling too childish.
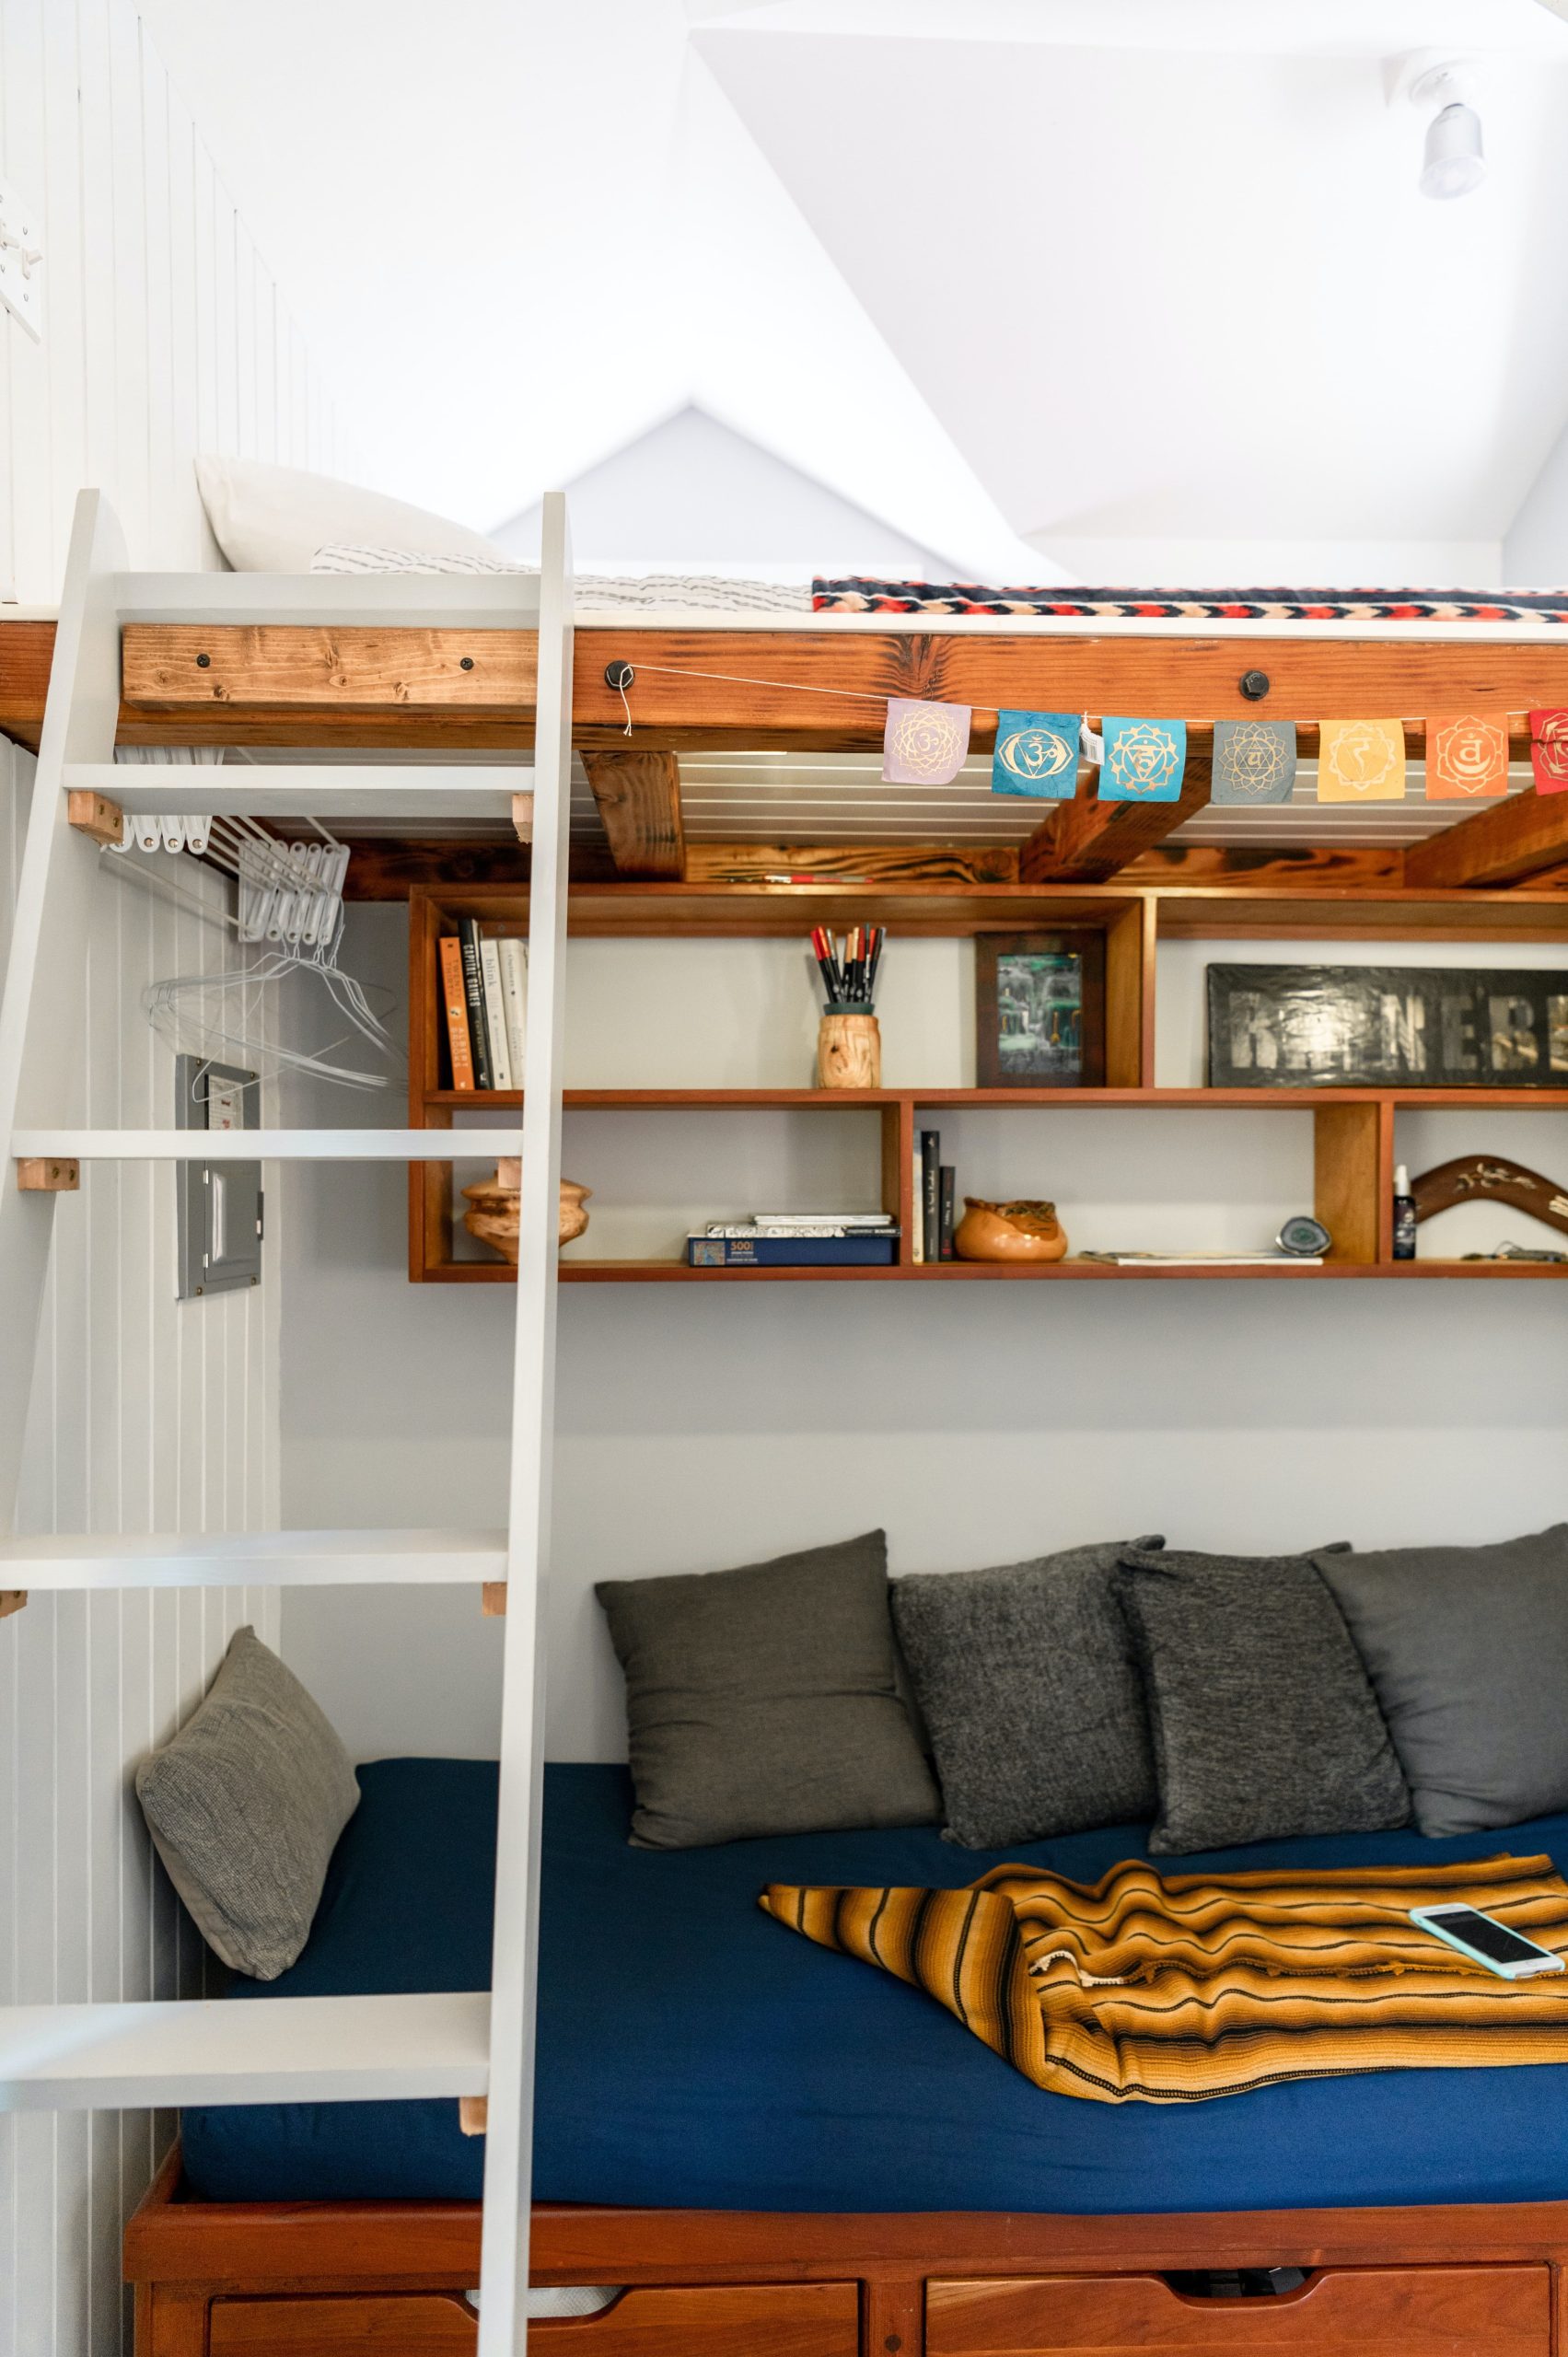
⭐ The One Thing
A fully custom built-in like this can be pricey, but you can achieve a very similar vibe with off-the-shelf components. Start with a simple wooden bunk bed from a retailer like IKEA or Wayfair. Then, install a series of matching wooden floating shelves or cube shelves (like IKEA’s EKET series) on the wall within the bunk area. Getting the wood tones to match exactly might be tricky, but embracing a slight variation can add to the charm. See another take on a bunk bed room in Idea #16.
16. A Bunk Bed That Combines a Couch and a Compact Kitchen
The multi-functionality of the bunk bed structure is everything here. It’s not just a bed; it’s a sofa frame, a staircase, and a shelving unit all in one. This level of integration is what allows a single piece of furniture to solve the sleeping, seating, and storage problems of a micro-apartment or studio. By building the steps into the shelving, the designer saved precious square footage that a separate ladder or staircase would have eaten up. It is the definition of hardworking furniture.
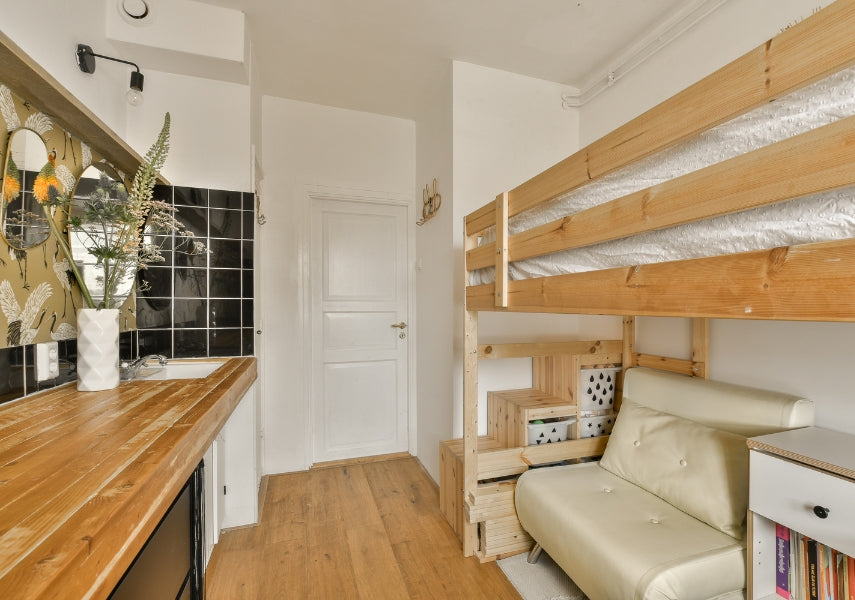
🔧 How-To Brief
This kind of all-in-one solution is designed for tiny spaces, often called micro-apartments or accessory dwelling units (ADUs), that are typically between 150 and 300 square feet. You’ll need a ceiling height of at least 9 feet to comfortably accommodate a loft bed with seating underneath. The crane-patterned wallpaper is a smart choice here, as the large scale of the pattern can actually make a small wall feel more expansive and less busy than a tiny, repeating print.
17. Minimalist Storage with a Black Rail Against a Paneled Wall
This look follows a classic Scandinavian minimalist formula: 80% white + 15% black accents + 5% natural wood/texture. The white-on-white of the cabinets and paneled wall creates a bright, expansive base. The black metal rail and the black trim on the storage boxes provide sharp, graphic contrast that defines the space. The few books and the wood-toned floor add just enough warmth to keep it from feeling cold. It’s a very controlled and intentional palette. You could swap the black for a dark charcoal gray for a slightly softer feel, as seen in the playful room in Idea #1.
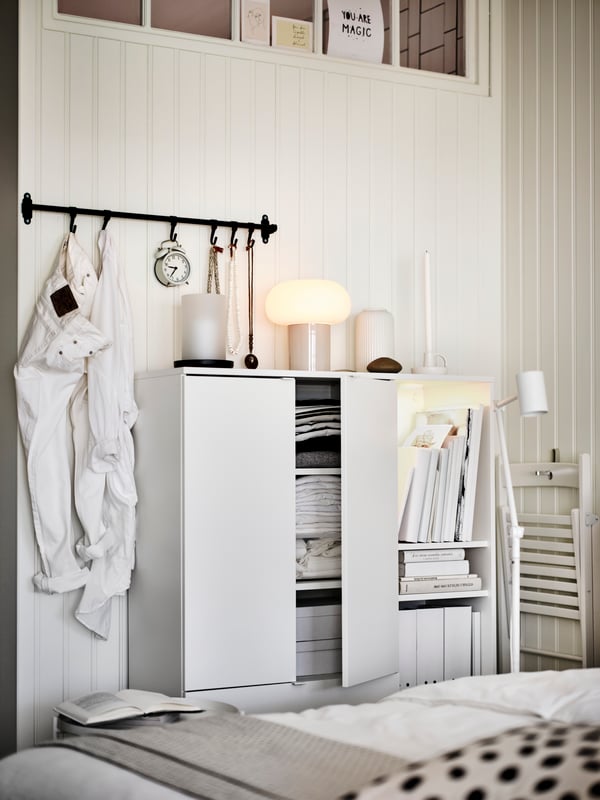
✅ Before You Start
That black metal rail is a game-changer for adding hanging storage without a closet. It acts as a sort of “display closet.” The trick is to be ruthless in your curation. Limit it to 5-7 of your most beautiful or frequently worn items. Use matching, high-quality hangers—no wire hangers allowed! This is as much about aesthetics as it is about storage. Think of it as a rotating collection of your favorite pieces.
18. Organized Calm: A White Floating Shelf Above Layered Storage Boxes
This setup is a masterclass in tone-on-tone decorating. By keeping the shelf, the storage boxes, most of the books, and the wall all within the same family of white, the overall effect is incredibly serene and decluttered. The texture of the whitewashed brick wall adds depth and prevents the monochromatic scheme from falling flat. The touches of natural wood and greenery are crucial, providing just enough warmth and life to the composition.
🔥 Trending Context
This is a high-end look that can be achieved on a shoestring budget. An IKEA LACK floating shelf in white is the perfect starting point (around $25). The white storage boxes can also be from IKEA (TJENA or KVARNVIK series) or any craft store. The key is the curated book collection: visit a thrift store and buy a stack of paperback books. Remove the covers to expose the white/cream pages, or simply turn them spine-inward for a unified look. The total cost could easily be under $75.
19. Go Vertical with Floor-to-Ceiling Shelves and Labeled Baskets
Creating Stylish, Uniform Labels for Baskets. Time: 30 minutes. Cost: $5-$10.
🧹 Maintenance Reality
- Choose your label type. The ones shown are simple cardstock tags. You can buy pre-cut tags with reinforced holes at any office supply or craft store.
- Use a consistent pen or marker for all labels. A black fine-tip permanent marker provides a clean, classic look that’s easy to read.
- Write your labels before you attach them. Decide on a consistent naming convention (e.g., “Winter Hats,” “Cables & Cords”).
- Attach the labels with twine or a small piece of black ribbon for a bit of contrast. If your baskets don’t have handles, you can use a small, discreet safety pin on the back to attach the string.
Checklist: Before you commit to floor-to-ceiling shelving, run through this quick checklist to save yourself a headache later. This is a much bigger commitment than the adjustable system in Idea #11.
- Measure Twice, Buy Once: Get the exact height and width of your wall. Don’t forget to account for baseboards!
- Check for Studs: Use a stud finder to locate and mark the wall studs. Your shelves MUST be anchored into studs to be safe and secure.
- Assess Your Floor: Is your floor level? If not, you may need to shim the bottom of the vertical supports to ensure the unit is stable.
- Plan Your Layout: Decide what you want to store. Heavier items like books need to go on lower shelves supported by brackets screwed into studs.
20. Sleek Living Room Storage with Built-Ins and a Floating Media Console
The success of this room lies in its balanced geometry and a tight color story. It’s roughly 60% neutral base (white built-ins, gray sofa) + 30% black graphic elements (floating shelves, window frames) + 10% warm accents (wood coffee table, blue pillows). The strict horizontal lines of the media console and floating shelves are softened by the cozy texture of the sectional sofa and the zigzag rug. This creates a space that feels both modern and comfortable.
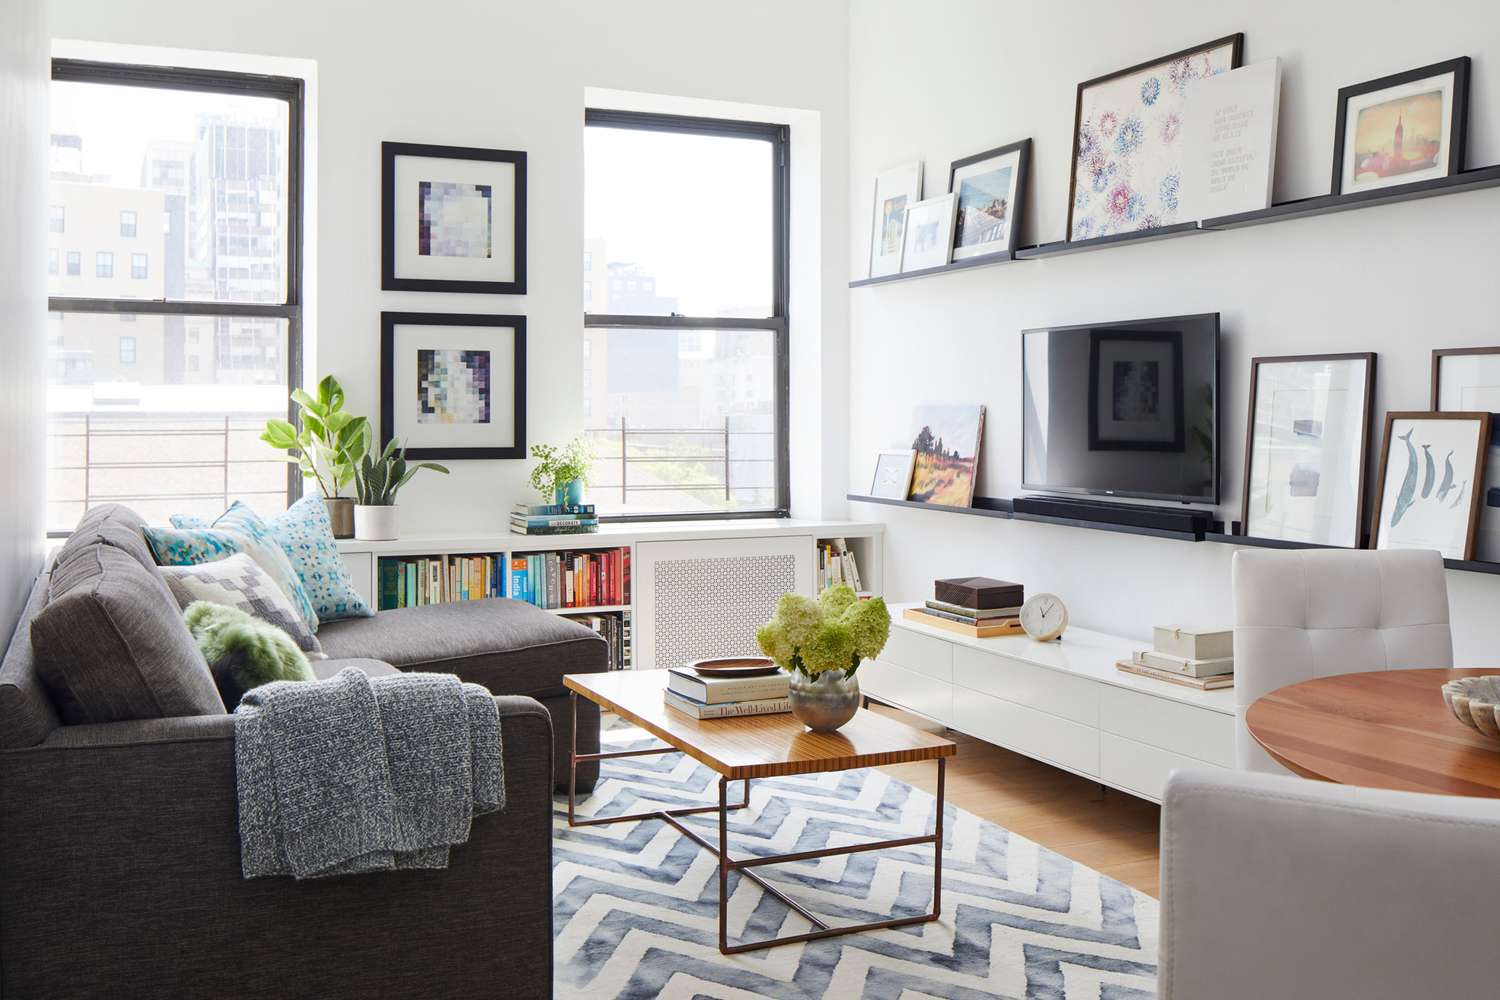
💸 Get This Look For Less
That floating media console looks incredibly sleek, but installation is not for the faint of heart. It needs to be mounted to a reinforced wall with proper blocking between the studs to support the weight of the console itself, plus anything you put in it. Do not attempt to hang a heavy console like this on drywall alone. You’ll either need to open up the wall to add support or hire a professional. It’s a significant undertaking that provides a clean, modern look, but the behind-the-scenes work is substantial.
21. A Classic White Cabinet with a Pull-Out Laundry Hamper
The integrated pull-out laundry hamper is the hero of this piece. It’s a simple feature, but it completely transforms the utility of the cabinet. It hides dirty laundry out of sight, eliminating the need for a separate, often unsightly, hamper taking up floor space. This is a perfect example of how thinking about your daily routines (like where laundry piles up) can lead to the most effective and satisfying storage solutions. It’s not just storage; it’s system design for your life.
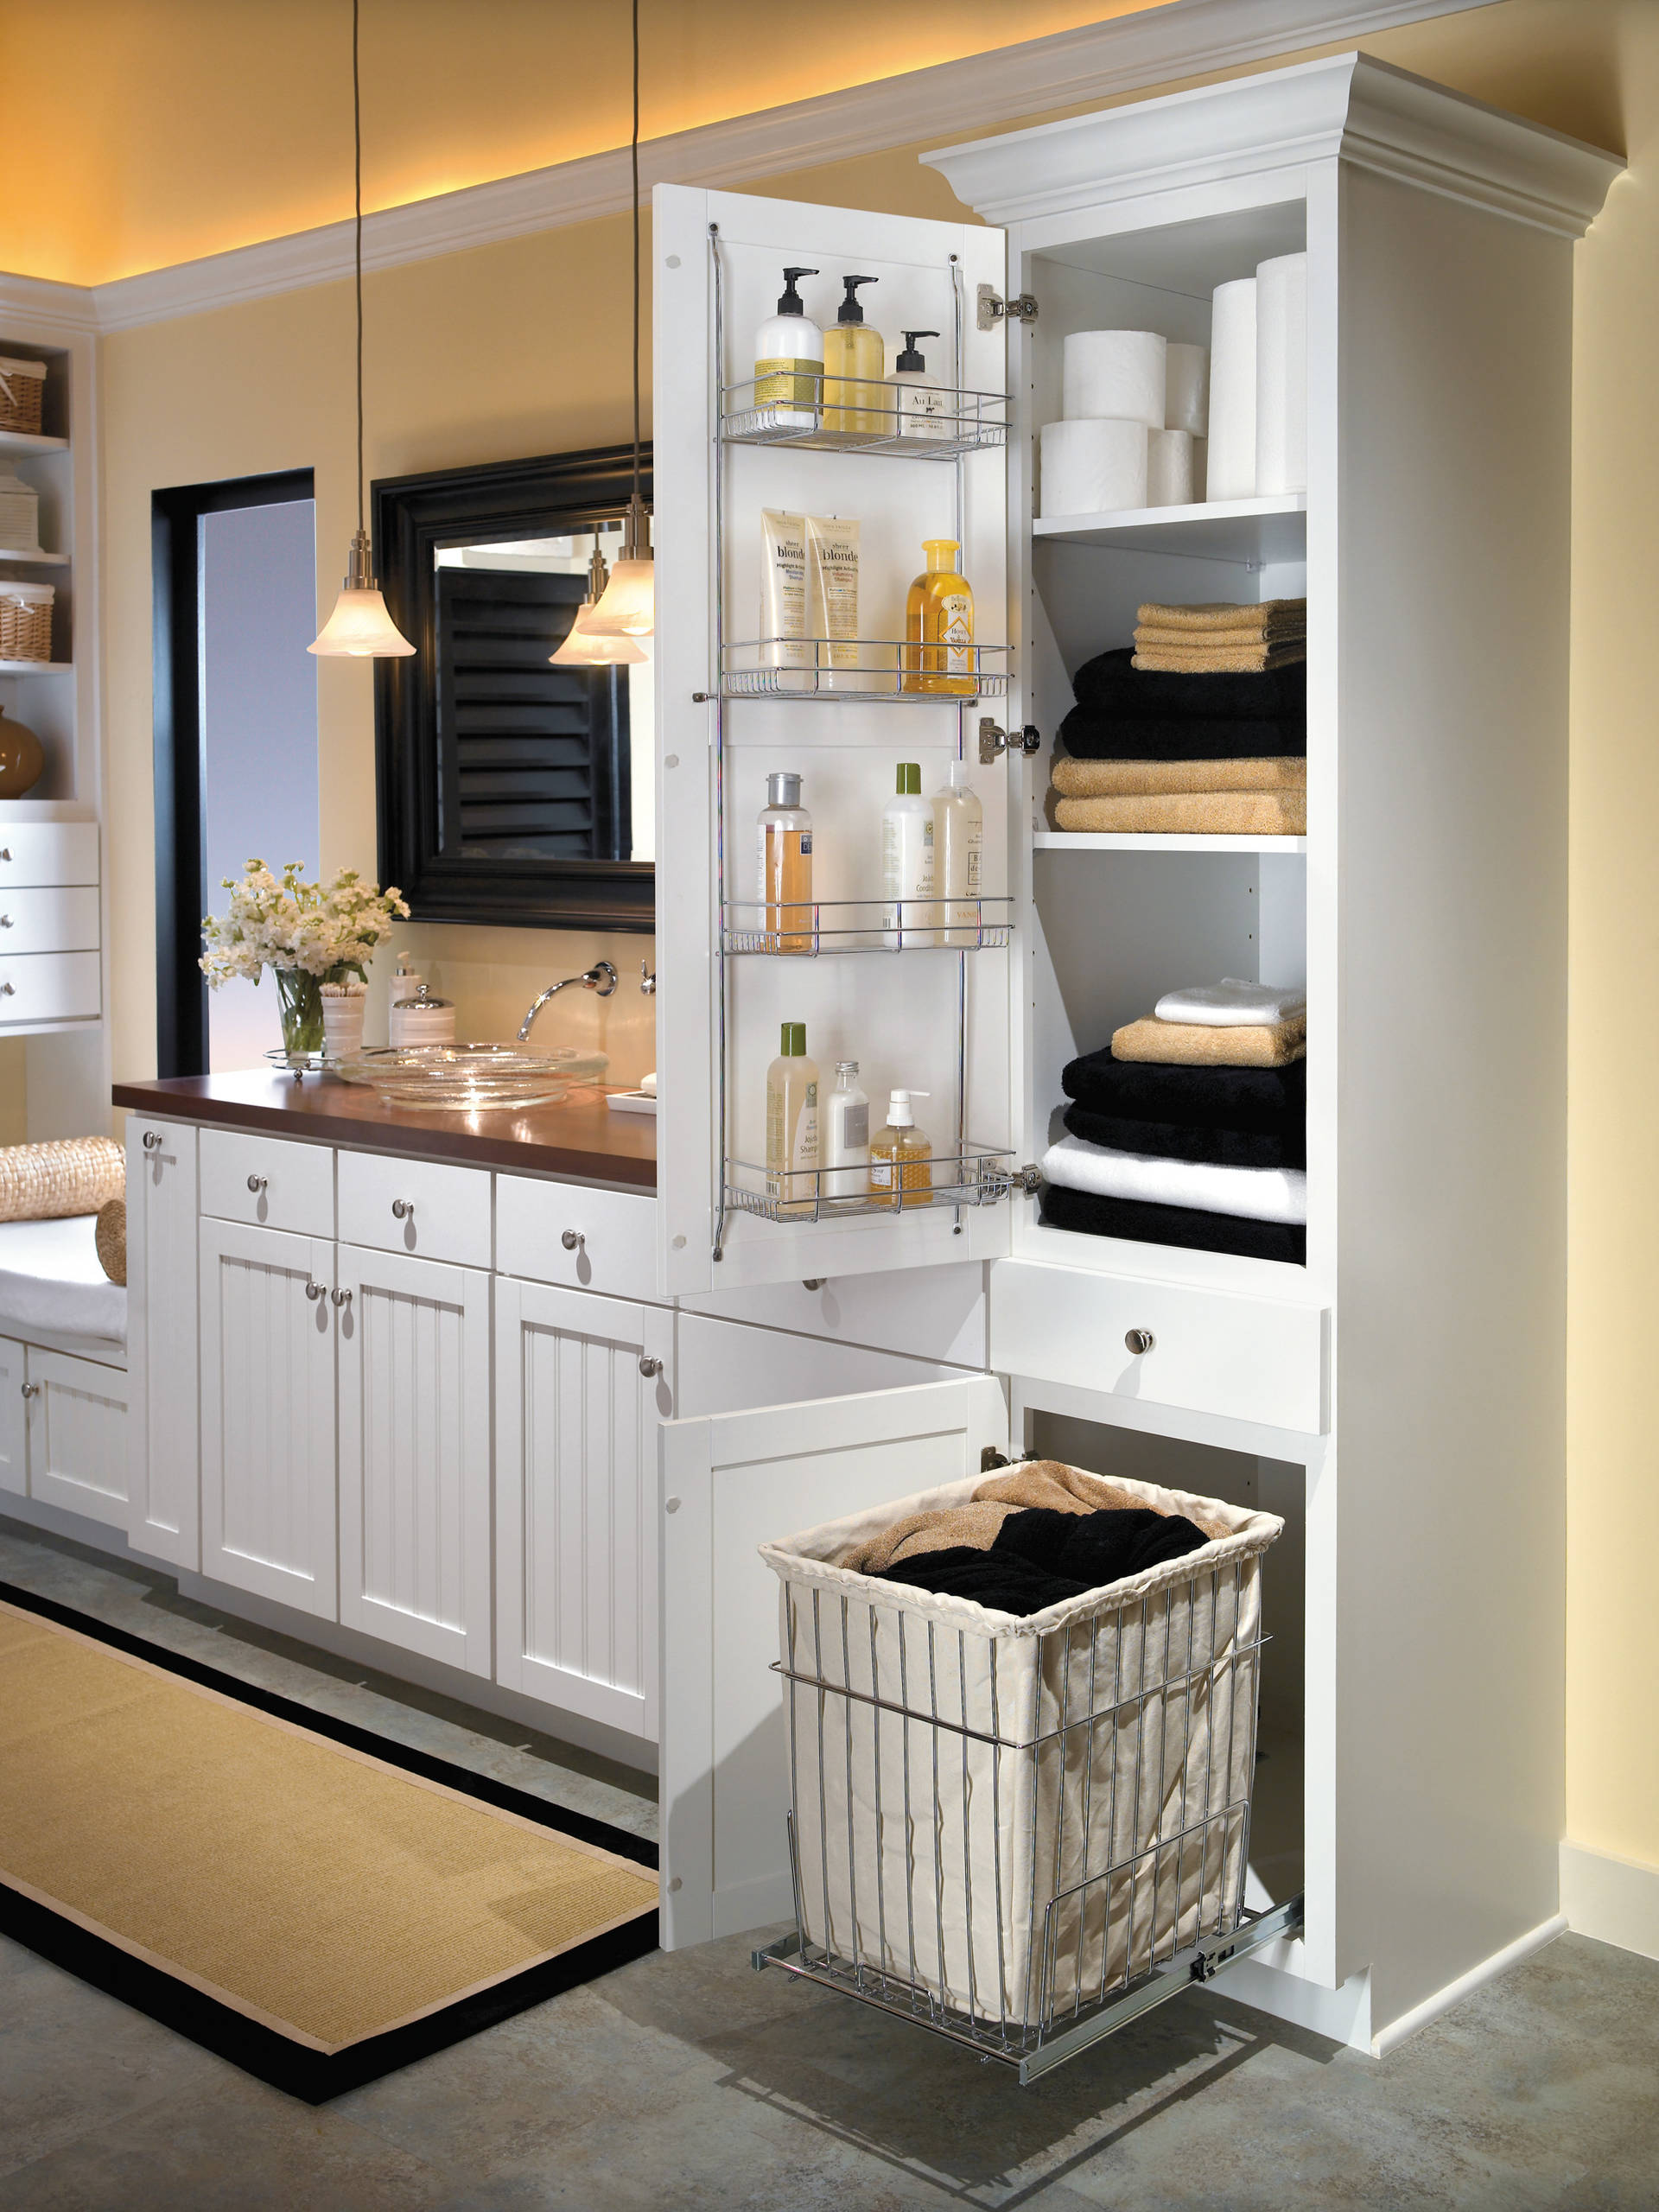
📏 Scale Guide
When planning custom cabinetry for a laundry room or bathroom, always incorporate a pull-out hamper mechanism. Companies like Rev-A-Shelf sell kits that can be retrofitted into existing cabinets. Measure the interior opening of your cabinet carefully before ordering. For a standard 18-inch wide cabinet, a double hamper system (one for whites, one for colors) is an amazing upgrade that will make laundry day significantly more organized and civilized.
22. Conquer Under-Sink Clutter with Clear Pull-Out Organizers
This under-sink area is an organizational masterpiece because of two key principles: visibility and accessibility. The clear acrylic organizers mean you can see everything at a glance, so you don’t end up with five half-empty bottles of the same cleaner. The pull-out drawers are crucial, as they bring items from the back of the cabinet to you, eliminating that awkward, frustrating dig through a dark and cluttered space. The tiered design maximizes vertical space, using every available inch.

🎯 What Makes It Work
Organize Your Under-Sink Cabinet. Time: 1 hour. Cost: $50-$150
- Empty everything out and clean the cabinet thoroughly. Throw away any empty bottles or expired products.
- Measure the interior width, depth, and height of your cabinet, paying close attention to the location of the plumbing pipes.
- Purchase modular, stackable, or pull-out organizers that fit your measurements. Clear ones are best!
- Group your remaining items by category (e.g., daily toiletries, cleaning supplies, back-stock).
- Place the items into the organizers. Put frequently used items in the most accessible spots, like the top tier or front of a drawer.
- Slide your newly organized containers into the cabinet. Enjoy the calm!
23. A Sleek, Hidden Pull-Out Pantry in a Light Green Kitchen
When integrating a pull-out pantry like this, panel-ready is the way to go. This means the front of the pull-out mechanism is designed to have a custom cabinet panel attached to it. This allows it to blend in perfectly with the rest of your kitchen cabinetry, creating a seamless, high-end look. Ask your cabinet maker for this specifically. Also, ensure the pull-out hardware you choose is high-quality and rated for the weight you plan to store. A fully-loaded pantry is heavy!
📐 Style Math
The move towards “soft minimalism” is perfectly encapsulated in this kitchen. The gentle sage green cabinetry offers a touch of color and personality without being overwhelming. It’s a step away from the all-white kitchens that dominated the 2010s. This trend, popular on Pinterest and in design magazines, focuses on creating spaces that feel both clean and calming. The hidden, hyper-functional storage is a key component, allowing the serene color palette to be the star of the show.
24. A Narrow Pull-Out Cabinet for Utensil Organization
The tiered, multi-level design within this single pull-out is what makes it so brilliant. It’s not just one deep bin; it’s three distinct zones. The top shelf with stainless steel canisters is perfect for long-handled utensils, the middle shelf for flatter tools like spatulas, and the bottom for whisks or other awkwardly shaped items. This thoughtful compartmentalization prevents the dreaded utensil jumble and makes grabbing the right tool mid-cooking a breeze. It’s a small detail that has a huge impact on daily kitchen workflow.
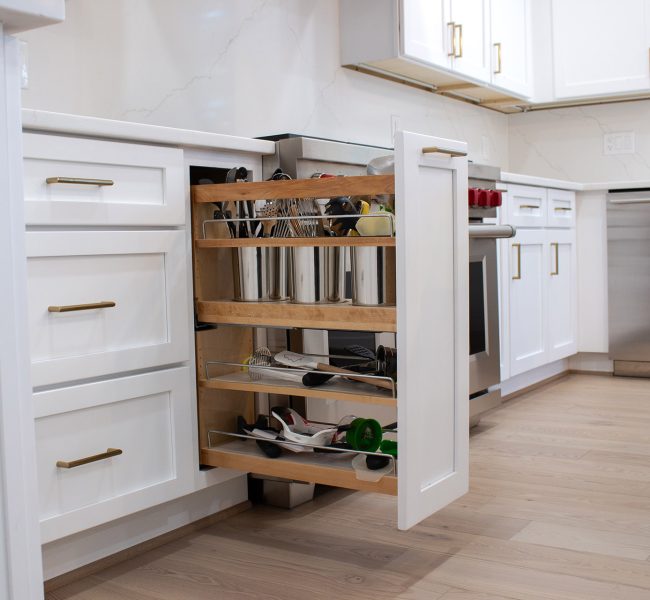
⚠️ Real Talk
While this is a fantastic organizational tool, it can become a crumb-and-dust-trap over time. The canisters need to be emptied and washed periodically, and the wooden shelves will require wiping down. Because it’s so densely packed, you’ll have to take everything out to do a thorough cleaning. It’s a minor inconvenience for a major organizational gain, but something to be aware of. Plan to give it a full clean-out once every season to keep it in top shape.
25. A Charming Kitchen with a Ladder Bookshelf for Open Storage
This kitchen feels warm and personal because it fearlessly mixes modern cabinetry with freestanding, decorative storage. The dark wood ladder bookshelf acts as a beautiful piece of furniture, providing a place to display cookbooks, pretty jars, and favorite dishes. It adds a layer of personality that built-in cabinets alone can’t offer. The contrast between the sleek, light gray cabinets and the rustic, dark wood of the bookshelf is what gives the room its character. This is a great alternative to the full built-in feel of Idea #5.
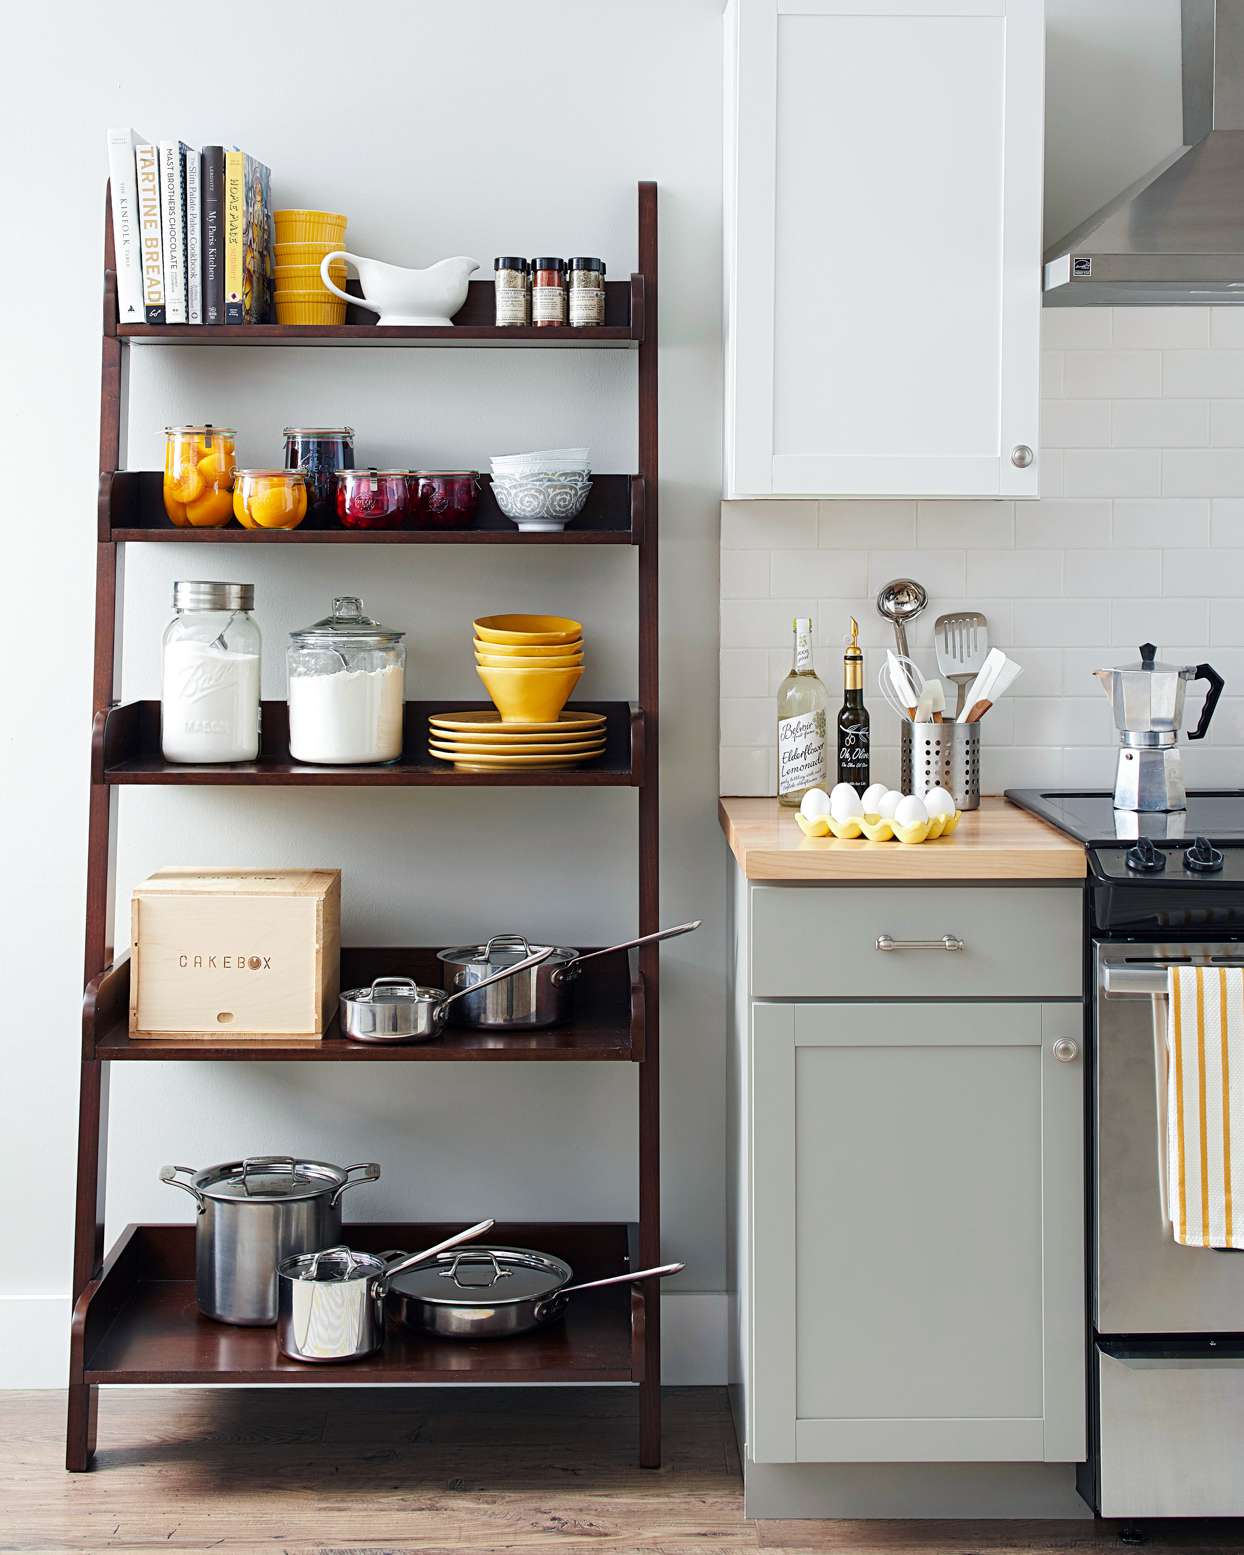
💰 Budget Breakdown
A ladder bookshelf in a kitchen is a look you commit to with your eyes wide open. It’s gorgeous, but it’s a magnet for cooking grease and dust. Anything you store on these open shelves will need to be washed or wiped down far more frequently than items behind a cabinet door. This solution is best for displaying items you use often (so they get washed regularly anyway) or for purely decorative pieces you don’t mind cleaning. Don’t store your fine china here unless you love dusting.
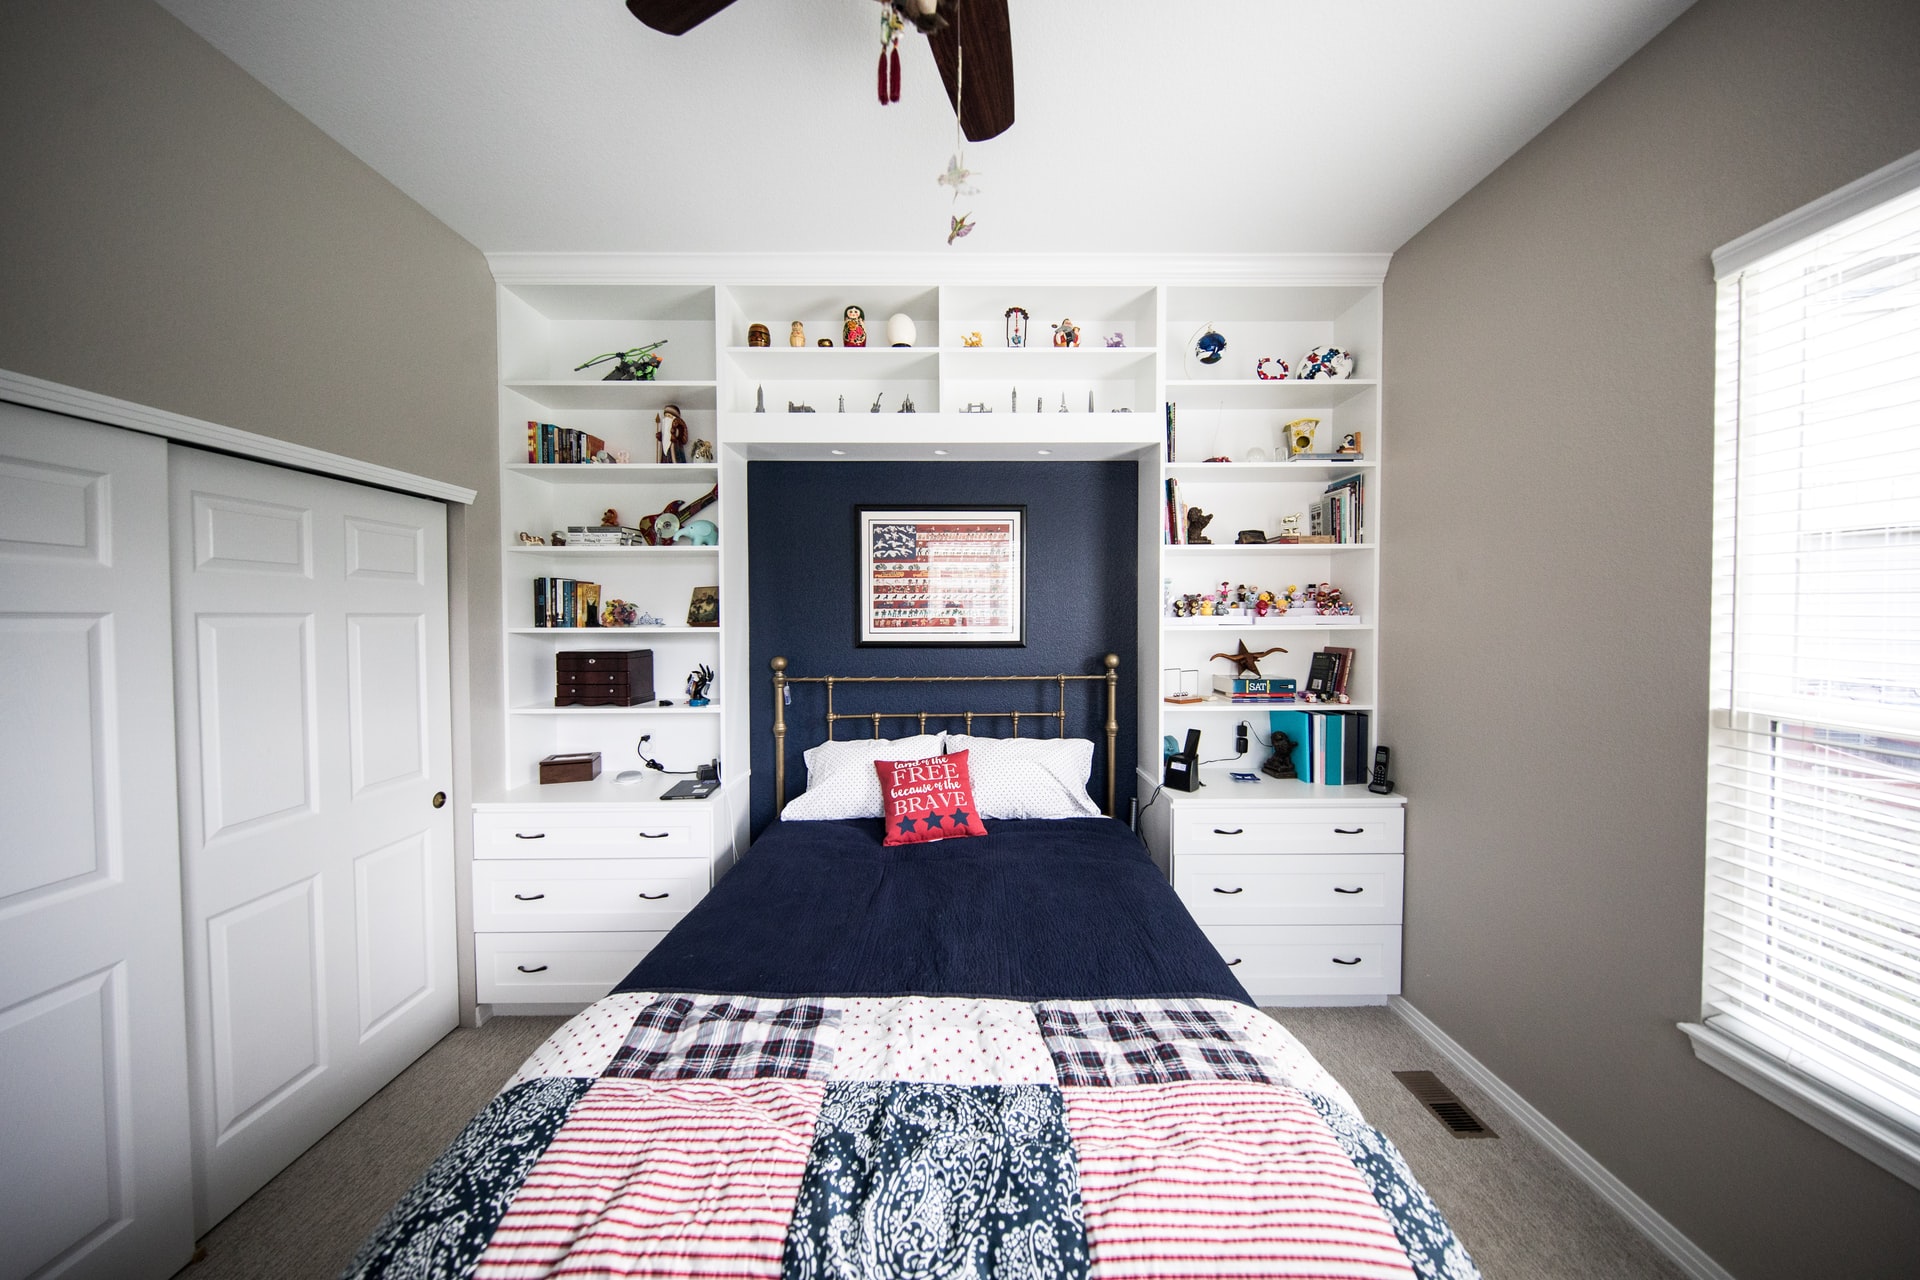
26. Frame Your Bed with Symmetrical Built-In Shelves and Dressers
Custom built-ins offer incredible storage but come at a premium price. The cost can vary dramatically based on your location, the materials you choose, and whether you hire a custom cabinet maker or a general carpenter. For a project of this scale, you should be prepared for a significant investment.
💡 Designer Tip
- Custom Cabinetry & Installation: $3,000 – $8,000+
- Hardware (pulls): $100 – $300
- Paint (for accent wall & units): $150 – $250
- TOTAL: $3,250 – $8,550+
- Budget alternative: Approximate this look for under $1,000 by flanking the bed with two IKEA HEMNES chests of drawers and adding wall-mounted shelves above them.
The design rests on a foundation of classic symmetry and bold contrast. The formula is: 50% white built-ins + 30% deep accent color (the navy wall) + 10% warm metallics (the brass bed frame) + 10% pattern/color (the bedding). The symmetry of the dressers and shelves creates a sense of calm and order, while the navy accent wall provides depth and a dramatic backdrop for the bed. It’s a timeless look that feels both grand and personal. Compare this to the cozier, more compact built-in from Idea #12.
27. Frame a Doorway with Elegant Arched Built-In Shelves
The arches are everything. Without them, these would just be standard (though lovely) built-in bookshelves. The graceful curve of the arch softens the lines of the room and adds a touch of architectural elegance and a sense of history that you can’t get from straight lines alone. The picture lights mounted above each arch are a crucial secondary element, turning the shelves from simple storage into highlighted features and creating a warm, inviting glow in the evening.
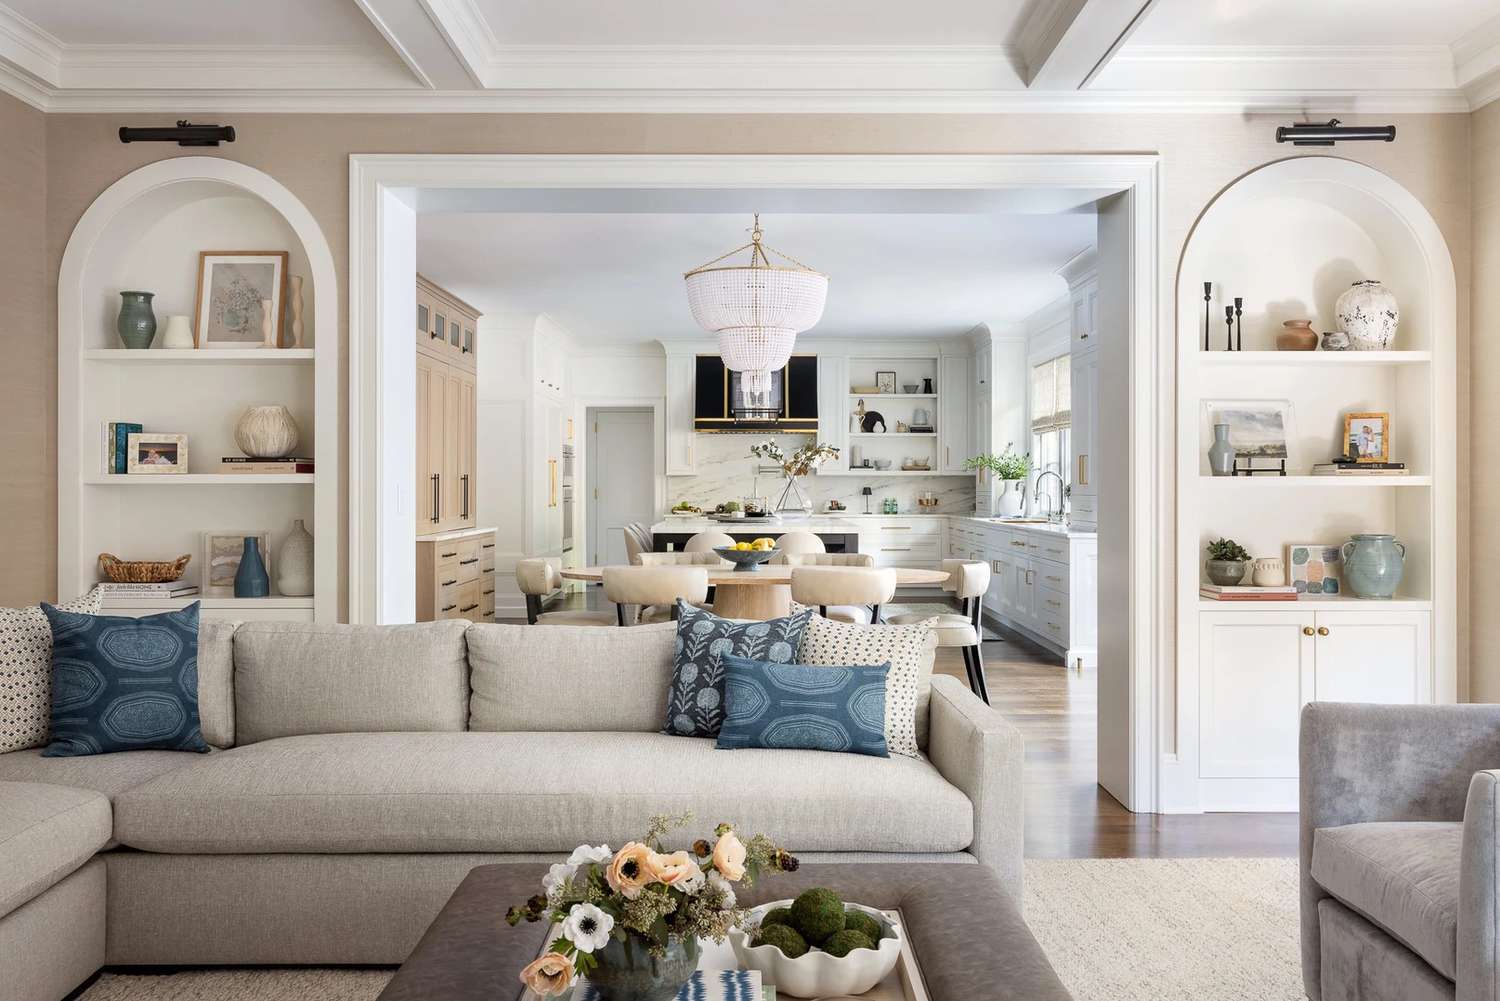
⭐ The One Thing
If you’re commissioning built-ins, adding an arch is less expensive than you might think, but it has a huge design impact. Ask your carpenter about it. To make them look their best, you must style them with restraint. Notice how these shelves aren’t crammed with books. They feature a curated mix of objects and books with plenty of breathing room. Use a 60/40 rule: 60% objects, 40% empty space. This curation is what makes them look sophisticated.
Your Home’s Next Chapter: Beautifully Organized
Whew, that was a lot, but hopefully, you’re buzzing with ideas! Remember, the best storage solution is one that fits your life, not just your stuff. It should make your day-to-day a little easier and a lot more beautiful. Don’t be afraid to mix and match these concepts to create a system that’s uniquely you.
Ready to start planning? Head over to Pinterest and create a new board for your favorite ideas from this list. Happy organizing!